
Camera Manual
Page 3
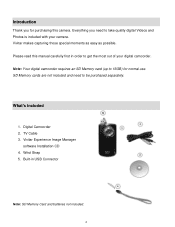
... digital camcorder. Digital Camcorder 2. Everything you for normal use. Wrist Strap 5. Vivitar Experience Image Manager software Installation CD 4. TV Cable 3. Note: Your digital camcorder requires an SD Memory card (up to 16GB) for purchasing this manual carefully first in USB Connector Note: SD Memory Card and batteries not included. 2 What‟s Included 1. Built-in order...
... digital camcorder. Digital Camcorder 2. Everything you for normal use. Wrist Strap 5. Vivitar Experience Image Manager software Installation CD 4. TV Cable 3. Note: Your digital camcorder requires an SD Memory card (up to 16GB) for purchasing this manual carefully first in USB Connector Note: SD Memory Card and batteries not included. 2 What‟s Included 1. Built-in order...
Camera Manual
Page 4
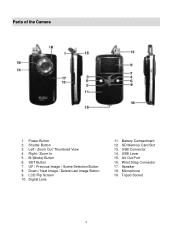
LCD Flip Screen 10. AV Out Port 16. Right / Zoom In 5. UP / Previous Image / Scene Selection Button 8. Battery Compartment 12. USB Lever 15. Speaker 18. Shutter Button 3. Left / Zoom Out/ Thumbnail View 4. SET Button 7. Tripod Socket 3 Down / Next Image / Delete Last Image Button 9. Digital Lens 11. USB Connector 14. Parts of the Camera 1. Wrist Strap Connector 17. Power Button 2. Microphone 19. SD Memory Card Slot 13. M (Mode) Button 6.
LCD Flip Screen 10. AV Out Port 16. Right / Zoom In 5. UP / Previous Image / Scene Selection Button 8. Battery Compartment 12. USB Lever 15. Speaker 18. Shutter Button 3. Left / Zoom Out/ Thumbnail View 4. SET Button 7. Tripod Socket 3 Down / Next Image / Delete Last Image Button 9. Digital Lens 11. USB Connector 14. Parts of the Camera 1. Wrist Strap Connector 17. Power Button 2. Microphone 19. SD Memory Card Slot 13. M (Mode) Button 6.

Camera Manual
Page 5
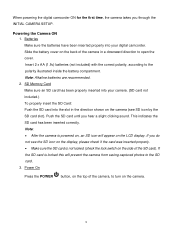
Initial Camera Setup Installing the Batteries Installing the Memory Card Slide open the battery cover and install 2 AA alkaline batteries with the correct polarity (as illustrated inside the battery compartment) into the battery compartment on the back of the camera. Using the Camera 4 Turning On the Camera SD Memory card (up to 16GB) needed for normal use.
Initial Camera Setup Installing the Batteries Installing the Memory Card Slide open the battery cover and install 2 AA alkaline batteries with the correct polarity (as illustrated inside the battery compartment) into the battery compartment on the back of the camera. Using the Camera 4 Turning On the Camera SD Memory card (up to 16GB) needed for normal use.
Camera Manual
Page 6
... correct polarity, according to turn on the camera. 5 SD Memory Card Make sure an SD card has been properly inserted into your camera. (SD card not included.) To properly insert the SD Card: Push the SD card into your digital camcorder. Push the SD card until you do not see SD icon by the SD card slot). Batteries Make sure the batteries have been inserted...
... correct polarity, according to turn on the camera. 5 SD Memory Card Make sure an SD card has been properly inserted into your camera. (SD card not included.) To properly insert the SD Card: Push the SD card into your digital camcorder. Push the SD card until you do not see SD icon by the SD card slot). Batteries Make sure the batteries have been inserted...

Camera Manual
Page 9
... pixels (30fps) / 320*240 pixels(30fps ) 2M (1600x1200), 1.3M (1280x1024), VGA (640x480) CMOS Sensor 1.8 Inch TFT Limited for test images (3 seconds for video or 2 photos) SD card (up to 16GB) needs to be inserted to use the camera 2 x Digital Zoom 50Hz / 60 Hz Auto / Scenery / Portrait / Night Scenery / Night Portrait / High Sensitivity...
... pixels (30fps) / 320*240 pixels(30fps ) 2M (1600x1200), 1.3M (1280x1024), VGA (640x480) CMOS Sensor 1.8 Inch TFT Limited for test images (3 seconds for video or 2 photos) SD card (up to 16GB) needs to be inserted to use the camera 2 x Digital Zoom 50Hz / 60 Hz Auto / Scenery / Portrait / Night Scenery / Night Portrait / High Sensitivity...
Camera Manual
Page 11
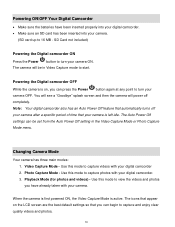
... Off settings can begin to 16 MB - Changing Camera Mode Your camera has three main modes: 1. Video Capture Mode - Playback Mode (for photos and videos) - SD Card not included) Powering the Digital camcorder ON Press the Power button to turn your camera ON. The icons that automatically turns off completely. The camera... Capture Mode menu. Use this mode to view the videos and photos you have been inserted properly into your digital camcorder. Make sure an SD card has been inserted into your camera. (SD card up to capture and enjoy clear quality videos and photos. 10
... Off settings can begin to 16 MB - Changing Camera Mode Your camera has three main modes: 1. Video Capture Mode - Playback Mode (for photos and videos) - SD Card not included) Powering the Digital camcorder ON Press the Power button to turn your camera ON. The icons that automatically turns off completely. The camera... Capture Mode menu. Use this mode to view the videos and photos you have been inserted properly into your digital camcorder. Make sure an SD card has been inserted into your camera. (SD card up to capture and enjoy clear quality videos and photos. 10
Camera Manual
Page 13
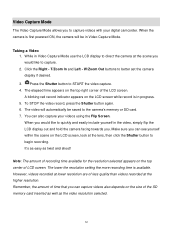
W/Zoom Out buttons to the camera‟s memory or SD card. 7. A blinking red record indicator appears on the LCD screen while record is available. Click the Right - T/Zoom In and Left - The video will be saved ... Mode. When the camera is first powered ON, the camera will automatically be in progress. 5. The elapsed time appears on the top center of the SD memory card inserted as well as twist and shoot! When you would like to START the video capture. 4. Note: The amount of recording time available for...
W/Zoom Out buttons to the camera‟s memory or SD card. 7. A blinking red record indicator appears on the LCD screen while record is available. Click the Right - T/Zoom In and Left - The video will be saved ... Mode. When the camera is first powered ON, the camera will automatically be in progress. 5. The elapsed time appears on the top center of the SD memory card inserted as well as twist and shoot! When you would like to START the video capture. 4. Note: The amount of recording time available for...

Camera Manual
Page 45
... to open the next window. 6. If you close the application you can run the Vivitar Experience Image Manager from the list and click "Next" to open the application. 13. Make sure the SD Memory Card is complete. Connect the camera‟s USB connector to open the next window. 7. ..." to where the program will have internet access, the "Choose your language" window opens, choose your computer. 9. On PC only: Let the "Vivitar Experience Image Manager" installer create the folder to confirm your camera model from the Programs (PC) or Applications (Mac) menu on your computer. 3. ...
... to open the next window. 6. If you close the application you can run the Vivitar Experience Image Manager from the list and click "Next" to open the application. 13. Make sure the SD Memory Card is complete. Connect the camera‟s USB connector to open the next window. 7. ..." to where the program will have internet access, the "Choose your language" window opens, choose your computer. 9. On PC only: Let the "Vivitar Experience Image Manager" installer create the folder to confirm your camera model from the Programs (PC) or Applications (Mac) menu on your computer. 3. ...

Camera Manual
Page 46
... your use. 45 If your computer. You can select to your camera is complete. 10. The "Get Images from your Camera to Your Computer An SD card needs to your computer. 1. Getting Photos and Videos from device" window opens. 3. Add the new photo and video files to your computer. 9. A message appears when...
... your use. 45 If your computer. You can select to your camera is complete. 10. The "Get Images from your Camera to Your Computer An SD card needs to your computer. 1. Getting Photos and Videos from device" window opens. 3. Add the new photo and video files to your computer. 9. A message appears when...
Camera Manual
Page 50
... all the photos should be retrieved from my computer. This camera requires an SD card for ? Q: How do I recover images that the images were successfully transferred but the photos do ? What do I get a message that I deleted images using the Vivitar Experience Image Manager are not stored in the camera‟s memory. Technical Support...
... all the photos should be retrieved from my computer. This camera requires an SD card for ? Q: How do I recover images that the images were successfully transferred but the photos do ? What do I get a message that I deleted images using the Vivitar Experience Image Manager are not stored in the camera‟s memory. Technical Support...


