

Camera Manual
Page 1
DVR 610 Digital Camcorder with Camera User Manual © 2009-2011 Sakar International, Inc. Windows and the Windows logo are the property of Microsoft Corporation. All rights reserved. All other trademarks are registered trademarks of their respective companies.
DVR 610 Digital Camcorder with Camera User Manual © 2009-2011 Sakar International, Inc. Windows and the Windows logo are the property of Microsoft Corporation. All rights reserved. All other trademarks are registered trademarks of their respective companies.

Camera Manual
Page 2
... 9 Powering ON/OFF Your Digital Camcorder 10 Changing Camera Mode ...10 Navigating the Menus...11 Video Capture Mode ...12 Video Playback Mode...20 Photo Capture Mode ...24 Photo Playback Mode ...37 Connecting the Camera to a TV 42 Connecting the Camera to a Headset 42 Installing the Software ...43 Connecting the Camera to the Computer 44 Getting...
... 9 Powering ON/OFF Your Digital Camcorder 10 Changing Camera Mode ...10 Navigating the Menus...11 Video Capture Mode ...12 Video Playback Mode...20 Photo Capture Mode ...24 Photo Playback Mode ...37 Connecting the Camera to a TV 42 Connecting the Camera to a Headset 42 Installing the Software ...43 Connecting the Camera to the Computer 44 Getting...
Camera Manual
Page 3
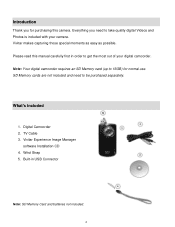
... as easy as possible. Note: Your digital camcorder requires an SD Memory card (up to be purchased separately. TV Cable 3. Wrist Strap 5. Please read this camera. Vivitar Experience Image Manager software Installation CD 4. Digital Camcorder 2. Built-in order to take quality digital Videos and Photos is included with your digital camcorder. Everything you for normal use.
... as easy as possible. Note: Your digital camcorder requires an SD Memory card (up to be purchased separately. TV Cable 3. Wrist Strap 5. Please read this camera. Vivitar Experience Image Manager software Installation CD 4. Digital Camcorder 2. Built-in order to take quality digital Videos and Photos is included with your digital camcorder. Everything you for normal use.
Camera Manual
Page 4
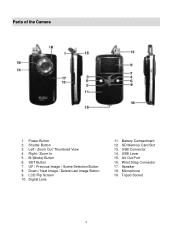
UP / Previous Image / Scene Selection Button 8. SD Memory Card Slot 13. Wrist Strap Connector 17. AV Out Port 16. Speaker 18. Right / Zoom In 5. Down / Next Image / Delete Last Image Button 9. USB Lever 15. M (Mode) Button 6. SET Button 7. Digital Lens 11. Power Button 2. Shutter Button 3. LCD Flip Screen 10. USB Connector 14. Tripod Socket 3 Microphone 19. Parts of the Camera 1. Battery Compartment 12. Left / Zoom Out/ Thumbnail View 4.
UP / Previous Image / Scene Selection Button 8. SD Memory Card Slot 13. Wrist Strap Connector 17. AV Out Port 16. Speaker 18. Right / Zoom In 5. Down / Next Image / Delete Last Image Button 9. USB Lever 15. M (Mode) Button 6. SET Button 7. Digital Lens 11. Power Button 2. Shutter Button 3. LCD Flip Screen 10. USB Connector 14. Tripod Socket 3 Microphone 19. Parts of the Camera 1. Battery Compartment 12. Left / Zoom Out/ Thumbnail View 4.
Camera Manual
Page 6
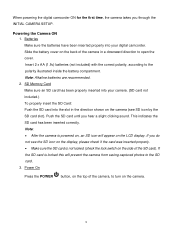
... properly. Make sure the SD card is not locked (check the lock switch on the side of the camera, to open the cover. Power On Press the POWER button, on the camera. 5 Insert 2 x AA (1.5v) batteries (not included) with the correct polarity, according to the SD card. 3. ...is powered on the LCD display. When powering the digital camcorder ON for the first time, the camera takes you through the INITIAL CAMERA SETUP. This indicates the SD card has been inserted correctly. Powering the Camera ON 1. Note: After the camera is locked this will appear on , an SD icon...
... properly. Make sure the SD card is not locked (check the lock switch on the side of the camera, to open the cover. Power On Press the POWER button, on the camera. 5 Insert 2 x AA (1.5v) batteries (not included) with the correct polarity, according to the SD card. 3. ...is powered on the LCD display. When powering the digital camcorder ON for the first time, the camera takes you through the INITIAL CAMERA SETUP. This indicates the SD card has been inserted correctly. Powering the Camera ON 1. Note: After the camera is locked this will appear on , an SD icon...

Camera Manual
Page 7
After selecting a language, the digital camcorder opens with the Video Capture mode ready for the camera. Press the SET button to capture your choice by pressing the UP or DOWN direction control buttons. 3. The Language selection menu will be prompted to select a language for you to confirm the selection. Select the language of your videos. 6 Setting the Camera Language 1. You will appear. 2.
After selecting a language, the digital camcorder opens with the Video Capture mode ready for the camera. Press the SET button to capture your choice by pressing the UP or DOWN direction control buttons. 3. The Language selection menu will be prompted to select a language for you to confirm the selection. Select the language of your videos. 6 Setting the Camera Language 1. You will appear. 2.
Camera Manual
Page 8
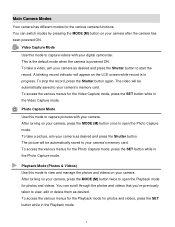
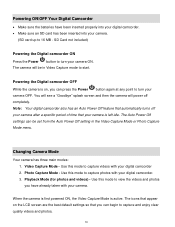
... can scroll through the photos and videos that you‟ve previously taken to capture videos with your digital camcorder. A blinking record indicator will be automatically saved to your camera, press the MODE (M) button once to open the Photo Capture mode. Photo Capture Mode Use this mode to view, ...desired. You can switch modes by pressing the MODE (M) button on the LCD screen while record is powered ON. After turning on your camera after the camera has been powered ON. To access the various menus for photos and videos, press the SET button while in the Playback mode. 7 ...
... can scroll through the photos and videos that you‟ve previously taken to capture videos with your digital camcorder. A blinking record indicator will be automatically saved to your camera, press the MODE (M) button once to open the Photo Capture mode. Photo Capture Mode Use this mode to view, ...desired. You can switch modes by pressing the MODE (M) button on the LCD screen while record is powered ON. After turning on your camera after the camera has been powered ON. To access the various menus for photos and videos, press the SET button while in the Playback mode. 7 ...

Camera Manual
Page 9
...) CMOS Sensor 1.8 Inch TFT Limited for test images (3 seconds for video or 2 photos) SD card (up to 16GB) needs to be inserted to use the camera 2 x Digital Zoom 50Hz / 60 Hz Auto / Scenery / Portrait / Night Scenery / Night Portrait / High Sensitivity / Sport / Beach / Party 2 seconds / 5 seconds / 10 seconds / Off Yes Auto / Daylight / Cloudy...
...) CMOS Sensor 1.8 Inch TFT Limited for test images (3 seconds for video or 2 photos) SD card (up to 16GB) needs to be inserted to use the camera 2 x Digital Zoom 50Hz / 60 Hz Auto / Scenery / Portrait / Night Scenery / Night Portrait / High Sensitivity / Sport / Beach / Party 2 seconds / 5 seconds / 10 seconds / Off Yes Auto / Daylight / Cloudy...
Camera Manual
Page 11
... begin to capture and enjoy clear quality videos and photos. 10 Photo Capture Mode - When the camera is first powered ON, the Video Capture Mode is left idle. Note: Your digital camcorder also has an Auto Power Off feature that automatically turns off completely. Use this mode to ... Make sure the batteries have already taken with your camera. Powering the Digital camcorder OFF While the camera is on the LCD screen are the best default settings so that your camera is active. The camera will power off your camera after a specific period of time that you can press the ...
... begin to capture and enjoy clear quality videos and photos. 10 Photo Capture Mode - When the camera is first powered ON, the Video Capture Mode is left idle. Note: Your digital camcorder also has an Auto Power Off feature that automatically turns off completely. Use this mode to ... Make sure the batteries have already taken with your camera. Powering the Digital camcorder OFF While the camera is on the LCD screen are the best default settings so that your camera is active. The camera will power off your camera after a specific period of time that you can press the ...
Camera Manual
Page 13
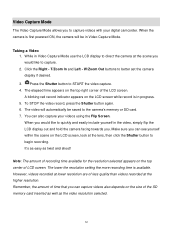
Press the Shutter button to better set the camera display if desired. 3. Note: The amount of recording time available for ...lower the resolution setting the more recording time is in the video, simply flip the LCD display out and hold the camera facing towards you. While in Video Capture Mode. W/Zoom Out buttons to START the video capture. 4. It‟... Flip Screen. When the camera is first powered ON, the camera will automatically be in Video Capture Mode use the LCD display to direct the camera at the lens, then click the Shutter button to the camera‟s memory or SD card...
Press the Shutter button to better set the camera display if desired. 3. Note: The amount of recording time available for ...lower the resolution setting the more recording time is in the video, simply flip the LCD display out and hold the camera facing towards you. While in Video Capture Mode. W/Zoom Out buttons to START the video capture. 4. It‟... Flip Screen. When the camera is first powered ON, the camera will automatically be in Video Capture Mode use the LCD display to direct the camera at the lens, then click the Shutter button to the camera‟s memory or SD card...
Camera Manual
Page 20
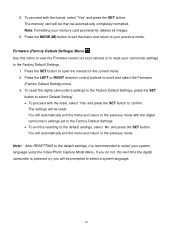
...to view the Firmware version on , you do not, the next time the digital camcorder is recommended to reset your memory card permanently deletes all images. 6. Note: After RESETTING to the default settings, it is powered on your camera or to select your previous mode. If you will be prompted to the... settings, select „No‟ and press the SET button. 5. You will automatically exit the menu and return to the previous mode with the digital camcorder‟s settings set to the Factory Default Settings. To exit the resetting to the previous mode. To reset the...
...to view the Firmware version on , you do not, the next time the digital camcorder is recommended to reset your memory card permanently deletes all images. 6. Note: After RESETTING to the default settings, it is powered on your camera or to select your previous mode. If you will be prompted to the... settings, select „No‟ and press the SET button. 5. You will automatically exit the menu and return to the previous mode with the digital camcorder‟s settings set to the Factory Default Settings. To exit the resetting to the previous mode. To reset the...

Camera Manual
Page 21
... photos and videos that you‟ve already taken with you camera. When you first turn on the camera, the camera will be displayed in Playback mode, press the UP or DOWN direction buttons to scroll through the images on your digital camcorder‟s memory card until you find the image you wish...
... photos and videos that you‟ve already taken with you camera. When you first turn on the camera, the camera will be displayed in Playback mode, press the UP or DOWN direction buttons to scroll through the images on your digital camcorder‟s memory card until you find the image you wish...
Camera Manual
Page 25
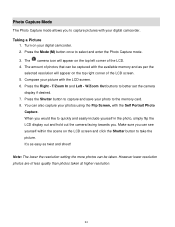
...that can be taken. However lower resolution photos are of the LCD. 4. Press the Mode (M) button once to better set the camera display if desired. 7. Compose your digital camcorder. W/Zoom Out buttons to select and enter the Photo Capture mode. 3. You can also capture your photos using the Flip...resolution. 24 Note: The lower the resolution setting the more photos can see yourself within the scene on your photo to capture and save your digital camcorder. 2. Turn on the LCD screen and click the Shutter button to take the picture. Press the Shutter button to the memory card....
...that can be taken. However lower resolution photos are of the LCD. 4. Press the Mode (M) button once to better set the camera display if desired. 7. Compose your digital camcorder. W/Zoom Out buttons to select and enter the Photo Capture mode. 3. You can also capture your photos using the Flip...resolution. 24 Note: The lower the resolution setting the more photos can see yourself within the scene on your photo to capture and save your digital camcorder. 2. Turn on the LCD screen and click the Shutter button to take the picture. Press the Shutter button to the memory card....
Camera Manual
Page 38
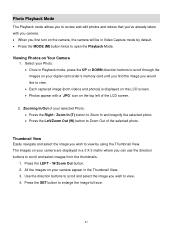
... on the LCD screen. Photos appear with you camera. When you first turn on the camera, the camera will be in Playback mode, press the UP or DOWN direction buttons to scroll through the images on your digital camcorder‟s memory card until you find the image you would... like to view. 4. Select your camera are displayed in the Thumbnail View. 3. Thumbnail View Easily navigate and select the image you...
... on the LCD screen. Photos appear with you camera. When you first turn on the camera, the camera will be in Playback mode, press the UP or DOWN direction buttons to scroll through the images on your digital camcorder‟s memory card until you find the image you would... like to view. 4. Select your camera are displayed in the Thumbnail View. 3. Thumbnail View Easily navigate and select the image you...
Camera Manual
Page 48
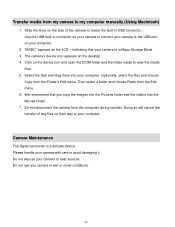
... folder and the videos into your camera to the USB port on your camera to connect your camera to heat sources. Camera Maintenance The digital camcorder is in connector on your camera is a delicate device. Transfer media from my camera to view the media files. 5. The camera‟s device icon appears on the... Finder‟s Edit menu. Use the USB built-in Mass Storage Mode. 3. "MSDC" appears on the desktop. 4. indicating that you camera in USB connector. Then select a folder and choose Paste from the Edit menu. 6. We recommend that your computer. 2. Please handle your...
... folder and the videos into your camera to the USB port on your camera to connect your camera to heat sources. Camera Maintenance The digital camcorder is in connector on your camera is a delicate device. Transfer media from my camera to view the media files. 5. The camera‟s device icon appears on the... Finder‟s Edit menu. Use the USB built-in Mass Storage Mode. 3. "MSDC" appears on the desktop. 4. indicating that you camera in USB connector. Then select a folder and choose Paste from the Edit menu. 6. We recommend that your computer. 2. Please handle your...

