Warranty
Page 1
...do not allow the limitation of incidental or consequential damages, so the above limitation or exclusion may apply to you. -1- During the period, Vivitar will repair or replace the product at no charge for any incidental or consequential damages arising from the date of the original purchase and expires...The time period of this warranty starts from the purchase, use or inability to use this product even if Vivitar has been advised of such damages. Limited One Year Warranty Vivitar warrants this quality product to be free of defects in or exposure to chemicals or liquids, extremes of climate...
...do not allow the limitation of incidental or consequential damages, so the above limitation or exclusion may apply to you. -1- During the period, Vivitar will repair or replace the product at no charge for any incidental or consequential damages arising from the date of the original purchase and expires...The time period of this warranty starts from the purchase, use or inability to use this product even if Vivitar has been advised of such damages. Limited One Year Warranty Vivitar warrants this quality product to be free of defects in or exposure to chemicals or liquids, extremes of climate...
Warranty
Page 2
... SUPPORT support team members will be not faulty or the defect is a result in wear and tear, Vivitar may levy a handling charge for the from anywhere else, please visit www.vivitar.com for example, a copy of your sales receipt). Include in the U.K.) Sakar UK 2D Siskin Parkway.... In the event the product is complete, the product will answer your local toll free number. -2- Return item (insured) to: (in the U.S.): Vivitar Attn: Technical Support 195 Carter Drive Edison NJ 08817 (in package: a) Evidence of date and place of original purchase (for your questions. STEP 3....
... SUPPORT support team members will be not faulty or the defect is a result in wear and tear, Vivitar may levy a handling charge for the from anywhere else, please visit www.vivitar.com for example, a copy of your sales receipt). Include in the U.K.) Sakar UK 2D Siskin Parkway.... In the event the product is complete, the product will answer your local toll free number. -2- Return item (insured) to: (in the U.S.): Vivitar Attn: Technical Support 195 Carter Drive Edison NJ 08817 (in package: a) Evidence of date and place of original purchase (for your questions. STEP 3....

Camera Manual
Page 1
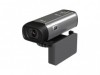
Windows and the Windows logo are the property of Microsoft Corporation. All other trademarks are registered trademarks of their respective companies. DVR 518 Digital Video Camcorder User's Manual © 2009 Sakar International, Inc. All rights reserved.
Windows and the Windows logo are the property of Microsoft Corporation. All other trademarks are registered trademarks of their respective companies. DVR 518 Digital Video Camcorder User's Manual © 2009 Sakar International, Inc. All rights reserved.
Camera Manual
Page 2
...Macintosh 5 A Quick Look at your Digital Video Camcorder 7 Preparing Your Camcorder for Use 8 Inserting an SD Memory Card 9 Maintenance and Care 11 DVR Function Control 12 Capturing Videos 15 Taking Photos 21 Audio Mode 34 Playback mode 35 Setup Mode 50 Connecting the Camcorder to a TV 59 Install... the Vivitar Experience Image Manager Software 59 Connect your camcorder to the computer 63 Get photos and videos from your camcorder to your computer 63 Get...
...Macintosh 5 A Quick Look at your Digital Video Camcorder 7 Preparing Your Camcorder for Use 8 Inserting an SD Memory Card 9 Maintenance and Care 11 DVR Function Control 12 Capturing Videos 15 Taking Photos 21 Audio Mode 34 Playback mode 35 Setup Mode 50 Connecting the Camcorder to a TV 59 Install... the Vivitar Experience Image Manager Software 59 Connect your camcorder to the computer 63 Get photos and videos from your camcorder to your computer 63 Get...
Camera Manual
Page 3
Key Features 5 modes - Your camcorder also has a PC Camera function for purchasing the DVR 518 Digital Video Camcorder. In addition, a SD compatible memory card of your camcorder as a PC Camera (on Windows 68 Sakar Warranty Card 69 Technical Specifications 70 ... media from my camcorder to my computer manually (Using Windows) ...66 Transfer media from my camcorder to my computer manually (Using Macintosh 67 Using your DVR camcorder. With your camcorder you for web conferencing.
Key Features 5 modes - Your camcorder also has a PC Camera function for purchasing the DVR 518 Digital Video Camcorder. In addition, a SD compatible memory card of your camcorder as a PC Camera (on Windows 68 Sakar Warranty Card 69 Technical Specifications 70 ... media from my camcorder to my computer manually (Using Windows) ...66 Transfer media from my camcorder to my computer manually (Using Macintosh 67 Using your DVR camcorder. With your camcorder you for web conferencing.
Camera Manual
Page 4
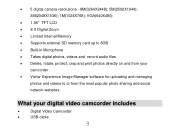
..., protect, crop and print photos directly on and from your digital video camcorder includes Digital Video Camcorder USB cable 3 What your camcorder Vivitar Experience Image Manager software for uploading and managing photos and videos to or from the most popular photo sharing and social network websites. 5 digital...
..., protect, crop and print photos directly on and from your digital video camcorder includes Digital Video Camcorder USB cable 3 What your camcorder Vivitar Experience Image Manager software for uploading and managing photos and videos to or from the most popular photo sharing and social network websites. 5 digital...
Camera Manual
Page 5
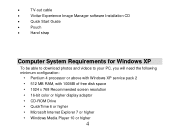
TV-out cable Vivitar Experience Image Manager software Installation CD Quick Start Guide Pouch Hand strap Computer System Requirements for Windows XP To be able to ...
TV-out cable Vivitar Experience Image Manager software Installation CD Quick Start Guide Pouch Hand strap Computer System Requirements for Windows XP To be able to ...
Camera Manual
Page 6
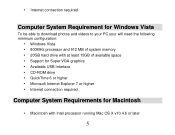
Internet connection required Computer System Requirement for Windows Vista To be able to download photos and videos to your PC your will need the following minimum configuration: Windows Vista 800MHz processor and 512 MB of system memory 20GB hard drive with at least 15GB of available space Support for Super VGA graphics Available USB Interface CD-ROM drive QuickTime 6 or higher Microsoft Internet Explorer 7 or higher Internet connection required Computer System Requirements for Macintosh ...
Internet connection required Computer System Requirement for Windows Vista To be able to download photos and videos to your PC your will need the following minimum configuration: Windows Vista 800MHz processor and 512 MB of system memory 20GB hard drive with at least 15GB of available space Support for Super VGA graphics Available USB Interface CD-ROM drive QuickTime 6 or higher Microsoft Internet Explorer 7 or higher Internet connection required Computer System Requirements for Macintosh ...

Camera Manual
Page 7
256 MB RAM, 100 MB free disk space Display: 1024 x 768 or higher-resolution monitor QuickTime 6 or higher Internet connection required 6
256 MB RAM, 100 MB free disk space Display: 1024 x 768 or higher-resolution monitor QuickTime 6 or higher Internet connection required 6

Camera Manual
Page 9
Insert the batteries in accordance with the polarity indicated in the battery compartment. 3. Preparing Your Camcorder for Use Battery Installation Your DVR camcorder requires 3 "AAA" batteries (not included). Note: 8 It is recommended that alkaline batteries be used. 1. Lift and open the battery compartment on the side of the camcorder. 2. Return and close the battery cover.
Insert the batteries in accordance with the polarity indicated in the battery compartment. 3. Preparing Your Camcorder for Use Battery Installation Your DVR camcorder requires 3 "AAA" batteries (not included). Note: 8 It is recommended that alkaline batteries be used. 1. Lift and open the battery compartment on the side of the camcorder. 2. Return and close the battery cover.

Camera Manual
Page 10
... in order to take photos, videos and audio. A SD Memory card is not lost if no SD Memory Card has been inserted in the DVR or when you change your batteries. We strongly recommend downloading your photos and videos regularly to your computer. Remove the batteries from the...
... in order to take photos, videos and audio. A SD Memory card is not lost if no SD Memory Card has been inserted in the DVR or when you change your batteries. We strongly recommend downloading your photos and videos regularly to your computer. Remove the batteries from the...
Camera Manual
Page 11
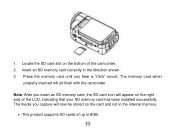
Note: After you hear a "Click" sound. Locate the SD card slot on the right side of the LCD, indicating that your SD memory card has been installed successfully. Insert an SD memory card correctly in the internal memory. This product supports SD cards of the camcorder. 2. The memory card when properly inserted will appear on the bottom of up to 8GB. 10 The media you capture will now be stored on the card and not in the direction shown. 3. Press the memory card until you insert an SD memory card, the SD card icon will sit flush with the camcorder. 1.
Note: After you hear a "Click" sound. Locate the SD card slot on the right side of the LCD, indicating that your SD memory card has been installed successfully. Insert an SD memory card correctly in the internal memory. This product supports SD cards of the camcorder. 2. The memory card when properly inserted will appear on the bottom of up to 8GB. 10 The media you capture will now be stored on the card and not in the direction shown. 3. Press the memory card until you insert an SD memory card, the SD card icon will sit flush with the camcorder. 1.

Camera Manual
Page 12
Never use the video camcorder with the camcorder (see the Setup section further on in the manual for this equipment may damage the card and render it unusable. Before using the video camcorder, please ensure that you read and understand the safety precautions described below: • Do not try to open the case of the video camcorder or attempt to modify this may lead to overheating, distortion of electric shock. • Use only the recommended power accessories. Use of power sources not expressly recommended for instruction on the SD Memory Card including protected data....
Never use the video camcorder with the camcorder (see the Setup section further on in the manual for this equipment may damage the card and render it unusable. Before using the video camcorder, please ensure that you read and understand the safety precautions described below: • Do not try to open the case of the video camcorder or attempt to modify this may lead to overheating, distortion of electric shock. • Use only the recommended power accessories. Use of power sources not expressly recommended for instruction on the SD Memory Card including protected data....

Camera Manual
Page 13
... an operation mode for use or in use . Power off Press the Power button to turn on your DVR camcorder off . If the DVR camcorder is insufficient battery power, a "Low Battery" message will switch off . DVR Function Control To power on the LCD screen. Power on the inside of the camcorder. The... DVR camcorder will appear on the camcorder you need to turn your DVR. The LCD monitor will switch off a few moments later. 12 The Power button is ready for 60 seconds it will light up ...
... an operation mode for use or in use . Power off Press the Power button to turn on your DVR camcorder off . If the DVR camcorder is insufficient battery power, a "Low Battery" message will switch off . DVR Function Control To power on the LCD screen. Power on the inside of the camcorder. The... DVR camcorder will appear on the camcorder you need to turn your DVR. The LCD monitor will switch off a few moments later. 12 The Power button is ready for 60 seconds it will light up ...
Camera Manual
Page 14
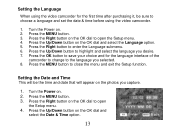
Press the Up/Down button on . 2. Press the Up/Down button to close the menu and exit the Setup function. Press the MENU button. 3. Press the Right button on the OK dial to the language you selected. 8. Setting the Date and Time This will be sure to choose a language and set the date & time before using the video camcorder for the language interface of the camcorder to change to open the Setup menu. 4. Press the Right button on the photos you desire. 7. Turn the Power on the OK dial and select the Language option. 5. Setting the Language When using the video ...
Press the Up/Down button on . 2. Press the Up/Down button to close the menu and exit the Setup function. Press the MENU button. 3. Press the Right button on the OK dial to the language you selected. 8. Setting the Date and Time This will be sure to choose a language and set the date & time before using the video camcorder for the language interface of the camcorder to change to open the Setup menu. 4. Press the Right button on the photos you desire. 7. Turn the Power on the OK dial and select the Language option. 5. Setting the Language When using the video ...

Camera Manual
Page 15
Press the OK button to close the menu and exit the Setup function Change the camcorder`s mode There are four modes in this DVR camcorder. 1. Audio mode For recording audio files. Playback mode Preview the record files. 14 Press the MENU button to save your choice. 9. Each time the ...
Press the OK button to close the menu and exit the Setup function Change the camcorder`s mode There are four modes in this DVR camcorder. 1. Audio mode For recording audio files. Playback mode Preview the record files. 14 Press the MENU button to save your choice. 9. Each time the ...

Camera Manual
Page 16
... you wish to capture. 3. Aim the camcorder at that resolution and memory appears on the bottom left corner of the LCD. 2. On turning on your DVR, press the DV/DSC button on the top right of the LCD. 1. To change between the function modes on the top of time left at...
... you wish to capture. 3. Aim the camcorder at that resolution and memory appears on the bottom left corner of the LCD. 2. On turning on your DVR, press the DV/DSC button on the top right of the LCD. 1. To change between the function modes on the top of time left at...
Camera Manual
Page 17
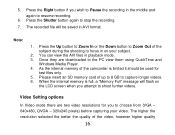
5. Press the Shutter button again to Pause the recording in playback mode. 3. You can view the AVI files in the middle and again to resume recording. 6. When the internal memory is limited it should be saved in on the LCD screen when you attempt to choose from (VGA - 640x480, QVGA - 320x240 pixels) before capturing your subject. 2. Please insert an SD memory card of the camcorder is full, a "Memory Full" message will be used for you wish to stop the recording. 7. As the internal memory of up to 8 GB to Zoom Out of the video, however higher quality 16 Note: 1....
5. Press the Shutter button again to Pause the recording in playback mode. 3. You can view the AVI files in the middle and again to resume recording. 6. When the internal memory is limited it should be saved in on the LCD screen when you attempt to choose from (VGA - 640x480, QVGA - 320x240 pixels) before capturing your subject. 2. Please insert an SD memory card of the camcorder is full, a "Memory Full" message will be used for you wish to stop the recording. 7. As the internal memory of up to 8 GB to Zoom Out of the video, however higher quality 16 Note: 1....

Camera Manual
Page 18
Press the Up/Down button to select the Setting you wish to change the Frame Rate, Metering and White Balance. You can also change from the menu that appears. 17 Press the MENU button. 2. To enter the Settings options for the Video mode: 1. videos use up more memory.
Press the Up/Down button to select the Setting you wish to change the Frame Rate, Metering and White Balance. You can also change from the menu that appears. 17 Press the MENU button. 2. To enter the Settings options for the Video mode: 1. videos use up more memory.

Camera Manual
Page 19
Press the OK button to the Setting menu. 5. Press the OK button to confirm, save your choice and exit to open the Movie Size submenu. 3. Press the Up/Down button to start capturing videos with the new resolution selected. 18 Movie Size You can select different Video resolutions - VGA 640x480 pixels / QVGA 320x240 pixels 1. Press the MENU button to revert back to the Video capture mode to highlight and select the resolution option: VGA 640x480, QVGA 320x240 4. Press the Up/Down button to select the Movie Size menu. 2.
Press the OK button to the Setting menu. 5. Press the OK button to confirm, save your choice and exit to open the Movie Size submenu. 3. Press the Up/Down button to start capturing videos with the new resolution selected. 18 Movie Size You can select different Video resolutions - VGA 640x480 pixels / QVGA 320x240 pixels 1. Press the MENU button to revert back to the Video capture mode to highlight and select the resolution option: VGA 640x480, QVGA 320x240 4. Press the Up/Down button to select the Movie Size menu. 2.
