Camera Manual
Page 3
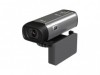
...has a PC Camera function for purchasing the DVR 518 Digital Video Camcorder. Key Features 5 modes - In addition, a SD compatible memory card of up to 8GB can be inserted in order to my computer manually (Using Macintosh 67 Using your camcorder as a PC Camera (on Windows 68... 69 Technical Specifications 70 Trouble Shooting 72 Introduction Thank you can shoot video clips, take individual photos and record audio files. Video, Audio, Camera, Playback and Set Up. Digital Video resolutions - 640x480 (VGA), 320x240 (QVGA). 2 Transfer media from my camcorder to my computer...
...has a PC Camera function for purchasing the DVR 518 Digital Video Camcorder. Key Features 5 modes - In addition, a SD compatible memory card of up to 8GB can be inserted in order to my computer manually (Using Macintosh 67 Using your camcorder as a PC Camera (on Windows 68... 69 Technical Specifications 70 Trouble Shooting 72 Introduction Thank you can shoot video clips, take individual photos and record audio files. Video, Audio, Camera, Playback and Set Up. Digital Video resolutions - 640x480 (VGA), 320x240 (QVGA). 2 Transfer media from my camcorder to my computer...
Camera Manual
Page 4
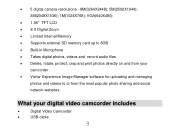
5 digital camera resolutions - 8M(3264X2448); 5M(2592X1944); 3M(2048X1536); 1M(1024X768); VGA(640X480) 1.96" TFT LCD 8 X Digital Zoom Limited Internal Memory Supports external ..., protect, crop and print photos directly on and from your digital video camcorder includes Digital Video Camcorder USB cable 3 What your camcorder Vivitar Experience Image Manager software for uploading and managing photos and videos to or from the most popular photo sharing and social network websites.
5 digital camera resolutions - 8M(3264X2448); 5M(2592X1944); 3M(2048X1536); 1M(1024X768); VGA(640X480) 1.96" TFT LCD 8 X Digital Zoom Limited Internal Memory Supports external ..., protect, crop and print photos directly on and from your digital video camcorder includes Digital Video Camcorder USB cable 3 What your camcorder Vivitar Experience Image Manager software for uploading and managing photos and videos to or from the most popular photo sharing and social network websites.

Camera Manual
Page 22
... camcorder, press the DV/DSC mode button on your shot. 1. menu. 6. Taking Photos After you power on the bottom left corner of the screen. The camera icon appears in order to 8GB in the top left of the LCD. Hold the camcorder steady and press the Shutter button on the top...
... camcorder, press the DV/DSC mode button on your shot. 1. menu. 6. Taking Photos After you power on the bottom left corner of the screen. The camera icon appears in order to 8GB in the top left of the LCD. Hold the camcorder steady and press the Shutter button on the top...
Camera Manual
Page 24
... 2 methods to use appear: 23 Press the Right button until you see the Self-Timer option you wish to activate the Self-Timer. In the camera mode, press the Right button. 2. Method 1: 1. The digital zoom digit icon appears on the top of the shutter button and when the photo is actually...
... 2 methods to use appear: 23 Press the Right button until you see the Self-Timer option you wish to activate the Self-Timer. In the camera mode, press the Right button. 2. Method 1: 1. The digital zoom digit icon appears on the top of the shutter button and when the photo is actually...
Camera Manual
Page 25
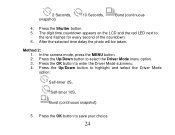
... Seconds, Burst (continuous 4. After the selected time delay the photo will be taken. Press the OK button to enter the Driver Mode submenu. 4. In the camera mode, press the MENU button. 2.
... Seconds, Burst (continuous 4. After the selected time delay the photo will be taken. Press the OK button to enter the Driver Mode submenu. 4. In the camera mode, press the MENU button. 2.
Camera Manual
Page 26
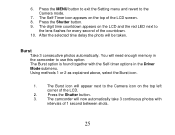
... camcorder to the lens flashes for every second of the LCD. 2. Press the MENU button to exit the Setting menu and revert to the Camera icon on the top of 1 second between shots. 25 Using methods 1 or 2 as explained above, select the Burst icon. 1. Burst Take... 3 consecutive photos automatically. 6. Press the Shutter button. 3. Press the Shutter button. 9. The camcorder will appear next to the Camera mode. 7. The Burst option is found together with intervals of the LCD screen. 8. After the selected time delay the photo will need enough memory...
... camcorder to the lens flashes for every second of the LCD. 2. Press the MENU button to exit the Setting menu and revert to the Camera icon on the top of 1 second between shots. 25 Using methods 1 or 2 as explained above, select the Burst icon. 1. Burst Take... 3 consecutive photos automatically. 6. Press the Shutter button. 3. Press the Shutter button. 9. The camcorder will appear next to the Camera mode. 7. The Burst option is found together with intervals of the LCD screen. 8. After the selected time delay the photo will need enough memory...
Camera Manual
Page 28
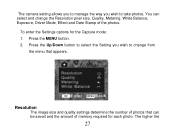
To enter the Settings options for each photo. Press the MENU button. 2. Press the Up/Down button to select the Setting you wish to change from the menu that can select and change the Resolution pixel size, Quality, Metering, White Balance, Exposure, Driver Mode, Effect and Date Stamp of the photos. The higher the 27 Resolution The image size and quality settings determine the number of memory required for the Capture mode: 1. The camera setting allows you to manage the way you wish to take photos. You can be saved and the amount of photos that appears.
To enter the Settings options for each photo. Press the MENU button. 2. Press the Up/Down button to select the Setting you wish to change from the menu that can select and change the Resolution pixel size, Quality, Metering, White Balance, Exposure, Driver Mode, Effect and Date Stamp of the photos. The higher the 27 Resolution The image size and quality settings determine the number of memory required for the Capture mode: 1. The camera setting allows you to manage the way you wish to take photos. You can be saved and the amount of photos that appears.

Camera Manual
Page 29
... your photo effectively. quality of the resolution options: 8M(3264X2448); 5M(2592X1944); 3M(2048X1536); 1M(1024X768); Press the MENU button to revert back to the Camera capture mode to select the Resolution menu. 2. Press the OK button to the Setting menu. 5. Quality 28
... your photo effectively. quality of the resolution options: 8M(3264X2448); 5M(2592X1944); 3M(2048X1536); 1M(1024X768); Press the MENU button to revert back to the Camera capture mode to select the Resolution menu. 2. Press the OK button to the Setting menu. 5. Quality 28
Camera Manual
Page 30
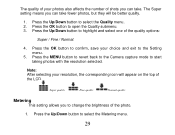
...: Super / Fine / Normal. 4. Super quality Fine quality Normal quality Metering This setting allows you can take. Press the MENU button to revert back to the Camera capture mode to select the Metering menu. 29 The Super setting means you can take fewer photos, but they will appear on the top of...
...: Super / Fine / Normal. 4. Super quality Fine quality Normal quality Metering This setting allows you can take. Press the MENU button to revert back to the Camera capture mode to select the Metering menu. 29 The Super setting means you can take fewer photos, but they will appear on the top of...
Camera Manual
Page 31
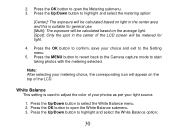
... is used to confirm, save your light source. 1. Press the OK button to the Setting menu. 5. Press the MENU button to revert back to the Camera capture mode to select the White Balance menu. 2. Press the Up/Down button to start taking photos with the metering selected. Press the Up/Down...
... is used to confirm, save your light source. 1. Press the OK button to the Setting menu. 5. Press the MENU button to revert back to the Camera capture mode to select the White Balance menu. 2. Press the Up/Down button to start taking photos with the metering selected. Press the Up/Down...
Camera Manual
Page 32
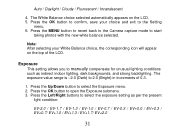
... light condition: EV-2.0 / EV-1.7 / EV-1.3 / EV-1.0 / EV-0.7 / EV-0.3 / EV+0.0 / EV+0.3 / EV+0.7/ EV+1.0 / EV+1.3 / EV+1.7/ EV+2.0 31 Press the MENU button to revert back to the Camera capture mode to open the Exposure submenu. 3. Exposure This setting allows you to confirm, save your White Balance choice, the corresponding icon will appear on...
... light condition: EV-2.0 / EV-1.7 / EV-1.3 / EV-1.0 / EV-0.7 / EV-0.3 / EV+0.0 / EV+0.3 / EV+0.7/ EV+1.0 / EV+1.3 / EV+1.7/ EV+2.0 31 Press the MENU button to revert back to the Camera capture mode to open the Exposure submenu. 3. Exposure This setting allows you to confirm, save your White Balance choice, the corresponding icon will appear on...
Camera Manual
Page 33
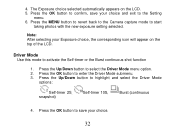
... the new exposure setting selected. Press the OK button to select the Driver Mode menu option. 2. Press the MENU button to revert back to the Camera capture mode to activate the Self-timer or the Burst continuous shot function 1. Press the Up/Down button to save your Exposure choice, the corresponding...
... the new exposure setting selected. Press the OK button to select the Driver Mode menu option. 2. Press the MENU button to revert back to the Camera capture mode to activate the Self-timer or the Burst continuous shot function 1. Press the Up/Down button to save your Exposure choice, the corresponding...
Camera Manual
Page 34
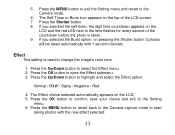
... to change the image's color tone. 1. Press the Up/Down button to the Setting menu. 6. Press the MENU button to revert back to the Camera capture mode to open the Effect submenu. 3. Press the Shutter button. 8. The Self-Timer or Burst icon appears on the LCD. 5. Effect This... setting is taken. 9. Press the Up/Down button to the Camera mode. 6. Press the MENU button to exit the Setting menu and revert to highlight and select the Effect option: Normal / B&W / Sepia / Negative / Red 4....
... to change the image's color tone. 1. Press the Up/Down button to the Setting menu. 6. Press the MENU button to revert back to the Camera capture mode to open the Effect submenu. 3. Press the Shutter button. 8. The Self-Timer or Burst icon appears on the LCD. 5. Effect This... setting is taken. 9. Press the Up/Down button to the Camera mode. 6. Press the MENU button to exit the Setting menu and revert to highlight and select the Effect option: Normal / B&W / Sepia / Negative / Red 4....

Camera Manual
Page 35
Press the MENU button to revert back to the Camera capture mode to record your camcorder. The amount of time to start taking photos with your audio clips depends on how much memory is taken ...
Press the MENU button to revert back to the Camera capture mode to record your camcorder. The amount of time to start taking photos with your audio clips depends on how much memory is taken ...

Camera Manual
Page 51
Sounds, Auto Review, Power Frequency, Power Save, Date & Time, Language, TV Out, USB, Start-up Image, Format and Reset All. 1. Press the MENU button. 2. Sounds In this Setup mode you can set - Press the Right button to select the icon to open the Setup menu. In Setup mode you can be accessed from the Video, Camera Capture and Playback modes. Setup Mode The Setup mode can adjust the sounds the camcorder emits 50
Sounds, Auto Review, Power Frequency, Power Save, Date & Time, Language, TV Out, USB, Start-up Image, Format and Reset All. 1. Press the MENU button. 2. Sounds In this Setup mode you can set - Press the Right button to select the icon to open the Setup menu. In Setup mode you can be accessed from the Video, Camera Capture and Playback modes. Setup Mode The Setup mode can adjust the sounds the camcorder emits 50
Camera Manual
Page 57
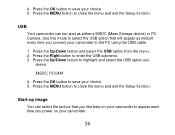
... the OK button to save your choice. 5. USB Your camcorder can select the picture that will appear as either a MSDC (Mass Storage device) or PC Camera. Press the Up/Down button to close the menu and exit the Setup function. Press the MENU button to highlight and select the USB option...
... the OK button to save your choice. 5. USB Your camcorder can select the picture that will appear as either a MSDC (Mass Storage device) or PC Camera. Press the Up/Down button to close the menu and exit the Setup function. Press the MENU button to highlight and select the USB option...

Camera Manual
Page 63
..." button when the installation is complete. 13. Please wait while the application continues the installation process on your camcorder is also a PC camera, the PC camera driver will be included in the installation process. Note: If your computer. 12. Please review the license terms. On PC: Click the..."Quit" button when the installation is complete. 9. Follow the instructions to open the application or close the window and run the Vivitar Experience Image Manager from your computer. . 62 Click the "Launch Vivitar Experience Image Manager" to install the driver. On PC only: Let the...
..." button when the installation is complete. 13. Please wait while the application continues the installation process on your camcorder is also a PC camera, the PC camera driver will be included in the installation process. Note: If your computer. 12. Please review the license terms. On PC: Click the..."Quit" button when the installation is complete. 9. Follow the instructions to open the application or close the window and run the Vivitar Experience Image Manager from your computer. . 62 Click the "Launch Vivitar Experience Image Manager" to install the driver. On PC only: Let the...

Camera Manual
Page 64
.... 5. The first time you connect the device to the computer you will cancel the transfer of the LCD screen to change it back to PC Camera mode. To use your computer. 2. Select the "Get Images" button from your camcorder to your computer. 1. As your camcorder is a mass storage device "MSDC" will... appear on the LCD, indicating that came with your camcorder to connect your camcorder to your camcorder as a PC camera, press the DV/DSC button on the bottom left of the LCD screen to change it back to Mass Storage mode. 6. Get photos and videos...
.... 5. The first time you connect the device to the computer you will cancel the transfer of the LCD screen to change it back to PC Camera mode. To use your computer. 2. Select the "Get Images" button from your camcorder to your computer. 1. As your camcorder is a mass storage device "MSDC" will... appear on the LCD, indicating that came with your camcorder to connect your camcorder to your camcorder as a PC camera, press the DV/DSC button on the bottom left of the LCD screen to change it back to Mass Storage mode. 6. Get photos and videos...

Camera Manual
Page 67
For more details on how to use the Vivitar Experience Image Manager open the Help file or click the "Take the Tour" button on the bottom left of options, select Open folder to view files and click OK. 5. If your camcorder appears in PC Camera mode, press the DV/DSC button on the...
For more details on how to use the Vivitar Experience Image Manager open the Help file or click the "Take the Tour" button on the bottom left of options, select Open folder to view files and click OK. 5. If your camcorder appears in PC Camera mode, press the DV/DSC button on the...

Camera Manual
Page 68
... Storage Mode. 3. Then select a folder and choose Paste from the Finder's Edit menu. Doing so will remain on all the while it is in PC Camera mode, press the DV/DSC button on the bottom left of the LCD screen to change it won't be switched off . 67 "MSDC" will automatically...
... Storage Mode. 3. Then select a folder and choose Paste from the Finder's Edit menu. Doing so will remain on all the while it is in PC Camera mode, press the DV/DSC button on the bottom left of the LCD screen to change it won't be switched off . 67 "MSDC" will automatically...


