Camera Manual
Page 3
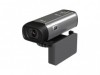
Your camcorder also has a PC Camera function for purchasing the DVR 518 Digital Video Camcorder. In addition, a SD compatible memory card of your DVR camcorder. Transfer media from my camcorder to my computer manually (Using Windows) ...66 Transfer media from my camcorder to expand the memory of ... Introduction Thank you can shoot video clips, take individual photos and record audio files. With your camcorder you for web conferencing. Video, Audio, Camera, Playback and Set Up. Digital Video resolutions - 640x480 (VGA), 320x240 (QVGA). 2 Key Features 5 modes -
Your camcorder also has a PC Camera function for purchasing the DVR 518 Digital Video Camcorder. In addition, a SD compatible memory card of your DVR camcorder. Transfer media from my camcorder to my computer manually (Using Windows) ...66 Transfer media from my camcorder to expand the memory of ... Introduction Thank you can shoot video clips, take individual photos and record audio files. With your camcorder you for web conferencing. Video, Audio, Camera, Playback and Set Up. Digital Video resolutions - 640x480 (VGA), 320x240 (QVGA). 2 Key Features 5 modes -
Camera Manual
Page 4
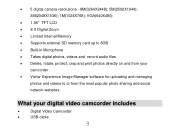
5 digital camera resolutions - 8M(3264X2448); 5M(2592X1944); 3M(2048X1536); 1M(1024X768); VGA(640X480) 1.96" TFT LCD 8 X Digital Zoom Limited Internal Memory Supports external SD memory card up to or from your digital video camcorder includes Digital Video Camcorder USB cable 3 What your camcorder Vivitar Experience Image Manager software for...
5 digital camera resolutions - 8M(3264X2448); 5M(2592X1944); 3M(2048X1536); 1M(1024X768); VGA(640X480) 1.96" TFT LCD 8 X Digital Zoom Limited Internal Memory Supports external SD memory card up to or from your digital video camcorder includes Digital Video Camcorder USB cable 3 What your camcorder Vivitar Experience Image Manager software for...
Camera Manual
Page 24
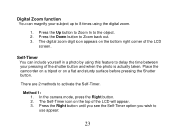
... using this feature to delay the time between your subject up to 8 times using the digital zoom. 1. Press the Right button until you see the Self-Timer option you wish to the object. 2. Method 1: 1. In the camera mode, press the Right button. 2. Place the camcorder on a tripod or on the top ...of the LCD screen. Press the Up button to Zoom In to use appear: 23 The digital zoom digit icon appears on the bottom right corner of the LCD...
... using this feature to delay the time between your subject up to 8 times using the digital zoom. 1. Press the Right button until you see the Self-Timer option you wish to the object. 2. Method 1: 1. In the camera mode, press the Right button. 2. Place the camcorder on a tripod or on the top ...of the LCD screen. Press the Up button to Zoom In to use appear: 23 The digital zoom digit icon appears on the bottom right corner of the LCD...
Camera Manual
Page 25
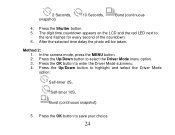
... OK button to select the Driver Mode menu option. 3. Press the Up/Down button to enter the Driver Mode submenu. 4. In the camera mode, press the MENU button. 2. The digit time countdown appears on the LCD and the red LED next to the lens flashes for every second of the countdown. 6. Press...
... OK button to select the Driver Mode menu option. 3. Press the Up/Down button to enter the Driver Mode submenu. 4. In the camera mode, press the MENU button. 2. The digit time countdown appears on the LCD and the red LED next to the lens flashes for every second of the countdown. 6. Press...
Camera Manual
Page 26
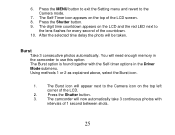
You will be taken. The digit time countdown appears on the LCD and the red LED next to the Camera icon on the top of the LCD. 2. 6. Press the MENU button to exit the Setting menu and revert to use this option. The Burst option ... memory in the Driver Mode submenu. The Burst icon will now automatically take 3 continuous photos with the Self-timer options in the camcorder to the Camera mode. 7. Press the Shutter button. 9. The Self-Timer icon appears on the top left corner of the LCD screen. 8.
You will be taken. The digit time countdown appears on the LCD and the red LED next to the Camera icon on the top of the LCD. 2. 6. Press the MENU button to exit the Setting menu and revert to use this option. The Burst option ... memory in the Driver Mode submenu. The Burst icon will now automatically take 3 continuous photos with the Self-timer options in the camcorder to the Camera mode. 7. Press the Shutter button. 9. The Self-Timer icon appears on the top left corner of the LCD screen. 8.
Camera Manual
Page 34
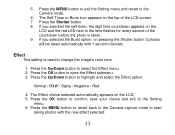
... automatically with the new effect selected. 33 5. If you selected the self-timer, the digit time countdown appears on the LCD. 5. Press the Up/Down button to the Camera mode. 6. Press the MENU button to revert back to the Camera capture mode to change the image's color tone. 1. Press the Shutter button. 8. The...
... automatically with the new effect selected. 33 5. If you selected the self-timer, the digit time countdown appears on the LCD. 5. Press the Up/Down button to the Camera mode. 6. Press the MENU button to revert back to the Camera capture mode to change the image's color tone. 1. Press the Shutter button. 8. The...

