Camera Manual
Page 3
... for web conferencing. Key Features 5 modes - Your camcorder also has a PC Camera function for purchasing the DVR 518 Digital Video Camcorder. In addition, a SD compatible memory card of up to expand the memory of your DVR camcorder. Video, Audio, Camera, Playback and Set Up. Digital Video resolutions - 640x480 (VGA), 320x240 (QVGA... 69 Technical Specifications 70 Trouble Shooting 72 Introduction Thank you can be inserted in order to 8GB can shoot video clips, take individual photos and record audio files.
... for web conferencing. Key Features 5 modes - Your camcorder also has a PC Camera function for purchasing the DVR 518 Digital Video Camcorder. In addition, a SD compatible memory card of up to expand the memory of your DVR camcorder. Video, Audio, Camera, Playback and Set Up. Digital Video resolutions - 640x480 (VGA), 320x240 (QVGA... 69 Technical Specifications 70 Trouble Shooting 72 Introduction Thank you can be inserted in order to 8GB can shoot video clips, take individual photos and record audio files.
Camera Manual
Page 4
... resolutions - 8M(3264X2448); 5M(2592X1944); 3M(2048X1536); 1M(1024X768); What your camcorder Vivitar Experience Image Manager software for uploading and managing photos and videos to 8GB Built-in Microphone Takes digital photos, videos and record audio files Delete, rotate, protect, crop and print photos directly on and from...
... resolutions - 8M(3264X2448); 5M(2592X1944); 3M(2048X1536); 1M(1024X768); What your camcorder Vivitar Experience Image Manager software for uploading and managing photos and videos to 8GB Built-in Microphone Takes digital photos, videos and record audio files Delete, rotate, protect, crop and print photos directly on and from...

Camera Manual
Page 10
... an increase in the number of up to 8GB (not included) should be inserted into your DVR camcorder. Media sitting on the memory card is required to expand the memory in order to capture and record many more media items. All the media in the built-in memory will not be captured... before transferring them to your computer. Remove the batteries from the DVR camcorder when not in use for an extended period. Inserting an...
... an increase in the number of up to 8GB (not included) should be inserted into your DVR camcorder. Media sitting on the memory card is required to expand the memory in order to capture and record many more media items. All the media in the built-in memory will not be captured... before transferring them to your computer. Remove the batteries from the DVR camcorder when not in use for an extended period. Inserting an...

Camera Manual
Page 15
...each of the settings you wish to save your choice. 9. Audio mode For recording audio files. Press the OK button to close the menu and exit the Setup function Change the camcorder`s mode There are four modes in this DVR camcorder. 1. Press the Up/Down button to change the mode. 4. Video ...mode For recording movie clips. Press the MENU button to open the date and time settings. 6. Each time the DV/...
...each of the settings you wish to save your choice. 9. Audio mode For recording audio files. Press the OK button to close the menu and exit the Setup function Change the camcorder`s mode There are four modes in this DVR camcorder. 1. Press the Up/Down button to change the mode. 4. Video ...mode For recording movie clips. Press the MENU button to open the date and time settings. 6. Each time the DV/...
Camera Manual
Page 17
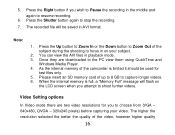
... the internal memory is limited it should be saved in the middle and again to resume recording. 6. Press the Up button to Zoom In or the Down button to Zoom Out of...before capturing your subject. 2. Note: 1. Once they are two video resolutions for test files only. 5. The recorded file will flash on your video. You can view the AVI files in on the LCD screen when you wish to Pause ... The higher the resolution selected the better the quality of up to 8 GB to stop the recording. 7. As the internal memory of the subject during the shooting to shoot further videos. Press ...
... the internal memory is limited it should be saved in the middle and again to resume recording. 6. Press the Up button to Zoom In or the Down button to Zoom Out of...before capturing your subject. 2. Note: 1. Once they are two video resolutions for test files only. 5. The recorded file will flash on your video. You can view the AVI files in on the LCD screen when you wish to Pause ... The higher the resolution selected the better the quality of up to 8 GB to stop the recording. 7. As the internal memory of the subject during the shooting to shoot further videos. Press ...

Camera Manual
Page 35
Press the OK button to select the Date Stamp menu. 2. Audio Mode You can record audio clips with the date stamp appearing on your audio clips depends on how much memory is... with your choice and exit to confirm, save your camcorder. Press the Up/Down button to record your photo. 1. Press the Up/Down button to open the Date Stamp submenu. 3. Date Stamp With this function, you ...may record the date and time on the photo when it is taken and when viewing the photos in Playback mode....
Press the OK button to select the Date Stamp menu. 2. Audio Mode You can record audio clips with the date stamp appearing on your audio clips depends on how much memory is... with your choice and exit to confirm, save your camcorder. Press the Up/Down button to record your photo. 1. Press the Up/Down button to open the Date Stamp submenu. 3. Date Stamp With this function, you ...may record the date and time on the photo when it is taken and when viewing the photos in Playback mode....
Camera Manual
Page 36
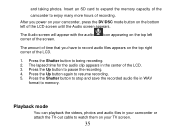
... enjoy many more hours of the screen. The Audio screen will appear with the audio corner of recording. Press the Shutter button to stop and save the recorded audio file in WAV format to pause the recording. 4. After you have to watch them on the bottom left The amount of time that you... power on your camcorder, press the DV/DSC mode button on your camcorder or attach the TV-out cable to record audio files appears on the top right corner of the LCD. 1. Playback mode You can playback the videos, photos and audio files in the center...
... enjoy many more hours of the screen. The Audio screen will appear with the audio corner of recording. Press the Shutter button to stop and save the recorded audio file in WAV format to pause the recording. 4. After you have to watch them on the bottom left The amount of time that you... power on your camcorder, press the DV/DSC mode button on your camcorder or attach the TV-out cable to record audio files appears on the top right corner of the LCD. 1. Playback mode You can playback the videos, photos and audio files in the center...
Camera Manual
Page 37
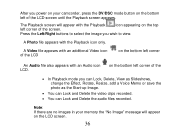
... a Voice Memo or save the photo as the Start-up Image. You can Lock and Delete the video clips recorded. You can Lock and Delete the audio files recorded. A Photo file appears with an Audio icon LCD. The Playback screen will appear on the LCD screen. 36 After you power...
... a Voice Memo or save the photo as the Start-up Image. You can Lock and Delete the video clips recorded. You can Lock and Delete the audio files recorded. A Photo file appears with an Audio icon LCD. The Playback screen will appear on the LCD screen. 36 After you power...

Camera Manual
Page 41
Press the MENU button. 2. Press the Up/Down button to confirm, save and delete all the unprotected files that are currently recorded on the memory card at once. 1. All 5. If Yes, press the OK button to select the Delete menu. 3. If you selected One and press the ...
Press the MENU button. 2. Press the Up/Down button to confirm, save and delete all the unprotected files that are currently recorded on the memory card at once. 1. All 5. If Yes, press the OK button to select the Delete menu. 3. If you selected One and press the ...
Camera Manual
Page 47
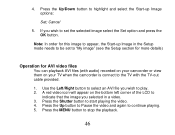
Press the Up/Down button to the TV with audio) recorded on your camcorder or view them on the bottom left corner of the LCD to indicate that the image you selected in the Setup mode ...
Press the Up/Down button to the TV with audio) recorded on your camcorder or view them on the bottom left corner of the LCD to indicate that the image you selected in the Setup mode ...

Camera Manual
Page 49
.... 13. Press the Up/Down button to select Yes to unlock or No to confirm, save and unprotect all the unprotected files that are currently recorded on the left hand side of the LCD for the image(s) selected. Press the MENU button. 2. Press the Up/Down button to exit. 10. Note...
.... 13. Press the Up/Down button to select Yes to unlock or No to confirm, save and unprotect all the unprotected files that are currently recorded on the left hand side of the LCD for the image(s) selected. Press the MENU button. 2. Press the Up/Down button to exit. 10. Note...

Camera Manual
Page 60
The TV slot is set to record, capture or playback mode, you want to record on the TV. Turn on the TV and the video...the pictures, video and audio clips stored in the video camcorder on the TV screen. 4. Install the Vivitar Experience Image Manager Software Warning: Do not plug your camcorder into your CD-ROM drive. Connecting the Camcorder... to a TV Connect the video camcorder to install and run the Vivitar Experience Image Manager software. 1. Insert the installation CD into the computer until the software installation is set to...
The TV slot is set to record, capture or playback mode, you want to record on the TV. Turn on the TV and the video...the pictures, video and audio clips stored in the video camcorder on the TV screen. 4. Install the Vivitar Experience Image Manager Software Warning: Do not plug your camcorder into your CD-ROM drive. Connecting the Camcorder... to a TV Connect the video camcorder to install and run the Vivitar Experience Image Manager software. 1. Insert the installation CD into the computer until the software installation is set to...

Camera Manual
Page 72
Memory Sensitivity Lens Digital Zoom Self-timer File Format White balance Exposure control Photo effect Language Burst TV out Microphone Speaker Recorder Interface System Requirements Battery Working Temperature Auto F=3.2 Fixed Focus 8x 2s/10s JPEG ( Still Image) /AVI ( Video) / WAV (Audio) Auto / Daylight / Tungsten / Fluorescent / Cloudy -2EV to +2EV in 0.3 counts Color/Sepia/Monochrome English, French, German, Italian, Spanish, Portuguese and Dutch Included NTSC / PAL YES YES YES USB 2.0 Windows XP, VISTA or MAC OS X 10.4.6 and higher 3*AAA (1.5V alkaline) 0 - 40° C 71
Memory Sensitivity Lens Digital Zoom Self-timer File Format White balance Exposure control Photo effect Language Burst TV out Microphone Speaker Recorder Interface System Requirements Battery Working Temperature Auto F=3.2 Fixed Focus 8x 2s/10s JPEG ( Still Image) /AVI ( Video) / WAV (Audio) Auto / Daylight / Tungsten / Fluorescent / Cloudy -2EV to +2EV in 0.3 counts Color/Sepia/Monochrome English, French, German, Italian, Spanish, Portuguese and Dutch Included NTSC / PAL YES YES YES USB 2.0 Windows XP, VISTA or MAC OS X 10.4.6 and higher 3*AAA (1.5V alkaline) 0 - 40° C 71
Camera Manual
Page 73
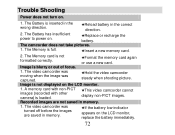
A memory card with non-PICT images (recorded with other camera) is full. ★Insert a new memory card. 2. Image is inserted in the wrong direction. ★Reload battery in memory. ★If the ... is not displayed on . ★Replace or recharge the battery. The camcorder does not take pictures. 1. The Memory card is blurry or out of focus. 1. Recorded images are saved in the correct direction. 2. The video camcorder was moving when the image was turned off before the images are not saved in...
A memory card with non-PICT images (recorded with other camera) is full. ★Insert a new memory card. 2. Image is inserted in the wrong direction. ★Reload battery in memory. ★If the ... is not displayed on . ★Replace or recharge the battery. The camcorder does not take pictures. 1. The Memory card is blurry or out of focus. 1. Recorded images are saved in the correct direction. 2. The video camcorder was moving when the image was turned off before the images are not saved in...


