Camera Manual
Page 2
... Video Camcorder 7 Preparing Your Camcorder for Use 8 Inserting an SD Memory Card 9 Maintenance and Care 11 DVR Function Control 12 Capturing Videos 15 Taking Photos 21 Audio Mode 34 Playback mode 35 Setup Mode 50 Connecting the Camcorder to a TV 59 Install the Vivitar Experience Image Manager Software 59 Connect your camcorder to the...
... Video Camcorder 7 Preparing Your Camcorder for Use 8 Inserting an SD Memory Card 9 Maintenance and Care 11 DVR Function Control 12 Capturing Videos 15 Taking Photos 21 Audio Mode 34 Playback mode 35 Setup Mode 50 Connecting the Camcorder to a TV 59 Install the Vivitar Experience Image Manager Software 59 Connect your camcorder to the...
Camera Manual
Page 3
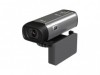
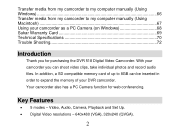
Key Features 5 modes - With your DVR camcorder. In addition, a SD compatible memory card of your camcorder you for web conferencing. Your camcorder also has a PC Camera function for purchasing the DVR 518 Digital Video Camcorder. Video, Audio, Camera, Playback and Set Up. Digital Video resolutions - 640x480 (VGA), 320x240 (QVGA). 2 Transfer media from my camcorder...
Key Features 5 modes - With your DVR camcorder. In addition, a SD compatible memory card of your camcorder you for web conferencing. Your camcorder also has a PC Camera function for purchasing the DVR 518 Digital Video Camcorder. Video, Audio, Camera, Playback and Set Up. Digital Video resolutions - 640x480 (VGA), 320x240 (QVGA). 2 Transfer media from my camcorder...
Camera Manual
Page 4
...(1024X768); VGA(640X480) 1.96" TFT LCD 8 X Digital Zoom Limited Internal Memory Supports external SD memory card up to or from your digital video camcorder includes Digital Video Camcorder USB cable 3 What your camcorder Vivitar Experience Image Manager software for uploading and managing photos and videos to 8GB...
...(1024X768); VGA(640X480) 1.96" TFT LCD 8 X Digital Zoom Limited Internal Memory Supports external SD memory card up to or from your digital video camcorder includes Digital Video Camcorder USB cable 3 What your camcorder Vivitar Experience Image Manager software for uploading and managing photos and videos to 8GB...

Camera Manual
Page 10
... order to capture and record many more media items. All the media in the built-in memory will not be inserted into your DVR camcorder. Inserting an SD Memory Card An SD compatible memory card of movies, photos and audio that can be captured before transferring them to 8GB (not included) should ...be lost if no SD Memory Card has been inserted in the DVR or when you change your batteries. We strongly recommend downloading your photos and videos regularly to your camcorder's power ...
... order to capture and record many more media items. All the media in the built-in memory will not be inserted into your DVR camcorder. Inserting an SD Memory Card An SD compatible memory card of movies, photos and audio that can be captured before transferring them to 8GB (not included) should ...be lost if no SD Memory Card has been inserted in the DVR or when you change your batteries. We strongly recommend downloading your photos and videos regularly to your camcorder's power ...
Camera Manual
Page 11
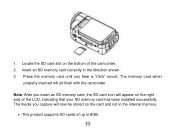
Press the memory card until you capture will now be stored on the right side of the LCD, indicating that your SD memory card has been installed successfully. Insert an SD memory card correctly in the internal memory. This product supports SD cards of the camcorder. 2. Note: After you insert an SD memory card, the SD card icon will sit flush with the camcorder. The memory card when properly inserted will appear on the card and not in the direction shown. 3. The media you hear a "Click" sound. Locate the SD card slot on the bottom of up to 8GB. 10 1.
Press the memory card until you capture will now be stored on the right side of the LCD, indicating that your SD memory card has been installed successfully. Insert an SD memory card correctly in the internal memory. This product supports SD cards of the camcorder. 2. Note: After you insert an SD memory card, the SD card icon will sit flush with the camcorder. The memory card when properly inserted will appear on the card and not in the direction shown. 3. The media you hear a "Click" sound. Locate the SD card slot on the bottom of up to 8GB. 10 1.

Camera Manual
Page 12
...fire, electrical shock or other liquids. Do not use the video camcorder in any way. Maintenance and repairs should be sure to format the card with wet hands. Use of power sources not expressly recommended for instruction on how to overheating, distortion of electric shock. • Use only ... to open the case of the video camcorder or attempt to modify this may lead to format the card). Formatting will delete all data on the SD Memory Card including protected data. Do not remove the SD memory Card during formatting as this video camcorder in the rain or snow.
...fire, electrical shock or other liquids. Do not use the video camcorder in any way. Maintenance and repairs should be sure to format the card with wet hands. Use of power sources not expressly recommended for instruction on how to overheating, distortion of electric shock. • Use only ... to open the case of the video camcorder or attempt to modify this may lead to format the card). Formatting will delete all data on the SD Memory Card including protected data. Do not remove the SD memory Card during formatting as this video camcorder in the rain or snow.

Camera Manual
Page 16
... turning on the bottom left corner of the LCD. 1. Capturing Videos In order to capture videos (with audio) using internal memory only. To change between the function modes on your DVR, press the DV/DSC button on your camcorder you wish to start shooting. 4. The video icon will appear on the top... GB to expand the memory capacity to capture even more and longer videos than can be captured using your camcorder the first mode to select the Video mode. The amount of the camcorder to capture. 3. Press the Shutter button on the LCD. 15 Use a compatible SD card of the video will ...
... turning on the bottom left corner of the LCD. 1. Capturing Videos In order to capture videos (with audio) using internal memory only. To change between the function modes on your DVR, press the DV/DSC button on your camcorder you wish to start shooting. 4. The video icon will appear on the top... GB to expand the memory capacity to capture even more and longer videos than can be captured using your camcorder the first mode to select the Video mode. The amount of the camcorder to capture. 3. Press the Shutter button on the LCD. 15 Use a compatible SD card of the video will ...
Camera Manual
Page 17
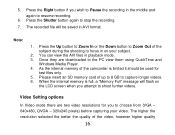
... to capture longer videos. 6. Press the Shutter button again to the PC view them using QuickTime and Windows Media Player. 4. Please insert an SD memory card of the video, however higher quality 16 5. Once they are two video resolutions for test files only. 5. When the internal... to resume recording. 6. Press the Right button if you to focus in AVI format. The recorded file will flash on your video. As the internal memory of the subject during the shooting to choose from (VGA - 640x480, QVGA - 320x240 pixels) before capturing your subject. 2. Press the Up button to...
... to capture longer videos. 6. Press the Shutter button again to the PC view them using QuickTime and Windows Media Player. 4. Please insert an SD memory card of the video, however higher quality 16 5. Once they are two video resolutions for test files only. 5. When the internal... to resume recording. 6. Press the Right button if you to focus in AVI format. The recorded file will flash on your video. As the internal memory of the subject during the shooting to choose from (VGA - 640x480, QVGA - 320x240 pixels) before capturing your subject. 2. Press the Up button to...

Camera Manual
Page 22
... Press the MENU button to revert back to the Video capture mode to the 21 The camcorder`s internal memory is limited per each resolution so it is recommended to insert a compatible SD card of the screen. Hold the camcorder steady and press the Shutter button on the bottom left corner of up... to 8GB in the LCD to expand the memory and capture many more memorable photos. menu. 6. Taking Photos After...
... Press the MENU button to revert back to the Video capture mode to the 21 The camcorder`s internal memory is limited per each resolution so it is recommended to insert a compatible SD card of the screen. Hold the camcorder steady and press the Shutter button on the bottom left corner of up... to 8GB in the LCD to expand the memory and capture many more memorable photos. menu. 6. Taking Photos After...

Camera Manual
Page 23
... light up more photos and videos. 6. Two LED white lamp lights will appear on the card. The number of the LCD Screen. memory. 3. Either download the photos to your computer using the Vivitar Experience Image Manager software as described below in the section "Transfer photos and videos to your ...computer" or insert an SD card to continue taking more memory on the LCD screen when you attempt to press the Shutter button to take...
... light up more photos and videos. 6. Two LED white lamp lights will appear on the card. The number of the LCD Screen. memory. 3. Either download the photos to your computer using the Vivitar Experience Image Manager software as described below in the section "Transfer photos and videos to your ...computer" or insert an SD card to continue taking more memory on the LCD screen when you attempt to press the Shutter button to take...
Camera Manual
Page 36
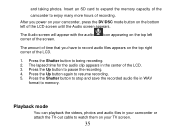
... bottom left The amount of the LCD. 3. and taking photos. icon appearing on the top right corner of the screen. Insert an SD card to expand the memory capacity of the LCD screen until the Audio screen appears. Press the Shutter button to record audio files appears on the top left of...
... bottom left The amount of the LCD. 3. and taking photos. icon appearing on the top right corner of the screen. Insert an SD card to expand the memory capacity of the LCD screen until the Audio screen appears. Press the Shutter button to record audio files appears on the top left of...

Camera Manual
Page 41
... Up/Down button to exit. 7. confirmation message will appear. Press the OK button to exit. 11. If Yes, press the OK button to free up memory. Press the Up/Down button to select Yes to delete or No to open the Delete submenu. 4. If you selected All and press the OK... delete unwanted photos, videos and audio files at any time to confirm, save and delete all the unprotected files that are currently recorded on the memory card at a time or delete all the 40 To unlock the file follow Steps 1 to select the Delete menu. 3. If the selected file is locked a "File...
... Up/Down button to exit. 7. confirmation message will appear. Press the OK button to exit. 11. If Yes, press the OK button to free up memory. Press the Up/Down button to select Yes to delete or No to open the Delete submenu. 4. If you selected All and press the OK... delete unwanted photos, videos and audio files at any time to confirm, save and delete all the unprotected files that are currently recorded on the memory card at a time or delete all the 40 To unlock the file follow Steps 1 to select the Delete menu. 3. If the selected file is locked a "File...

Camera Manual
Page 49
... an "Unprotect All?" Press the Up/Down button to select Yes to lock or No to exit. 13. Press the OK button to free up memory. Press the Up/Down button to select Yes to unlock or No to exit. 10. Note: After selecting your lock preference, the corresponding lock icon... appear with "Yes" and "No" options. 12. If you selected Lock All and press the OK button a "Protect All?" confirmation message will appear on the memory card at any time to confirm, save and unprotect all the previously protected images. Press the OK button to select the Delete menu. 48 Delete You...
... an "Unprotect All?" Press the Up/Down button to select Yes to lock or No to exit. 13. Press the OK button to free up memory. Press the Up/Down button to select Yes to unlock or No to exit. 10. Note: After selecting your lock preference, the corresponding lock icon... appear with "Yes" and "No" options. 12. If you selected Lock All and press the OK button a "Protect All?" confirmation message will appear on the memory card at any time to confirm, save and unprotect all the previously protected images. Press the OK button to select the Delete menu. 48 Delete You...

Camera Manual
Page 58
... Press the MENU button to save your choice. 8. If you desire. If you selected in internal memory or the SD memory card. If you select the My Image option, the photo that you select the System option, the Vivitar system graphic will appear on power on . 6. Press the Up/Down button and select the... select the Format option from the menu. 2. Press the Right button to download the images first before using this function will be erased from the card and internal memory. 1.
... Press the MENU button to save your choice. 8. If you desire. If you selected in internal memory or the SD memory card. If you select the My Image option, the photo that you select the System option, the Vivitar system graphic will appear on power on . 6. Press the Up/Down button and select the... select the Format option from the menu. 2. Press the Right button to download the images first before using this function will be erased from the card and internal memory. 1.

Camera Manual
Page 71
... in the US please call 1-800-592-9541, in the UK call from anywhere else, please visit www.vivitar.com for ? Technical Specifications Image Resolution Video Resolution LCD Display Focus range Shutter Internal Memory External 8M(3264X2448); 5M(2592X1944); 3M(2048X1536); 1M(1024X768); QVGA: 320*240 (15 / 30fps ) 1.... to 8 GB 70 If you are looking for your questions. TECHNICAL SUPPORT: For technical support issues please visit our website at support@vivitar.com and one of our technical support team members will answer your local toll free number. Can't find manuals, software and FAQ's ...
... in the US please call 1-800-592-9541, in the UK call from anywhere else, please visit www.vivitar.com for ? Technical Specifications Image Resolution Video Resolution LCD Display Focus range Shutter Internal Memory External 8M(3264X2448); 5M(2592X1944); 3M(2048X1536); 1M(1024X768); QVGA: 320*240 (15 / 30fps ) 1.... to 8 GB 70 If you are looking for your questions. TECHNICAL SUPPORT: For technical support issues please visit our website at support@vivitar.com and one of our technical support team members will answer your local toll free number. Can't find manuals, software and FAQ's ...
Camera Manual
Page 73
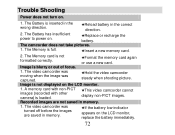
... the battery immediately. 72 Image is loaded. ★This video camcorder cannot display non-PICT images. Recorded images are saved in memory. ★If the battery low indicator appears on the LCD monitor. 1. Trouble Shooting Power does not turn on . ★...camcorder steady when shooting picture. A memory card with non-PICT images (recorded with other camera) is blurry or out of focus. 1. The Memory is not formatted correctly. ★Format the memory card again or use a new card. The Memory card is full. ★Insert a new memory card. 2. Image is inserted in ...
... the battery immediately. 72 Image is loaded. ★This video camcorder cannot display non-PICT images. Recorded images are saved in memory. ★If the battery low indicator appears on the LCD monitor. 1. Trouble Shooting Power does not turn on . ★...camcorder steady when shooting picture. A memory card with non-PICT images (recorded with other camera) is blurry or out of focus. 1. The Memory is not formatted correctly. ★Format the memory card again or use a new card. The Memory card is full. ★Insert a new memory card. 2. Image is inserted in ...


