v2 Camera Manual
Page 1
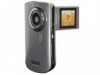
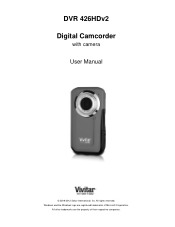
DVR 426HDv2 Digital Camcorder with camera User Manual © 2009-2012 Sakar International, Inc. Windows and the Windows logo are the property of Microsoft Corporation. All other trademarks are registered trademarks of their respective companies. All rights reserved.
DVR 426HDv2 Digital Camcorder with camera User Manual © 2009-2012 Sakar International, Inc. Windows and the Windows logo are the property of Microsoft Corporation. All other trademarks are registered trademarks of their respective companies. All rights reserved.
v2 Camera Manual
Page 2
Contents Introduction ...2 What's Included...2 Parts of the Camcorder ...3 Initial Camcorder Setup ...4 Main Camcorder Modes ...7 Camcorder Technical Specifications 8 Computer System Requirements - Windows 9 Computer System Requirements - Macintosh 9 Powering ON/OFF Your Digital Video Recorder 10 Changing Camcorder Mode ...11 Navigating the Menus...12 Video Capture Mode ...13 Video Playback Mode...17 Photo Capture Mode ...21 Photo Playback Mode ...25...
Contents Introduction ...2 What's Included...2 Parts of the Camcorder ...3 Initial Camcorder Setup ...4 Main Camcorder Modes ...7 Camcorder Technical Specifications 8 Computer System Requirements - Windows 9 Computer System Requirements - Macintosh 9 Powering ON/OFF Your Digital Video Recorder 10 Changing Camcorder Mode ...11 Navigating the Menus...12 Video Capture Mode ...13 Video Playback Mode...17 Photo Capture Mode ...21 Photo Playback Mode ...25...
v2 Camera Manual
Page 3
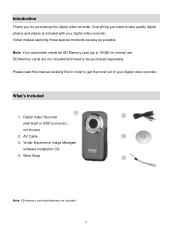
... for normal use. What's Included 1. Note: Your camcorder needs an SD Memory card (up to 16GB) for purchasing this manual carefully first in USB Connector, not shown) 2. Digital Video Recorder (with your digital video recorder. Vivitar makes capturing those special moments as easy as possible. AV Cable 3. Vivitar Experience Image Manager software Installation CD 4. Introduction...
... for normal use. What's Included 1. Note: Your camcorder needs an SD Memory card (up to 16GB) for purchasing this manual carefully first in USB Connector, not shown) 2. Digital Video Recorder (with your digital video recorder. Vivitar makes capturing those special moments as easy as possible. AV Cable 3. Vivitar Experience Image Manager software Installation CD 4. Introduction...
v2 Camera Manual
Page 6
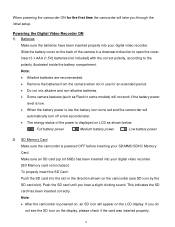
...correctly. Note: Alkaline batteries are recommended. Remove the batteries from the camera when not in use for the first time the camcorder will automatically turn off a few seconds later. The energy status of the camera in some models) will not work if the battery power... recorder. (SD Memory card not included.) To properly insert the SD Card: Push the SD card into your digital video recorder. When powering the camcorder ON for an extended period. Do not mix alkaline and non-alkaline batteries. Some camera features (such as shown below:...
...correctly. Note: Alkaline batteries are recommended. Remove the batteries from the camera when not in use for the first time the camcorder will automatically turn off a few seconds later. The energy status of the camera in some models) will not work if the battery power... recorder. (SD Memory card not included.) To properly insert the SD Card: Push the SD card into your digital video recorder. When powering the camcorder ON for an extended period. Do not mix alkaline and non-alkaline batteries. Some camera features (such as shown below:...
v2 Camera Manual
Page 7
Select the language of the SD card). Setting the Camcorder Language You will appear. The Language selection menu will first be prompted to select a language for the camcorder. If the SD card is not locked (check the lock switch on the camcorder. Make sure the SD card is locked this will prevent the camcorder from saving captured photos to the SD card. 3) Power On Press and hold the POWER button to turn on the side of your choice and press the Shutter/OK button to confirm the selection. Your digital video recorder is now ready to begin capturing videos and photos. 6
Select the language of the SD card). Setting the Camcorder Language You will appear. The Language selection menu will first be prompted to select a language for the camcorder. If the SD card is not locked (check the lock switch on the camcorder. Make sure the SD card is locked this will prevent the camcorder from saving captured photos to the SD card. 3) Power On Press and hold the POWER button to turn on the side of your choice and press the Shutter/OK button to confirm the selection. Your digital video recorder is now ready to begin capturing videos and photos. 6
v2 Camera Manual
Page 8
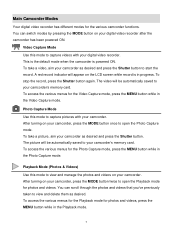
... capture pictures with your digital video recorder after the camcorder has been powered ON. This is the default mode when the camcorder is in progress. You can switch modes by pressing the MODE button on your camcorder's memory card. Main Camcorder Modes Your digital video recorder has different... videos, press the MENU button while in the Playback mode. 7 To access the various menus for the various camcorder functions. After turning on your digital video recorder. The picture will be automatically saved to view and delete them as desired and press the Shutter button...
... capture pictures with your digital video recorder after the camcorder has been powered ON. This is the default mode when the camcorder is in progress. You can switch modes by pressing the MODE button on your camcorder's memory card. Main Camcorder Modes Your digital video recorder has different... videos, press the MENU button while in the Playback mode. 7 To access the various menus for the various camcorder functions. After turning on your digital video recorder. The picture will be automatically saved to view and delete them as desired and press the Shutter button...
v2 Camera Manual
Page 9
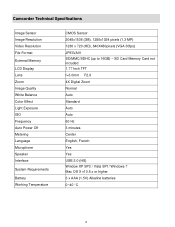
... not included 1.77 Inch TFT f=3.0mm F2.8 4X Digital Zoom Normal Auto Standard Auto Auto 60 Hz 3 minutes Center English, French Yes Yes USB 2.0 (HS) Window XP SP3 / Vista SP1/ Windows 7 Mac OS X v10.5.x or higher 3 x AAA (1.5V) Alkaline batteries 0~40 C 8 Camcorder Technical Specifications Image Sensor Image Resolution Video Resolution File...
... not included 1.77 Inch TFT f=3.0mm F2.8 4X Digital Zoom Normal Auto Standard Auto Auto 60 Hz 3 minutes Center English, French Yes Yes USB 2.0 (HS) Window XP SP3 / Vista SP1/ Windows 7 Mac OS X v10.5.x or higher 3 x AAA (1.5V) Alkaline batteries 0~40 C 8 Camcorder Technical Specifications Image Sensor Image Resolution Video Resolution File...
v2 Camera Manual
Page 11
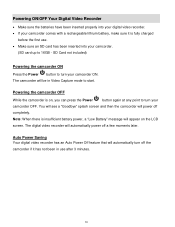
... Make sure the batteries have been inserted properly into your camcorder. (SD card up to 16GB - Powering the camcorder OFF While the camcorder is fully charged before the first use after 3 minutes. 10 Auto Power Saving Your digital video recorder has an Auto Power Off feature that will automatically... battery power, a "Low Battery" message will be in use . Make sure an SD card has been inserted into your digital video recorder. If your camcorder comes with a rechargeable lithium battery, make sure it has not been in Video Capture mode to turn your...
... Make sure the batteries have been inserted properly into your camcorder. (SD card up to 16GB - Powering the camcorder OFF While the camcorder is fully charged before the first use after 3 minutes. 10 Auto Power Saving Your digital video recorder has an Auto Power Off feature that will automatically... battery power, a "Low Battery" message will be in use . Make sure an SD card has been inserted into your digital video recorder. If your camcorder comes with a rechargeable lithium battery, make sure it has not been in Video Capture mode to turn your...
v2 Camera Manual
Page 12
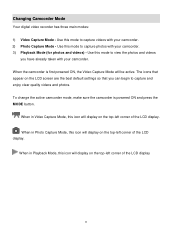
...your camcorder. 3) Playback Mode (for photos and videos) - When in Video Capture Mode, this mode to capture videos with your camcorder.... When in Photo Capture Mode, this icon will display on the LCD screen are the best default settings so that appear on the top-left corner of the LCD display. When the camcorder... is powered ON and press the MODE button. To change the active camcorder mode, make sure the camcorder is ...will be active. Use this mode to capture photos with your camcorder. 2) Photo Capture Mode - Use this mode to view ...
...your camcorder. 3) Playback Mode (for photos and videos) - When in Video Capture Mode, this mode to capture videos with your camcorder.... When in Photo Capture Mode, this icon will display on the LCD screen are the best default settings so that appear on the top-left corner of the LCD display. When the camcorder... is powered ON and press the MODE button. To change the active camcorder mode, make sure the camcorder is ...will be active. Use this mode to capture photos with your camcorder. 2) Photo Capture Mode - Use this mode to view ...

v2 Camera Manual
Page 14
...the LCD display to direct the camcorder at the lens, then click the Shutter button to begin to appear on the top right corner of time that you to capture videos with your videos using the iTwist Flip Screen. Make sure you can also capture your digital video recorder. Note: The ...amount of recording time available for the resolution selected appears on the LCD screen, look at the scene you . Remember, the amount of the LCD screen and a red indicator will display by default. W/Zoom Out buttons to better set the camcorder display if ...
...the LCD display to direct the camcorder at the lens, then click the Shutter button to begin to appear on the top right corner of time that you to capture videos with your videos using the iTwist Flip Screen. Make sure you can also capture your digital video recorder. Note: The ...amount of recording time available for the resolution selected appears on the LCD screen, look at the scene you . Remember, the amount of the LCD screen and a red indicator will display by default. W/Zoom Out buttons to better set the camcorder display if ...
v2 Camera Manual
Page 18
... to exit the menu and return to your previous mode. 8) Remember that you've already taken with your digital video recorder. When you first turn on the camcorder, the camcorder will be in Playback mode, press the LEFT or RIGHT direction button to scroll through the images on Your... Digital Video Recorder 1) Select your Video: Once in Video Capture mode by your selected Video: Press the ...
... to exit the menu and return to your previous mode. 8) Remember that you've already taken with your digital video recorder. When you first turn on the camcorder, the camcorder will be in Playback mode, press the LEFT or RIGHT direction button to scroll through the images on Your... Digital Video Recorder 1) Select your Video: Once in Video Capture mode by your selected Video: Press the ...
v2 Camera Manual
Page 20
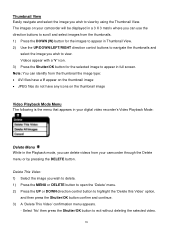
...61623; JPEG files do not have any icons on the thumbnail image Video Playback Mode Menu The following is the menu that appears in your camcorder through the Delete menu or by using the Thumbnail View. Select 'No' then press the Shutter/OK button to appear in full screen. ...Videos appear with a 'V' icon. 3) Press the Shutter/OK button for the images to appear in the Playback mode, you can identify from your digital video recorder's Video Playback Mode: Delete Menu While in Thumbnail View. 2) Use the UP/DOWN/LEFT/RIGHT direction control buttons to navigate the thumbnails and...
...61623; JPEG files do not have any icons on the thumbnail image Video Playback Mode Menu The following is the menu that appears in your camcorder through the Delete menu or by using the Thumbnail View. Select 'No' then press the Shutter/OK button to appear in full screen. ...Videos appear with a 'V' icon. 3) Press the Shutter/OK button for the images to appear in the Playback mode, you can identify from your digital video recorder's Video Playback Mode: Delete Menu While in Thumbnail View. 2) Use the UP/DOWN/LEFT/RIGHT direction control buttons to navigate the thumbnails and...
v2 Camera Manual
Page 22
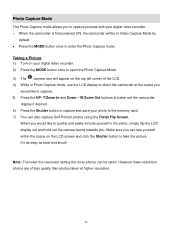
... higher resolution. 21 Photo Capture Mode The Photo Capture mode allows you to capture pictures with your digital video recorder. When the camcorder is first powered ON, the camcorder will appear on the LCD screen and click the Shutter button to capture. 5) Press the UP- W/Zoom Out buttons ...to better set the camcorder display if desired. 6) Press the Shutter button to capture and save your digital video recorder. 2) Press the MODE button once to open the Photo Capture Mode. 3) The camera icon will...
... higher resolution. 21 Photo Capture Mode The Photo Capture mode allows you to capture pictures with your digital video recorder. When the camcorder is first powered ON, the camcorder will appear on the LCD screen and click the Shutter button to capture. 5) Press the UP- W/Zoom Out buttons ...to better set the camcorder display if desired. 6) Press the Shutter button to capture and save your digital video recorder. 2) Press the MODE button once to open the Photo Capture Mode. 3) The camera icon will...
v2 Camera Manual
Page 25
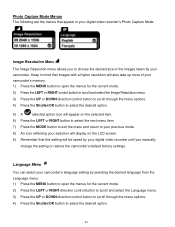
... the menu and return to select the desired option. 24 Keep in your digital video recorder's Photo Capture Mode: Image Resolution Menu The Image Resolution menu allows you manually change the setting or restore the camcorder's default factory settings. Photo Capture Mode Menus The following are the menus that... appear in mind that images with a higher resolution will also take up more of the images taken by your digital video recorder until you to choose the desired size of your camcorder's memory. 1) Press the MENU button to open the menus for the current mode. 2) Press the LEFT or...
... the menu and return to select the desired option. 24 Keep in your digital video recorder's Photo Capture Mode: Image Resolution Menu The Image Resolution menu allows you manually change the setting or restore the camcorder's default factory settings. Photo Capture Mode Menus The following are the menus that... appear in mind that images with a higher resolution will also take up more of the images taken by your digital video recorder until you to choose the desired size of your camcorder's memory. 1) Press the MENU button to open the menus for the current mode. 2) Press the LEFT or...
v2 Camera Manual
Page 26
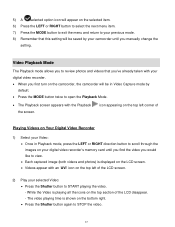
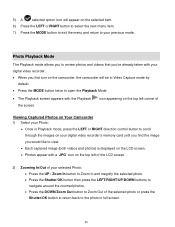
Photo Playback Mode The Playback mode allows you to review photos and videos that you've already taken with your digital video recorder. When you would like to view. Each captured image (both videos and photos) is displayed on the LCD screen. Photos ... to select the next menu item. 7) Press the MODE button to exit the menu and return to your digital video recorder's memory card until you find the image you first turn on the camcorder, the camcorder will be in Video Capture mode by default. Press the MODE button twice to open the...
Photo Playback Mode The Playback mode allows you to review photos and videos that you've already taken with your digital video recorder. When you would like to view. Each captured image (both videos and photos) is displayed on the LCD screen. Photos ... to select the next menu item. 7) Press the MODE button to exit the menu and return to your digital video recorder's memory card until you find the image you first turn on the camcorder, the camcorder will be in Video Capture mode by default. Press the MODE button twice to open the...
v2 Camera Manual
Page 27
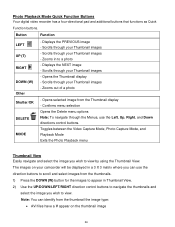
... (W) button for the images to appear in to view by using the Thumbnail View. Scrolls through your camcorder will be displayed in a 3 X 3 matrix where you wish to a photo - Photo Playback Mode Quick Function Buttons Your digital video recorder has a four-directional pad and additional buttons that functions as Quick Function buttons. Opens...
... (W) button for the images to appear in to view by using the Thumbnail View. Scrolls through your camcorder will be displayed in a 3 X 3 matrix where you wish to a photo - Photo Playback Mode Quick Function Buttons Your digital video recorder has a four-directional pad and additional buttons that functions as Quick Function buttons. Opens...
v2 Camera Manual
Page 28
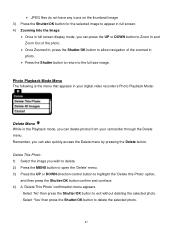
... can also quickly access the Delete menu by pressing the Delete button. Photo Playback Mode Menu The following is the menu that appears in your camcorder through the Delete menu. Remember, you wish to delete. 2) Press the MENU button to open the 'Delete' menu. 3) Press the UP or DOWN... direction control button to the full size image. Delete This Photo: 1) Select the image you can delete photos from your digital video recorder's Photo Playback Mode: Delete Menu While in photo. Press the Shutter button to return to highlight the 'Delete this Photo' option,...
... can also quickly access the Delete menu by pressing the Delete button. Photo Playback Mode Menu The following is the menu that appears in your camcorder through the Delete menu. Remember, you wish to delete. 2) Press the MENU button to open the 'Delete' menu. 3) Press the UP or DOWN... direction control button to the full size image. Delete This Photo: 1) Select the image you can delete photos from your digital video recorder's Photo Playback Mode: Delete Menu While in photo. Press the Shutter button to return to highlight the 'Delete this Photo' option,...
v2 Camera Manual
Page 31
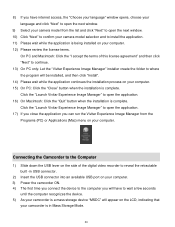
...to continue. 13) On PC only: Let the "Vivitar Experience Image Manager" installer create the folder to where the program will appear on the LCD, indicating that your camcorder is in USB connector. 2) Insert the USB connector ... device to the computer you have to wait a few seconds until the computer recognizes the device. 5) As your camcorder is a mass storage device "MSDC" will be installed, and then click "Install". 14) Please wait while the...terms. On PC and Macintosh: Click the "I accept the terms of the digital video recorder to reveal the retractable built -in Mass Storage Mode. 30
...to continue. 13) On PC only: Let the "Vivitar Experience Image Manager" installer create the folder to where the program will appear on the LCD, indicating that your camcorder is in USB connector. 2) Insert the USB connector ... device to the computer you have to wait a few seconds until the computer recognizes the device. 5) As your camcorder is a mass storage device "MSDC" will be installed, and then click "Install". 14) Please wait while the...terms. On PC and Macintosh: Click the "I accept the terms of the digital video recorder to reveal the retractable built -in Mass Storage Mode. 30
v2 Camera Manual
Page 35
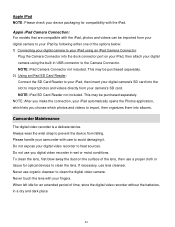
...Reader not included. Please handle your camcorder with care to prevent the device from falling. Never use lens cleanser. Never touch the lens with your device packaging for compatibility with the iPad, photos and videos can be imported from your digital video recorder to import, then ...using an iPad Camera Connector: Plug the Camera Connector into the dock connector port on your iPad, then attach your digital camera's SD card into albums. Camcorder Maintenance The digital video recorder is a delicate device. NOTE: After you make the connection, your iPad by following either one of...
...Reader not included. Please handle your camcorder with care to prevent the device from falling. Never use lens cleanser. Never touch the lens with your device packaging for compatibility with the iPad, photos and videos can be imported from your digital video recorder to import, then ...using an iPad Camera Connector: Plug the Camera Connector into the dock connector port on your iPad, then attach your digital camera's SD card into albums. Camcorder Maintenance The digital video recorder is a delicate device. NOTE: After you make the connection, your iPad by following either one of...


