
Warranty
Page 1
... material and workmanship for parts or labor. TIME PERIOD OF THIS WARRANTY The time period of this product which result from accident, abuse, misuse, failure to operate the product in accordance with relevant instructions, neglect, immersion in or exposure to be free of defects in this ..., use or inability to use this quality product to chemicals or liquids, extremes of climate, fungus, excessive wear and tear/cosmetic damage and defects resulting from the date of purchase. This warranty shall not extend to you. -1- During the period, Vivitar will repair or replace the product at...
... material and workmanship for parts or labor. TIME PERIOD OF THIS WARRANTY The time period of this product which result from accident, abuse, misuse, failure to operate the product in accordance with relevant instructions, neglect, immersion in or exposure to be free of defects in this ..., use or inability to use this quality product to chemicals or liquids, extremes of climate, fungus, excessive wear and tear/cosmetic damage and defects resulting from the date of purchase. This warranty shall not extend to you. -1- During the period, Vivitar will repair or replace the product at...
Warranty
Page 2
... our website www.vivitar.com TECHNICAL SUPPORT support team members will be not faulty or the defect is complete, the product will answer your problem. If you shipping prepaid. For phone support in the US please call 0800 917 4831. Package the product and relevant accessories carefully, using ample padding materials...-592-9541, in transit. In the event the product is deemed to : (in the U.S.): Vivitar Attn: Technical Support 195 Carter Drive Edison NJ 08817 (in the U.K.) Sakar UK 2D Siskin Parkway East CV3 4PE, UK When service is a result in package: a) Evidence of date...
... our website www.vivitar.com TECHNICAL SUPPORT support team members will be not faulty or the defect is complete, the product will answer your problem. If you shipping prepaid. For phone support in the US please call 0800 917 4831. Package the product and relevant accessories carefully, using ample padding materials...-592-9541, in transit. In the event the product is deemed to : (in the U.S.): Vivitar Attn: Technical Support 195 Carter Drive Edison NJ 08817 (in the U.K.) Sakar UK 2D Siskin Parkway East CV3 4PE, UK When service is a result in package: a) Evidence of date...
CV-1025 Manual
Page 2
... The time period of this warranty starts from the purchase, use or inability to use this product even if Vivitar has been advised of such damages. During the period, Vivitar will repair or replace the product at no charge for any incidental or consequential damages arising from... operate the product in accordance with relevant instructions, neglect, immersion in material and workmanship for a period of one year from other extraneous causes such as unauthorised disassembly, repair or modification. WHAT IS NOT COVERED BY THIS WARRANTY No express or implied warranty is made for parts ...
... The time period of this warranty starts from the purchase, use or inability to use this product even if Vivitar has been advised of such damages. During the period, Vivitar will repair or replace the product at no charge for any incidental or consequential damages arising from... operate the product in accordance with relevant instructions, neglect, immersion in material and workmanship for a period of one year from other extraneous causes such as unauthorised disassembly, repair or modification. WHAT IS NOT COVERED BY THIS WARRANTY No express or implied warranty is made for parts ...
CV-1025 Manual
Page 3
... and place of your problem. STEP 3. In the event the product is deemed to be not faulty or the defect is complete, the product will be returned to you specific legal rights. For more information visit our website www.vivitar.com -2- Return item ...(insured) to State thereof. You may levy a handling charge for example, a copy of original purchase (for the return ofthe product. WHAT TO DO WHEN SERVICE IS NEEDED STEP 1. Package the product and relevant accessories carefully, using...
... and place of your problem. STEP 3. In the event the product is deemed to be not faulty or the defect is complete, the product will be returned to you specific legal rights. For more information visit our website www.vivitar.com -2- Return item ...(insured) to State thereof. You may levy a handling charge for example, a copy of original purchase (for the return ofthe product. WHAT TO DO WHEN SERVICE IS NEEDED STEP 1. Package the product and relevant accessories carefully, using...
CV-1025 Manual
Page 4
Table of Contents What your camera includes 4 Computer System Requirements 4 A Quick Look at Your Camera 5 Preparing Your Camera for Use 6 Starting Your Camera...7 The Camera's Modes...8 Operating Your Camera 9 Software & Camera Driver Installation 14 Downloading Photos 19 Appendix A: Technical Speci cations 21 -3-
Table of Contents What your camera includes 4 Computer System Requirements 4 A Quick Look at Your Camera 5 Preparing Your Camera for Use 6 Starting Your Camera...7 The Camera's Modes...8 Operating Your Camera 9 Software & Camera Driver Installation 14 Downloading Photos 19 Appendix A: Technical Speci cations 21 -3-
CV-1025 Manual
Page 5
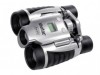
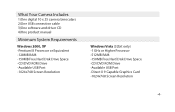
What Your Camera Includes 1)One digital 10 x 25 camera binoculars 2)One USB connection cable 3)One software and driver CD 4)One product manual Minimum System Requirements Windows 2000, XP -Pentium III Processor or Equivalent -128MB RAM -150MB Free Hard Disk Drive Space -CD/DVD ROM Drive -Available USB Port -1024x768 Screen Resolution Windows Vista (32bit only) -1 GHz or Higher Processor -512MB RAM -150MB Free Hard Disk Drive Space -CD/DVD ROM Drive -Available USB Port -Direct X 9 Capable Graphics Card -1024x768 Screen Resolution -4-
What Your Camera Includes 1)One digital 10 x 25 camera binoculars 2)One USB connection cable 3)One software and driver CD 4)One product manual Minimum System Requirements Windows 2000, XP -Pentium III Processor or Equivalent -128MB RAM -150MB Free Hard Disk Drive Space -CD/DVD ROM Drive -Available USB Port -1024x768 Screen Resolution Windows Vista (32bit only) -1 GHz or Higher Processor -512MB RAM -150MB Free Hard Disk Drive Space -CD/DVD ROM Drive -Available USB Port -Direct X 9 Capable Graphics Card -1024x768 Screen Resolution -4-
CV-1025 Manual
Page 6
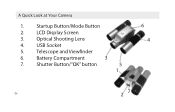
Optical Shooting Lens 4 4. USB Socket 5. Telescope and View nder 6. LCD Display Screen 3. Shutter Button/"OK" button 5 1 -5- 27 Battery Compartment 3 7. A Quick Look at Your Camera 1. Startup Button/Mode Button 6 2.
Optical Shooting Lens 4 4. USB Socket 5. Telescope and View nder 6. LCD Display Screen 3. Shutter Button/"OK" button 5 1 -5- 27 Battery Compartment 3 7. A Quick Look at Your Camera 1. Startup Button/Mode Button 6 2.
CV-1025 Manual
Page 7
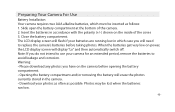
... LCD display screen will display "Lo" and then automatically switch o . Slide open the battery compartment at the bottom of the cover. 3. Photos may be inserted as possible. Preparing Your Camera For Use Battery Installation Your camera requires two AAA alkaline batteries, which case you will erase the photos currently stored in the camera. • Download your photos as often as follows: 1.
... LCD display screen will display "Lo" and then automatically switch o . Slide open the battery compartment at the bottom of the cover. 3. Photos may be inserted as possible. Preparing Your Camera For Use Battery Installation Your camera requires two AAA alkaline batteries, which case you will erase the photos currently stored in the camera. • Download your photos as often as follows: 1.
CV-1025 Manual
Page 8
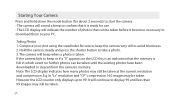
...images may still be taken at the current resolution and compression. However the LCD counter only displays up to take a photo. 3. Starting Your Camera Press and hold down the mode button (for about 2 seconds) to start the camera. • The camera will sound a beep to confirm that it becomes necessary to download...to display 99 until the existing photos have been downloaded or cleared from the camera's memory. If the camera fails to beep or if a "0" appears on the LCD this is an indication that can be taken before it is ready for use. • The LCD display will indicate the ...
...images may still be taken at the current resolution and compression. However the LCD counter only displays up to take a photo. 3. Starting Your Camera Press and hold down the mode button (for about 2 seconds) to start the camera. • The camera will sound a beep to confirm that it becomes necessary to download...to display 99 until the existing photos have been downloaded or cleared from the camera's memory. If the camera fails to beep or if a "0" appears on the LCD this is an indication that can be taken before it is ready for use. • The LCD display will indicate the ...

CV-1025 Manual
Page 9
St..turns on the screen, it indicates the number of photos remaining to take. OFF..turns your camera is turned on, you will see the following symbols on the LCD display screen: When you have taken Hr..high resolution mode Lr..low resolution mode F5..light frequency 50Hz F6..light frequency 60Hz -8- The Camera's Modes When your camera o . CP..turns on compression nP..no compression AI..record video CL..clears the last photo you have taken CA..clears all the photos you see a number on the self timer Ct..Continuous shooting mode.
St..turns on the screen, it indicates the number of photos remaining to take. OFF..turns your camera is turned on, you will see the following symbols on the LCD display screen: When you have taken Hr..high resolution mode Lr..low resolution mode F5..light frequency 50Hz F6..light frequency 60Hz -8- The Camera's Modes When your camera o . CP..turns on compression nP..no compression AI..record video CL..clears the last photo you have taken CA..clears all the photos you see a number on the self timer Ct..Continuous shooting mode.
CV-1025 Manual
Page 12
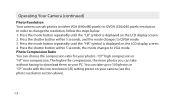
Operating Your Camera (continued) Photo Resolution Your camera can tak photos in "CP" mode with the low resolution (LR) setting preset on your camera (see the photo resolution section above). -11- In order to your photos -"CP" high compression or "nP" non compression. Press the shutter button within 5 seconds, ... repeatedly until the "LR" symbol is displayed on the LCD display screen. 2. The higher the compression, the more photos you can take without having to download them to change the resolution, follow the steps below: 1.
Operating Your Camera (continued) Photo Resolution Your camera can tak photos in "CP" mode with the low resolution (LR) setting preset on your camera (see the photo resolution section above). -11- In order to your photos -"CP" high compression or "nP" non compression. Press the shutter button within 5 seconds, ... repeatedly until the "LR" symbol is displayed on the LCD display screen. 2. The higher the compression, the more photos you can take without having to download them to change the resolution, follow the steps below: 1.
CV-1025 Manual
Page 13
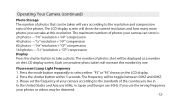
...current resolution and how many more photos you can take a photo. Please set the frequency of your camera according to the resolution and compression ratio of the photos. If you live in Japan and Europe use the wrong frequency your camera can store is: 20 photos --- "Lr" resolution + "CP" ...Frequency 1. The frequency will vary according to the standards of photos your photos or videos may be displayed as a number on the LCD display. 2. In the United States and Asia use 60Hz, in . Operating Your Camera (continued) Photo Storage The number of photos that can be taken will be ...
...current resolution and how many more photos you can take a photo. Please set the frequency of your camera according to the resolution and compression ratio of the photos. If you live in Japan and Europe use the wrong frequency your camera can store is: 20 photos --- "Lr" resolution + "CP" ...Frequency 1. The frequency will vary according to the standards of photos your photos or videos may be displayed as a number on the LCD display. 2. In the United States and Asia use 60Hz, in . Operating Your Camera (continued) Photo Storage The number of photos that can be taken will be ...

CV-1025 Manual
Page 14
Once recording gets started, It will blink at the same time. Press the shutter button to start recording, the LCD will not stop recording until you release the shutter button or the "number of photos" remaining turns to select the A1 symbol on the LCD display screen. Notes: move your hands slowly and smoothly during the recording course. -13- Operating Your Camera (continued) Video Recording Mode Press the mode button repeatedly to "00".
Once recording gets started, It will blink at the same time. Press the shutter button to start recording, the LCD will not stop recording until you release the shutter button or the "number of photos" remaining turns to select the A1 symbol on the LCD display screen. Notes: move your hands slowly and smoothly during the recording course. -13- Operating Your Camera (continued) Video Recording Mode Press the mode button repeatedly to "00".
CV-1025 Manual
Page 15
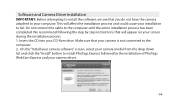
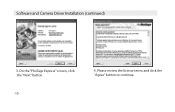
On the "Install your camera software" screen, select your camera model from the drop down list and click the "Install" button to install PhoTags Express followed by step instructions that will a ect the installation process and could cause your camera driver. -14- Software and Camera Driver Installation IMPORTANT: Before attempting to install the software, ensure that you do not have the camera attached to your CD-Rom drive. Insert the...
On the "Install your camera software" screen, select your camera model from the drop down list and click the "Install" button to install PhoTags Express followed by step instructions that will a ect the installation process and could cause your camera driver. -14- Software and Camera Driver Installation IMPORTANT: Before attempting to install the software, ensure that you do not have the camera attached to your CD-Rom drive. Insert the...
CV-1025 Manual
Page 16
Please review the license terms and click the "Agree" button to continue. Software and Camera Driver Installation (continued) 3. On the "PhoTags Express" screen, click the "Next" button. -15- 4.
Please review the license terms and click the "Agree" button to continue. Software and Camera Driver Installation (continued) 3. On the "PhoTags Express" screen, click the "Next" button. -15- 4.

CV-1025 Manual
Page 17
Software and Camera Driver Installation (continued) 5. Click "Finish" to , and then click "Install" 6. Let the "PhoTags Express" installer create the folder where the program will be installed to let the "PhoTags Express" installer nish the installation program. -16-
Software and Camera Driver Installation (continued) 5. Click "Finish" to , and then click "Install" 6. Let the "PhoTags Express" installer create the folder where the program will be installed to let the "PhoTags Express" installer nish the installation program. -16-

CV-1025 Manual
Page 18
Click "Next" to restart your computer. Once the program has nished installing you will automatically launch the Install shield for the camera driver. This will have successfully installed the "PhoTags Express" software, the "PhoTags WebCam Express" program and the camera's driver. -17- Congratulations!! You have to continue. 8. Software and Camera Driver Installation (continued) 7.
Click "Next" to restart your computer. Once the program has nished installing you will automatically launch the Install shield for the camera driver. This will have successfully installed the "PhoTags Express" software, the "PhoTags WebCam Express" program and the camera's driver. -17- Congratulations!! You have to continue. 8. Software and Camera Driver Installation (continued) 7.
CV-1025 Manual
Page 19
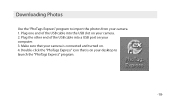
Plug one end of the USB cable into the USB slot on . 4. Downloading Photos Use the "PhoTags Express" program to launch the "PhoTags Express" program. -18- Make sure that is connected and turned on your camera. 1. Double-click the "PhoTags Express" icon that your camera is on your computer. 3. Plug the other end of the USB cable into a USB port on your desktop to import the photos from your camera. 2.
Plug one end of the USB cable into the USB slot on . 4. Downloading Photos Use the "PhoTags Express" program to launch the "PhoTags Express" program. -18- Make sure that is connected and turned on your camera. 1. Double-click the "PhoTags Express" icon that your camera is on your computer. 3. Plug the other end of the USB cable into a USB port on your desktop to import the photos from your camera. 2.
CV-1025 Manual
Page 20
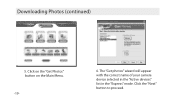
The "Get photos" wizard will appear with the correct name of your camera device selected in the "Active devices" list in the "Express" mode. Click the "Next" button to proceed. Click on the "Get Photos" button on the Main Menu. -19- 6. Downloading Photos (continued) 5.
The "Get photos" wizard will appear with the correct name of your camera device selected in the "Active devices" list in the "Express" mode. Click the "Next" button to proceed. Click on the "Get Photos" button on the Main Menu. -19- 6. Downloading Photos (continued) 5.
CV-1025 Manual
Page 22
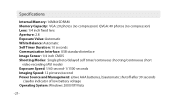
... Communication Interface: USB standard interface Image Sensor: 1/4 inch CMOS Shooting Modes: Single photo/delayed self timer/continuous shooting/continuous short video recording (AVI mode) Exposure Speed: 1/60 second-1/1500 seconds Imaging Speed: 12 pictures/second Power Source and Management: a)two AAA batteries, b)automatic shuto after 30 seconds c)audio indicator of low battery voltage Operating System: Windows 2000/XP/Vista...
... Communication Interface: USB standard interface Image Sensor: 1/4 inch CMOS Shooting Modes: Single photo/delayed self timer/continuous shooting/continuous short video recording (AVI mode) Exposure Speed: 1/60 second-1/1500 seconds Imaging Speed: 12 pictures/second Power Source and Management: a)two AAA batteries, b)automatic shuto after 30 seconds c)audio indicator of low battery voltage Operating System: Windows 2000/XP/Vista...


