8324 Users Manual
Page 2
... for Windows Vista 4 Computer System Requirements for Macintosh 4 A Quick Look at Your Camera...5 Preparing Your Camera for Use...6 Installing SD Memory Card...7 How to hold your camera correctly when capturing images 9 Starting Your Digital Camera...10 Camera Mode...11 Video Mode ...33 Playback Mode ...36 Installing PhoTags Express Software...47 Everything you need to get the most from your photos 52 Download photos and videos to your PC ...54 Viewing Videos...59 Transferring photos and videos to your PC manually 60 Transferring photos and videos...
... for Windows Vista 4 Computer System Requirements for Macintosh 4 A Quick Look at Your Camera...5 Preparing Your Camera for Use...6 Installing SD Memory Card...7 How to hold your camera correctly when capturing images 9 Starting Your Digital Camera...10 Camera Mode...11 Video Mode ...33 Playback Mode ...36 Installing PhoTags Express Software...47 Everything you need to get the most from your photos 52 Download photos and videos to your PC ...54 Viewing Videos...59 Transferring photos and videos to your PC manually 60 Transferring photos and videos...
8324 Users Manual
Page 3
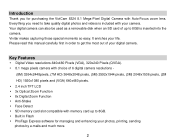
... and (VGA) 640x480 pixels. 2.4 inch TFT LCD 3x Optical Zoom Function 8x Digital Zoom Function Anti-Shake Face Detect SD memory card slot compatible with memory card up to take quality digital photos and videos is inserted into the camera. Vivitar makes capturing those special moments so easy. Introduction Thank you need to 8GB is included with Auto-Focus zoom lens. Everything you for managing and enhancing your...
... and (VGA) 640x480 pixels. 2.4 inch TFT LCD 3x Optical Zoom Function 8x Digital Zoom Function Anti-Shake Face Detect SD memory card slot compatible with memory card up to take quality digital photos and videos is inserted into the camera. Vivitar makes capturing those special moments so easy. Introduction Thank you need to 8GB is included with Auto-Focus zoom lens. Everything you for managing and enhancing your...
8324 Users Manual
Page 7
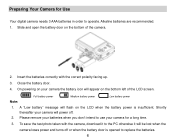
... remove your batteries when you don't intend to operate. Insert the batteries correctly with the camera, download it will be lost when the camera loses power and turns off . 2. Close the battery door. 4. Slide and open the battery door on the bottom of the LCD screen. Note: Full battery power Medium battery power Low battery power 1. Preparing Your Camera for Use Your digital camera needs 3 AAA batteries in order to use your camera for a long time. 3. To save the test photo...
... remove your batteries when you don't intend to operate. Insert the batteries correctly with the camera, download it will be lost when the camera loses power and turns off . 2. Close the battery door. 4. Slide and open the battery door on the bottom of the LCD screen. Note: Full battery power Medium battery power Low battery power 1. Preparing Your Camera for Use Your digital camera needs 3 AAA batteries in order to use your camera for a long time. 3. To save the test photo...

8324 Users Manual
Page 8
... Memory card into the slot in the battery compartment at the bottom of your camera before transferring the photos and videos to your camera. 4. Once the external memory card is locked. 7 Your camera supports any compatible SD memory card (up to take one test photo. Adding a memory card will allow you turn on your PC. 1. Locate the Memory Card slot situated in the correct direction. 3. No images can be stored on the bottom of the LCD screen...
... Memory card into the slot in the battery compartment at the bottom of your camera before transferring the photos and videos to your camera. 4. Once the external memory card is locked. 7 Your camera supports any compatible SD memory card (up to take one test photo. Adding a memory card will allow you turn on your PC. 1. Locate the Memory Card slot situated in the correct direction. 3. No images can be stored on the bottom of the LCD screen...
8324 Users Manual
Page 9
... this may damage the card and render it in order to continue using your camera to capture more high quality photos and videos. 8 When your PC and delete the photos and videos from it unusable. 4. Please download the images before powering off or if the batteries are removed. Formatting will be deleted when the camera`s power is turned off . 2. Note: 1. Limited internal memory is full, download the media on the SD memory card including protected data. 3.
... this may damage the card and render it in order to continue using your camera to capture more high quality photos and videos. 8 When your PC and delete the photos and videos from it unusable. 4. Please download the images before powering off or if the batteries are removed. Formatting will be deleted when the camera`s power is turned off . 2. Note: 1. Limited internal memory is full, download the media on the SD memory card including protected data. 3.
8324 Users Manual
Page 11
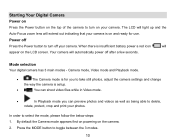
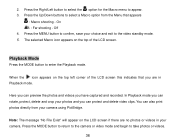
... the Auto-Focus zoom lens will appear on the camera. 2. Power off after a few seconds. Camera mode, Video mode and Playback mode. • The Camera mode is for use. By default the Camera mode appears first on powering on the LCD screen. When there is setup. • You can shoot video files while in Video mode. • In Playback mode you can preview photos and videos as well as being able to take still photos, adjust the camera settings and change the way the camera is insufficient battery power a red icon will...
... the Auto-Focus zoom lens will appear on the camera. 2. Power off after a few seconds. Camera mode, Video mode and Playback mode. • The Camera mode is for use. By default the Camera mode appears first on powering on the LCD screen. When there is setup. • You can shoot video files while in Video mode. • In Playback mode you can preview photos and videos as well as being able to take still photos, adjust the camera settings and change the way the camera is insufficient battery power a red icon will...
8324 Users Manual
Page 12
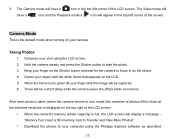
... image will appear in on the LCD. 5. Taking Photos 1. Compose your object with the white frame that appears on the object. 4. When the frame turns green lift your computer using the LCD screen. 2. Center your shot using the Photags Express software as described 11 3. The Camera mode will have a icon and the Playback mode a icon will be a short delay while the camera saves the JPEG photo to Transfer and Take More Photos!" ? Download the photos to take the photo...
... image will appear in on the LCD. 5. Taking Photos 1. Compose your object with the white frame that appears on the object. 4. When the frame turns green lift your computer using the LCD screen. 2. Center your shot using the Photags Express software as described 11 3. The Camera mode will have a icon and the Playback mode a icon will be a short delay while the camera saves the JPEG photo to Transfer and Take More Photos!" ? Download the photos to take the photo...
8324 Users Manual
Page 13
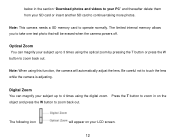
... "Download photos and videos to your PC" and thereafter delete them from your SD card or insert another SD card to take one test photo that will be erased when the camera powers off. Note: When using the optical zoom by pressing the T button or press the W button to zoom back out. Be careful not to operate normally. Note: This camera needs a SD memory card to touch the lens while the camera is adjusting...
... "Download photos and videos to your PC" and thereafter delete them from your SD card or insert another SD card to take one test photo that will be erased when the camera powers off. Note: When using the optical zoom by pressing the T button or press the W button to zoom back out. Be careful not to operate normally. Note: This camera needs a SD memory card to touch the lens while the camera is adjusting...
8324 Users Manual
Page 14
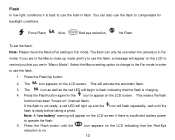
... icon will appear on " (manual flash). Press the Flash/Up button. 2. If the flash is charging. 4. Force Flash, Auto, Red eye reduction, No Flash To set the flash: Note: Please move the Macro/Far setting to compensate for the icon to appear on the LCD screen. Select the Macro setting option to change to the Far mode in "Macro Mode". Press the Flash button until the flash is insufficient battery power to operate the flash. 5. Flash In low light conditions it is best to use...
... icon will appear on " (manual flash). Press the Flash/Up button. 2. If the flash is charging. 4. Force Flash, Auto, Red eye reduction, No Flash To set the flash: Note: Please move the Macro/Far setting to compensate for the icon to appear on the LCD screen. Select the Macro setting option to change to the Far mode in "Macro Mode". Press the Flash button until the flash is insufficient battery power to operate the flash. 5. Flash In low light conditions it is best to use...

8324 Users Manual
Page 15
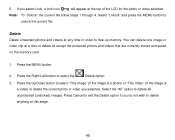
... sec or Off • Delete - A "This Image" delete confirmation message appears on the LCD for quick access to select: Auto, Night Portrait, Night Scenery, Portrait, Scenery, Sport, Party, Beach, High Sensitivity • Self-timer - Press the MENU button to cancel the delete. 4. Press the Left/Right button to choose "Yes" to delete the photo or "No" to confirm. 5. Each setting will turn off the flash function. the 9 scene options...
... sec or Off • Delete - A "This Image" delete confirmation message appears on the LCD for quick access to select: Auto, Night Portrait, Night Scenery, Portrait, Scenery, Sport, Party, Beach, High Sensitivity • Self-timer - Press the MENU button to cancel the delete. 4. Press the Left/Right button to choose "Yes" to delete the photo or "No" to confirm. 5. Each setting will turn off the flash function. the 9 scene options...
8324 Users Manual
Page 29
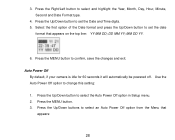
... set the Date and Time digits. 5. Auto Power Off By default, if your camera is idle for 60 seconds it will automatically be powered off. DD MM YY; Use the Auto Power Off option to confirm, save the changes and exit. Press the MENU button to change this setting: 1. Press the Right/Left button to set the date format that appears: 28 Press the Up/Down buttons to select the Auto Power Off option in Setup menu...
... set the Date and Time digits. 5. Auto Power Off By default, if your camera is idle for 60 seconds it will automatically be powered off. DD MM YY; Use the Auto Power Off option to confirm, save the changes and exit. Press the MENU button to change this setting: 1. Press the Right/Left button to set the date format that appears: 28 Press the Up/Down buttons to select the Auto Power Off option in Setup menu...
8324 Users Manual
Page 31
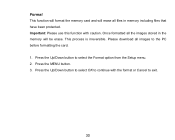
This process is irreversible. Press the Up/Down button to the PC before formatting the card. 1. Once formatted all the images stored in the memory will erase all images to select the Format option from the Setup menu. 2. Format This function will format the memory card and will be erase. Please download all files in memory including files that have been protected. Press the Up/Down button to select OK to continue with caution. Press the MENU button. 3. Important: Please use this function with the format or Cancel to exit. 30
This process is irreversible. Press the Up/Down button to the PC before formatting the card. 1. Once formatted all the images stored in the memory will erase all images to select the Format option from the Setup menu. 2. Format This function will format the memory card and will be erase. Please download all files in memory including files that have been protected. Press the Up/Down button to select OK to continue with caution. Press the MENU button. 3. Important: Please use this function with the format or Cancel to exit. 30
8324 Users Manual
Page 32
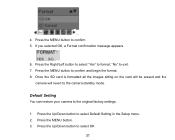
... begin the format. 8. Press the MENU button to exit. 7. If you selected OK, a Format confirmation message appears. ? 6. Default Setting You can restore your camera to select Default Setting in the Setup menu. 2. Press the Up/Down button to the original factory settings. 1. Press the MENU button. 3. Press the Up/Down button to the camera standby mode. 4. Once the SD card is formatted all the images sitting on the card will be erased and the camera will...
... begin the format. 8. Press the MENU button to exit. 7. If you selected OK, a Format confirmation message appears. ? 6. Default Setting You can restore your camera to select Default Setting in the Setup menu. 2. Press the Up/Down button to the original factory settings. 1. Press the MENU button. 3. Press the Up/Down button to the camera standby mode. 4. Once the SD card is formatted all the images sitting on the card will be erased and the camera will...

8324 Users Manual
Page 34
... the recording and save this indicates that you wish to select the Video mode. When the camera's memory is full, the "Memory Full Insert a SD Memory Card to use the video mode normally. Press the Shutter button to your computer by using Quick Time and Windows Media Player. You can preview the AVI files in order to Transfer and Shoot More video!" Prepare the object or subject you are in AVI format. message will flash on...
... the recording and save this indicates that you wish to select the Video mode. When the camera's memory is full, the "Memory Full Insert a SD Memory Card to use the video mode normally. Press the Shutter button to your computer by using Quick Time and Windows Media Player. You can preview the AVI files in order to Transfer and Shoot More video!" Prepare the object or subject you are in AVI format. message will flash on...
8324 Users Manual
Page 37
... rotate, protect, delete and crop your choice and exit to enter the Playback mode. 2. Off 4. On : Far shooting - You can also print photos directly from the Menu that you have captured and recorded. Press the Right/Left button to select the option for the Macro menu to take photos or videos. 36 When the icon appears on the top left corner of the LCD screen. Note: The message "No File Exist...
... rotate, protect, delete and crop your choice and exit to enter the Playback mode. 2. Off 4. On : Far shooting - You can also print photos directly from the Menu that you have captured and recorded. Press the Right/Left button to select the option for the Macro menu to take photos or videos. 36 When the icon appears on the top left corner of the LCD screen. Note: The message "No File Exist...
8324 Users Manual
Page 41
... a video) to delete the current photo or video you select Lock, a lock icon will appear at a time or delete all unprotected (unlocked) images. Select the "All" option to free up memory. Note: To "Unlock" the current file follow steps 1 through 4. Press the MENU button. 2. Press Cancel to exit the Delete option if you do not wish to delete anything at any time in order to delete all except the protected photos...
... a video) to delete the current photo or video you select Lock, a lock icon will appear at a time or delete all unprotected (unlocked) images. Select the "All" option to free up memory. Note: To "Unlock" the current file follow steps 1 through 4. Press the MENU button. 2. Press Cancel to exit the Delete option if you do not wish to delete anything at any time in order to delete all except the protected photos...
8324 Users Manual
Page 44
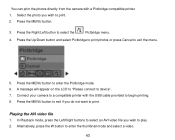
.../Left button to enter the thumbnail mode and select a video. 43 Select the photo you do not want to print. Alternatively, press the W button to select the Pictbridge menu. 4. In Playback mode, press the Left/Right buttons to select an AVI video file you wish to enter the Pictbridge mode. 6. Press the MENU button to play. 2. You can print the photos directly from the camera with the USB cable provided to begin printing. 8.
.../Left button to enter the thumbnail mode and select a video. 43 Select the photo you do not want to print. Alternatively, press the W button to select the Pictbridge menu. 4. In Playback mode, press the Left/Right buttons to select an AVI video file you wish to enter the Pictbridge mode. 6. Press the MENU button to play. 2. You can print the photos directly from the camera with the USB cable provided to begin printing. 8.

8324 Users Manual
Page 48
... USB PORT UNTIL THE SOFTWARE INSTALLATION HAS BEEN COMPLETELY INSTALLED. The installation screen should automatically open. Insert the installation CD into your camera model from the drop down list and click the "Install" button to install the Photags Express CD installation disk. For more installation information click the "Read Me First!" Installing PhoTags Express Software In order to install the Software to download the photos and videos captured using this camera to your computer, you need...
... USB PORT UNTIL THE SOFTWARE INSTALLATION HAS BEEN COMPLETELY INSTALLED. The installation screen should automatically open. Insert the installation CD into your camera model from the drop down list and click the "Install" button to install the Photags Express CD installation disk. For more installation information click the "Read Me First!" Installing PhoTags Express Software In order to install the Software to download the photos and videos captured using this camera to your computer, you need...
8324 Users Manual
Page 63
... material or workmanship. Copy of original bill of the problem. 3. Your return address and telephone number (Daytime) MAIL TO ADDRESS BELOW: Sakar International Attention: Service Department 195 Carter Drive Edison, NJ 08817 You may also visit www.vivitar.com for further assistance if necessary or call our tech support department toll free at no charge for parts or labor for a period...
... material or workmanship. Copy of original bill of the problem. 3. Your return address and telephone number (Daytime) MAIL TO ADDRESS BELOW: Sakar International Attention: Service Department 195 Carter Drive Edison, NJ 08817 You may also visit www.vivitar.com for further assistance if necessary or call our tech support department toll free at no charge for parts or labor for a period...
8324 Users Manual
Page 65
... at least 128 MB ram. The device will work as possible to free up to use your images will be lost or damaged. Please note that your card gets lost . This also is saved in camera." If you still get a "no photos" error this card. Press the Shutter button a few times to your photos. The test photo is a backup if your computer may mean that...
... at least 128 MB ram. The device will work as possible to free up to use your images will be lost or damaged. Please note that your card gets lost . This also is saved in camera." If you still get a "no photos" error this card. Press the Shutter button a few times to your photos. The test photo is a backup if your computer may mean that...


