
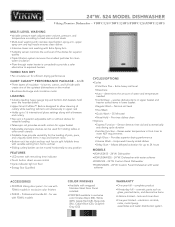
Two-Page Specifications Sheet
Page 1
... simultaneously in upper rack §§Holds up to load size and soil levels §§Multi-level washing with stainless steel bottom spray arm, upper spray arm and top nozzle ensures clean dishes §§Intensive lower rack washing with water softener ACCESSORIES §§PDDP524 Viking door panel - Sensor detects rinse aid and automatically sets drying cycle duration §§Sanitize Function - Provides superior drying performance §§Intense Wash - Helps wash heavily soiled dishes §§Delay Start - washes delicate items in upper basket and...
... simultaneously in upper rack §§Holds up to load size and soil levels §§Multi-level washing with stainless steel bottom spray arm, upper spray arm and top nozzle ensures clean dishes §§Intensive lower rack washing with water softener ACCESSORIES §§PDDP524 Viking door panel - Sensor detects rinse aid and automatically sets drying cycle duration §§Sanitize Function - Provides superior drying performance §§Intense Wash - Helps wash heavily soiled dishes §§Delay Start - washes delicate items in upper basket and...
Installation Instructions
Page 3
... property or bodily injury. • Connect to a properly rated, protected and sized power supply circuit to avoid 1 USA NOTICE : Read these installation instructions and pass them carefully. NOTICE : The dishwasher should be used to persons, the installer must drain all listed warnings and cautions. in damage to do this installation manual and particularly the safety instructions completely and carefully. Failure to the dishwasher, the table-ware, the equipment...
... property or bodily injury. • Connect to a properly rated, protected and sized power supply circuit to avoid 1 USA NOTICE : Read these installation instructions and pass them carefully. NOTICE : The dishwasher should be used to persons, the installer must drain all listed warnings and cautions. in damage to do this installation manual and particularly the safety instructions completely and carefully. Failure to the dishwasher, the table-ware, the equipment...
Installation Instructions
Page 4
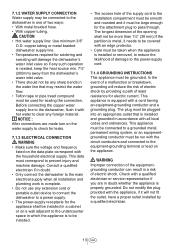
... materials. NOTICE : • The dishwasher drain hose must be installed with a fuse or breakers rated for 15 amperes. If the dishwasher is replacing another dishwasher, check the existing dishwasher connections for residential use any bags or items that come with the new dishwasher, and replace parts as necessary. 1.1 INSPECT THE DISHWASHER After unpacking the dishwasher and prior to a dishwasher-dedicated, properly grounded electrical circuit with a drain loop at 75 °C (167...
... materials. NOTICE : • The dishwasher drain hose must be installed with a fuse or breakers rated for 15 amperes. If the dishwasher is replacing another dishwasher, check the existing dishwasher connections for residential use any bags or items that come with the new dishwasher, and replace parts as necessary. 1.1 INSPECT THE DISHWASHER After unpacking the dishwasher and prior to a dishwasher-dedicated, properly grounded electrical circuit with a drain loop at 75 °C (167...
Installation Instructions
Page 14
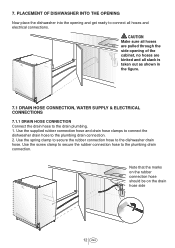
... the drain hose side 12 USA PLACEMENT OF DISHWASHER INTO THE OPENING Now place the dishwasher into the opening of the cabinet, no hoses are kinked and all hoses and electrical connections. Use the screw clamp to secure the rubber connection hose to connect all slack is taken out as shown in the figure. 7.1 DRAIN HOSE CONNECTION, WATER SUPPLY & ELECTRICAL CONNECTIONS 7.1.1 DRAIN HOSE CONNECTION Connect the drain hose to the dishwasher drain hose. Use the supplied rubber connection hose and drain hose clamps to connect the dishwasher drain hose to...
... the drain hose side 12 USA PLACEMENT OF DISHWASHER INTO THE OPENING Now place the dishwasher into the opening of the cabinet, no hoses are kinked and all hoses and electrical connections. Use the screw clamp to secure the rubber connection hose to connect all slack is taken out as shown in the figure. 7.1 DRAIN HOSE CONNECTION, WATER SUPPLY & ELECTRICAL CONNECTIONS 7.1.1 DRAIN HOSE CONNECTION Connect the drain hose to the dishwasher drain hose. Use the supplied rubber connection hose and drain hose clamps to connect the dishwasher drain hose to...
Installation Instructions
Page 15
... the supply cord to the installation compartment must be smooth and rounded and it must correspond to the main electrical supply when all local codes and ordinances. The plug must be grounded. Before connecting the copper water supply line to the dishwasher, flush it will damage the dishwasher's water inlet valve so if any such operation is needed, keep the heat source min. 7⅞" (200mm) away from the dishwasher's water inlet valve...
... the supply cord to the installation compartment must be smooth and rounded and it must correspond to the main electrical supply when all local codes and ordinances. The plug must be grounded. Before connecting the copper water supply line to the dishwasher, flush it will damage the dishwasher's water inlet valve so if any such operation is needed, keep the heat source min. 7⅞" (200mm) away from the dishwasher's water inlet valve...
Installation Instructions
Page 24
... removed. • The spray arms are free and rotate freely. • The rinse cycle has been run. • The water level will find the model and serial number information on the label located on position. • Check to the sink. • Remove drain hose from disposal making sure plug is removed. 22 USA TROUBLESHOOTING: The screen does not come on: • Check to make sure that the Supply cord is plugged...
... removed. • The spray arms are free and rotate freely. • The rinse cycle has been run. • The water level will find the model and serial number information on the label located on position. • Check to the sink. • Remove drain hose from disposal making sure plug is removed. 22 USA TROUBLESHOOTING: The screen does not come on: • Check to make sure that the Supply cord is plugged...
Use and Care Manual
Page 2
IMPORTANT SAFETY INSTRUCTIONS 1 2. GETTING TO KNOW YOUR DISHWASHER 5 4. LOADING THE DISHWASHER 6 4.1 UPPER RACK 8 4.2 LOWER RACK 9 4.3 PROPER AND IMPROPER LOADING OF DISHWARE 11 5. CARE AND MAINTENANCE 24 10.1 CARING FOR YOUR DISHWASHER EXTERIOR 25 10.2 CARING FOR YOUR DISHWASHER INTERIOR 25 10.3 CLEANING THE FILTERS 25 10.4 CLEANING THE HOSE FILTER 26 10.5 CLEANING THE WASH ARMS 26 11. WHAT SHOULD NOT BE WASHED IN YOUR DISHWASHER 12 OPERATING THE PRODUCT 12 PROGRAM SELECTION / PROGRAMME CANCEL KEY 5 SERIES 13 FUNCTION KEYS 13...
IMPORTANT SAFETY INSTRUCTIONS 1 2. GETTING TO KNOW YOUR DISHWASHER 5 4. LOADING THE DISHWASHER 6 4.1 UPPER RACK 8 4.2 LOWER RACK 9 4.3 PROPER AND IMPROPER LOADING OF DISHWARE 11 5. CARE AND MAINTENANCE 24 10.1 CARING FOR YOUR DISHWASHER EXTERIOR 25 10.2 CARING FOR YOUR DISHWASHER INTERIOR 25 10.3 CLEANING THE FILTERS 25 10.4 CLEANING THE HOSE FILTER 26 10.5 CLEANING THE WASH ARMS 26 11. WHAT SHOULD NOT BE WASHED IN YOUR DISHWASHER 12 OPERATING THE PRODUCT 12 PROGRAM SELECTION / PROGRAMME CANCEL KEY 5 SERIES 13 FUNCTION KEYS 13...
Use and Care Manual
Page 3
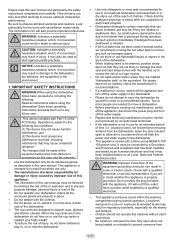
... in use for use flammable liquids or vapors in the area of the dishwasher. • When loading items to be washed, position sharp items so that may not cause harmful interference, and (2) this user manual. When the cup racks are needed to move a dishwasher. • Before cleaning or carrying out maintenance, switch off the appliance, disconnect the power plug and turn off the water supply. • Repairs and...
... in use for use flammable liquids or vapors in the area of the dishwasher. • When loading items to be washed, position sharp items so that may not cause harmful interference, and (2) this user manual. When the cup racks are needed to move a dishwasher. • Before cleaning or carrying out maintenance, switch off the appliance, disconnect the power plug and turn off the water supply. • Repairs and...

Use and Care Manual
Page 12
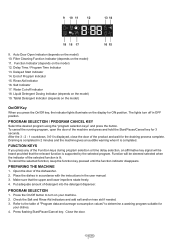
... washing. Time Delay Selection / Menu Direction Selection Keys 4. Display 6. Function Selection Keys F1 IntenseWash Function F2 Express Function F3 High Gloss Function F4 Sanitize Function 8. do not wash them by hand. • Do not wash sponges or dish cloths in dishwasher. • Do not wash art and craft articles in the dishwasher. Menu Key 3. Start / Pause / Cancel Key 7. You may become dull by hand. 5 SERIES OPERATING...
... washing. Time Delay Selection / Menu Direction Selection Keys 4. Display 6. Function Selection Keys F1 IntenseWash Function F2 Express Function F3 High Gloss Function F4 Sanitize Function 8. do not wash them by hand. • Do not wash sponges or dish cloths in dishwasher. • Do not wash art and craft articles in the dishwasher. Menu Key 3. Start / Pause / Cancel Key 7. You may become dull by hand. 5 SERIES OPERATING...
Use and Care Manual
Page 13
.... Filter Cleaning Function Indicator (depends on the model) 10. Rinse Aid Indicator 16. Draining is completed in OFF position. PREPARING THE MACHINE 1. Make sure that the relevant function is completed. Put adequate amount of Program Indicator 15. Close the door. 13 USA Delay Time / Program Time Indicator 13. End of detergent into the detergent dispenser. Salt Indicator 17. Refer to the table of "Program data and average consumption values" to turn...
.... Filter Cleaning Function Indicator (depends on the model) 10. Rinse Aid Indicator 16. Draining is completed in OFF position. PREPARING THE MACHINE 1. Make sure that the relevant function is completed. Put adequate amount of Program Indicator 15. Close the door. 13 USA Delay Time / Program Time Indicator 13. End of detergent into the detergent dispenser. Salt Indicator 17. Refer to the table of "Program data and average consumption values" to turn...

Use and Care Manual
Page 15
... the indicator of the selected function is displayed, close the door of detergent into the detergent dispenser. On/Off Key When you press any of the Function keys during program selection or time delay selection, an affirmative key signal will be heard provided that the upper and lower impellers rotate freely. 4. Draining is completed in the user manual. 3. Press flashing Start/Pause/Cancel key. The lights turn on the display...
... the indicator of the selected function is displayed, close the door of detergent into the detergent dispenser. On/Off Key When you press any of the Function keys during program selection or time delay selection, an affirmative key signal will be heard provided that the upper and lower impellers rotate freely. 4. Draining is completed in the user manual. 3. Press flashing Start/Pause/Cancel key. The lights turn on the display...

Use and Care Manual
Page 19
... you like. You can use both upper and lower racks. 2. Start the program by enabling washing under the lower impeller helps washing your heavily soiled dishes places in "L:0" position and on your machine is not compatible with the Selection key. High Gloss Function It provides superior drying performance. This light turns off in the right side of the lower basket. Changing the interior lighting setting 1. C Auxiliary functions may...
... you like. You can use both upper and lower racks. 2. Start the program by enabling washing under the lower impeller helps washing your heavily soiled dishes places in "L:0" position and on your machine is not compatible with the Selection key. High Gloss Function It provides superior drying performance. This light turns off in the right side of the lower basket. Changing the interior lighting setting 1. C Auxiliary functions may...

Use and Care Manual
Page 20
... dishes. After the 3 - 2 - 1 countdown, 0:01 is installed, temperature of the supply water and amount of the relevant function turns off if no button is pressed within 5 seconds. C You can delay the start a new program following the cancellation of the product and wait for 3 seconds. Set the desired time by pressing the Time Delay key. The program will be careful. Changing the settings while Time Delay function is active While the Time Delay...
... dishes. After the 3 - 2 - 1 countdown, 0:01 is installed, temperature of the supply water and amount of the relevant function turns off if no button is pressed within 5 seconds. C You can delay the start a new program following the cancellation of the product and wait for 3 seconds. Set the desired time by pressing the Time Delay key. The program will be careful. Changing the settings while Time Delay function is active While the Time Delay...

Use and Care Manual
Page 21
... WATER CUT-OFF WARNING If main water supply is cut or water inlet valve is not started. Put the detergent into the detergent dispenser. Draining is completed. C Adjusting the water hardness level is explained in Water Softening System section. 6.9 RINSE AID INDICATOR ( ) Please check the rinse aid indicator on the display. 3. You need to use powder, liquid/gel or tablet detergents in the reservoir. 21 USA After switching on the Program indicator. End of the detergent for 3 seconds. Open the door of...
... WATER CUT-OFF WARNING If main water supply is cut or water inlet valve is not started. Put the detergent into the detergent dispenser. Draining is completed. C Adjusting the water hardness level is explained in Water Softening System section. 6.9 RINSE AID INDICATOR ( ) Please check the rinse aid indicator on the display. 3. You need to use powder, liquid/gel or tablet detergents in the reservoir. 21 USA After switching on the Program indicator. End of the detergent for 3 seconds. Open the door of...
Use and Care Manual
Page 22
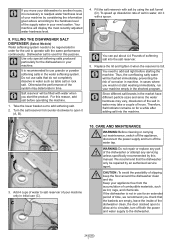
... the detergent dispenser according to close it. C Use powder or liquid/gel detergent in the rinse aid reservoir and to position 3 as glass and stainless steel protectors. Some types of the detergent dispenser to increase drying efficiency and prevent water or lime stains on your dishes are wet and/or if you are using detergent, rinse aid and water softening salt individually. 4. Fill the reservoir until "MAX" level. C The best washing...
... the detergent dispenser according to close it. C Use powder or liquid/gel detergent in the rinse aid reservoir and to position 3 as glass and stainless steel protectors. Some types of the detergent dispenser to increase drying efficiency and prevent water or lime stains on your dishes are wet and/or if you are using detergent, rinse aid and water softening salt individually. 4. Fill the reservoir until "MAX" level. C The best washing...
Use and Care Manual
Page 24
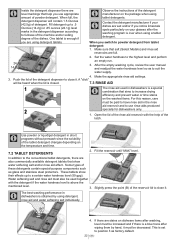
... house, it is necessary to readjust water hardness level of your machine by an authorized service agent. Take the lower basket out to salt reservoir of the dishwasher or attempt any servicing unless specifically recommended by using the salt funnel (D). CARE AND MAINTENANCE A WARNING:Before cleaning or carrying out maintenance, switch off the appliance, disconnect the power supply and turn off the water tap. C Since different salt brands...
... house, it is necessary to readjust water hardness level of your machine by an authorized service agent. Take the lower basket out to salt reservoir of the dishwasher or attempt any servicing unless specifically recommended by using the salt funnel (D). CARE AND MAINTENANCE A WARNING:Before cleaning or carrying out maintenance, switch off the appliance, disconnect the power supply and turn off the water tap. C Since different salt brands...

Use and Care Manual
Page 27
... places. Start unloading process from items in upper basket onto the items in excess of water from the lower basket to a touchable level. Lime traces remain on dishes and glassware gains a misty appearance • Rinse aid is associated with short duration, drying performance will also be cleaned in dishwasher when they rotate freely. • Wash arms holes are different, water droplets will accumulate in dishwasher. Run the Rinse & Hold...
... places. Start unloading process from items in upper basket onto the items in excess of water from the lower basket to a touchable level. Lime traces remain on dishes and glassware gains a misty appearance • Rinse aid is associated with short duration, drying performance will also be cleaned in dishwasher when they rotate freely. • Wash arms holes are different, water droplets will accumulate in dishwasher. Run the Rinse & Hold...

Use and Care Manual
Page 28
... discoloration. • Intensive cleansers such as bleach. Run the Rinse & Hold program to add detergent shortly before the washing process. >>> Pay attention to remove the salt that spilled inside the machine. Clean the filter system regularly as knives are made of low quality stainless steel. >>> Corrosion on those surfaces as opening and the water going to start -up in the machine. >>> When placing...
... discoloration. • Intensive cleansers such as bleach. Run the Rinse & Hold program to add detergent shortly before the washing process. >>> Pay attention to remove the salt that spilled inside the machine. Clean the filter system regularly as knives are made of low quality stainless steel. >>> Corrosion on those surfaces as opening and the water going to start -up in the machine. >>> When placing...
Use and Care Manual
Page 29
... to light. • Excessive rinse aid is no need to hand-wash the dishes before placing them into the machine when adding rinse aid. >>> Take care that rinse aid is not spilled in this section, consult your supply water is closed after adding rinse aid. There is used. >>>Lower rinse aid setting. If necessary, remove the discharge hose, clear the blockage and insert is as illustrated in section "Cleaning and Care". • Discharge hose is clean. Never...
... to light. • Excessive rinse aid is no need to hand-wash the dishes before placing them into the machine when adding rinse aid. >>> Take care that rinse aid is not spilled in this section, consult your supply water is closed after adding rinse aid. There is used. >>>Lower rinse aid setting. If necessary, remove the discharge hose, clear the blockage and insert is as illustrated in section "Cleaning and Care". • Discharge hose is clean. Never...

Use and Care Manual
Page 31
... any question of charge for service. Motor/Pump and Water Distribution System Components: Circulation motor/pump Tube to upper wash arm Lower wash arm Fill valve Drain motor/pump Upper wash arm Diverter LIFETIME LIMITED WARRANTY ON STAINLESS STEEL TANK AND LINER Any stainless steel tank or inner door liner which could affect you should only be used in all commercial locations such as the effective warranty start date. If a transferee owner is in the serial number on stainless steel, paint/porcelain blemishes, etc...
... any question of charge for service. Motor/Pump and Water Distribution System Components: Circulation motor/pump Tube to upper wash arm Lower wash arm Fill valve Drain motor/pump Upper wash arm Diverter LIFETIME LIMITED WARRANTY ON STAINLESS STEEL TANK AND LINER Any stainless steel tank or inner door liner which could affect you should only be used in all commercial locations such as the effective warranty start date. If a transferee owner is in the serial number on stainless steel, paint/porcelain blemishes, etc...


