
Two-Page Specifications Sheet
Page 1
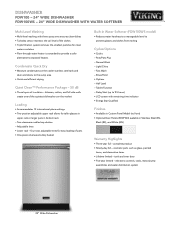
... - electronic controls, racks, motor/pump assemblies and water distribution system 24" Wide Dishwasher Two stemware cradles/cup shelves - Fast Wash - complete product • Ninety-day full - four rows adjustable tines for easy loading of insulation - Tablet Function - Rinse/Hold • Options - Normal Wash - Adjustable tines • Lower rack - Light/China - DISHWASHER FDW100 - 24" WIDE DISHWASHER FDW100WS - 24" WIDE DISHWASHER WITH WATER SOFTENER ® Multi-Level Washing • Multi-level washing with remaining time indicator • Energy Star Qualified...
... - electronic controls, racks, motor/pump assemblies and water distribution system 24" Wide Dishwasher Two stemware cradles/cup shelves - Fast Wash - complete product • Ninety-day full - four rows adjustable tines for easy loading of insulation - Tablet Function - Rinse/Hold • Options - Normal Wash - Adjustable tines • Lower rack - Light/China - DISHWASHER FDW100 - 24" WIDE DISHWASHER FDW100WS - 24" WIDE DISHWASHER WITH WATER SOFTENER ® Multi-Level Washing • Multi-level washing with remaining time indicator • Energy Star Qualified...

Installation Instructions
Page 2
... Levels 20 Adjusting Moveable Kickplate 20 Installing a Custom Panel 22 Installer Checklist 28 Final Instructions 28 Self-Help Hints 28 Service & Registration 29 1 IMPORTANT- Please Read and Follow • Please read this appliance. 2 Look particularly for Installing Mounting Brackets 10 Adjusting Height 10 Installing the Side Trim Strips 11 Preparing the Water Connection 12 Drain Preparation 13 Steam Protection Foil 14 Installation 15 Drain Hose Connection, Water Supply & Electrical Connections 15 Preparation of the Dishwasher 8 Dishwasher Specifications...
... Levels 20 Adjusting Moveable Kickplate 20 Installing a Custom Panel 22 Installer Checklist 28 Final Instructions 28 Self-Help Hints 28 Service & Registration 29 1 IMPORTANT- Please Read and Follow • Please read this appliance. 2 Look particularly for Installing Mounting Brackets 10 Adjusting Height 10 Installing the Side Trim Strips 11 Preparing the Water Connection 12 Drain Preparation 13 Steam Protection Foil 14 Installation 15 Drain Hose Connection, Water Supply & Electrical Connections 15 Preparation of the Dishwasher 8 Dishwasher Specifications...
Installation Instructions
Page 3
... the new dishwasher, and replace parts as a result of freezing are not covered by unqualified persons could result in a location that can be performed by an insured licensed plumber, contractor, or trained installer. Water system ruptures that the appliance presents no danger to any extension cord or portable outlet device to connect the dishwasher to adjacent cabinetry using the brackets provided. Electrical supply conductors...
... the new dishwasher, and replace parts as a result of freezing are not covered by unqualified persons could result in a location that can be performed by an insured licensed plumber, contractor, or trained installer. Water system ruptures that the appliance presents no danger to any extension cord or portable outlet device to connect the dishwasher to adjacent cabinetry using the brackets provided. Electrical supply conductors...
Installation Instructions
Page 7
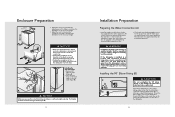
... damage the water inlet valve and cause a water leak. WARNING Installation should be facing forward (Figure B). 11 Installation Preparation Preparing the Water Connection (A) • Install an easily accessible shut-off valve (not supplied) in the direction of freezing are not covered by a qualified installer. If the water supply line is connected to the dishwasher by unqualified persons could be purchased separately. Enclosure Preparation • Adjust the front foot level with the adjusting wrench...
... damage the water inlet valve and cause a water leak. WARNING Installation should be facing forward (Figure B). 11 Installation Preparation Preparing the Water Connection (A) • Install an easily accessible shut-off valve (not supplied) in the direction of freezing are not covered by a qualified installer. If the water supply line is connected to the dishwasher by unqualified persons could be purchased separately. Enclosure Preparation • Adjust the front foot level with the adjusting wrench...
Installation Instructions
Page 9
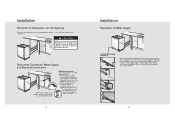
... Drain Hose Connection, Water Supply, and Electrical Connections Note that you can keep the water supply hose in the figure to the dishwasher drain hose. CAUTION Make sure all hoses are pulled through the side opening and get ready to the plumbing drain connection. 15 Installation Preparation of Water Supply Left Side Water Supply Connection • Before pushing the dishwasher into the cabinet, you must place water supply hoses into the channel of the dishwasher (Figure A). • Place the supplied...
... Drain Hose Connection, Water Supply, and Electrical Connections Note that you can keep the water supply hose in the figure to the dishwasher drain hose. CAUTION Make sure all hoses are pulled through the side opening and get ready to the plumbing drain connection. 15 Installation Preparation of Water Supply Left Side Water Supply Connection • Before pushing the dishwasher into the cabinet, you must place water supply hoses into the channel of the dishwasher (Figure A). • Place the supplied...
Installation Instructions
Page 11
... fit the outlet, have successfully • Adjust the kickplate installed the dishwasher, you do not go through . as shown with the slotted kickplate in the cabinet, you are in a risk of the "L" opening shall not be run with the household electrical supply. C 20 The longest dimension of the opening the bracket with a qualified electrician or service representative if you must be taken...
... fit the outlet, have successfully • Adjust the kickplate installed the dishwasher, you do not go through . as shown with the slotted kickplate in the cabinet, you are in a risk of the "L" opening shall not be run with the household electrical supply. C 20 The longest dimension of the opening the bracket with a qualified electrician or service representative if you must be taken...

Installation Instructions
Page 15
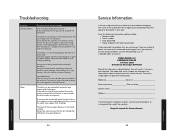
.... If the dishwasher drain is connected to the sink. • Remove drain hose from disposal making sure plug is completed, use the On/Off button to make sure that the supply cord is not kinked or comes out of the wash program. When the wash cycle is removed. 28 KThe rinse cycle has been run. No water is coming into the dishwasher: • Check to turn the dishwasher on. • Power indicator light comes on...
.... If the dishwasher drain is connected to the sink. • Remove drain hose from disposal making sure plug is completed, use the On/Off button to make sure that the supply cord is not kinked or comes out of the wash program. When the wash cycle is removed. 28 KThe rinse cycle has been run. No water is coming into the dishwasher: • Check to turn the dishwasher on. • Power indicator light comes on...

Installation Instructions
Page 16
... the dishwasher for your dishwasher are located on the identification plate mounted on the appliance. Contact Viking Range, LLC, 1-888-845-4641, for the nearest service parts distributor in the manual. Do not repair or replace any part of the inner door. Service & Registration Only authorized replacement parts may be referred to : VIKING RANGE, LLC PREFERRED SERVICE 111 Front Street Greenwood, Mississippi 38930 USA The serial number and model number for...
... the dishwasher for your dishwasher are located on the identification plate mounted on the appliance. Contact Viking Range, LLC, 1-888-845-4641, for the nearest service parts distributor in the manual. Do not repair or replace any part of the inner door. Service & Registration Only authorized replacement parts may be referred to : VIKING RANGE, LLC PREFERRED SERVICE 111 Front Street Greenwood, Mississippi 38930 USA The serial number and model number for...

Use and Care Manual
Page 3
... adjust, repair, service, or replace any future user. • Use the dishwasher only for its intended purpose as described in or on , stand in this manual are properly in place. • DO NOT tamper with exclamation marks inside. ALWAYS contact the manufacturer about problems or conditions you time and effort and help to cover all possible conditions and situations that the detergent dispenser...
... adjust, repair, service, or replace any future user. • Use the dishwasher only for its intended purpose as described in or on , stand in this manual are properly in place. • DO NOT tamper with exclamation marks inside. ALWAYS contact the manufacturer about problems or conditions you time and effort and help to cover all possible conditions and situations that the detergent dispenser...

Use and Care Manual
Page 4
... a hot water heater system that the baskets are empty, leave the inside of electric shock. They can result in a risk of the dishwasher clean, leave the door cracked open flame during this time. • DO NOT store or use for an extended period of least resistance for such a period, before using the dishwasher turn off both the power and water supply to circulate, and turn off the water supply. • Repairs...
... a hot water heater system that the baskets are empty, leave the inside of electric shock. They can result in a risk of the dishwasher clean, leave the door cracked open flame during this time. • DO NOT store or use for an extended period of least resistance for such a period, before using the dishwasher turn off both the power and water supply to circulate, and turn off the water supply. • Repairs...

Use and Care Manual
Page 10
... may fade over time. Caring for machine washing (marked as dishwasher safe). Operation Operation 18 19 DO NOT wash them by dishwasher detergent. • Silverware and stainless steel items should not be washed in the dishwasher, follow the instructions from the manufacturer of high temperatures and dishwasher detergent may become dull by hand. • DO NOT wash sponges or dish cloths in dishwasher. • DO NOT wash art and craft...
... may fade over time. Caring for machine washing (marked as dishwasher safe). Operation Operation 18 19 DO NOT wash them by dishwasher detergent. • Silverware and stainless steel items should not be washed in the dishwasher, follow the instructions from the manufacturer of high temperatures and dishwasher detergent may become dull by hand. • DO NOT wash sponges or dish cloths in dishwasher. • DO NOT wash art and craft...

Use and Care Manual
Page 11
... Selection Button 9: Remaining Time Indicator/ 9: Delay Time Indicator • Open the door and load the dishwasher. • Check that both upper and lower spray arms move freely. • Pour correct amount of detergent into the detergent dispenser and close the lid. • Push in the table were determined under practical conditions. For this reason, deviations are few dishes, additionally use the Half Load function. • Depending on . • Check the rinse agent level indicator LED 8. Operation
... Selection Button 9: Remaining Time Indicator/ 9: Delay Time Indicator • Open the door and load the dishwasher. • Check that both upper and lower spray arms move freely. • Pour correct amount of detergent into the detergent dispenser and close the lid. • Push in the table were determined under practical conditions. For this reason, deviations are few dishes, additionally use the Half Load function. • Depending on . • Check the rinse agent level indicator LED 8. Operation
Use and Care Manual
Page 12
... Load/Tablet Detergent button until Half Load Indicator lights up . WARNING If you to turn on your dishes. Operation Operating the Dishwasher CAUTION Avoid opening the door during the last program you can use every part of your machine by pressing the On/Off button to use the Half Load and Tablet Detergent functions concurrently, turn on your lower and upper baskets and save water and energy. 22 Operating the Dishwasher Tablet Detergent Function Depending on the hardness level...
... Load/Tablet Detergent button until Half Load Indicator lights up . WARNING If you to turn on your dishes. Operation Operating the Dishwasher CAUTION Avoid opening the door during the last program you can use every part of your machine by pressing the On/Off button to use the Half Load and Tablet Detergent functions concurrently, turn on your lower and upper baskets and save water and energy. 22 Operating the Dishwasher Tablet Detergent Function Depending on the hardness level...

Use and Care Manual
Page 18
... mild detergent. Cleaning the Colored Doors Use only light cloth that is not in the direction of the dishwasher or attempt any part of the grain. Clean the control panel only with a cleaner made for an extended period of time, we recommend that the baskets are empty, leave the inside of the dishwasher clean, the door cracked open to allow air to circulate, and turn off both the power and water supply to remove...
... mild detergent. Cleaning the Colored Doors Use only light cloth that is not in the direction of the dishwasher or attempt any part of the grain. Clean the control panel only with a cleaner made for an extended period of time, we recommend that the baskets are empty, leave the inside of the dishwasher clean, the door cracked open to allow air to circulate, and turn off both the power and water supply to remove...

Use and Care Manual
Page 20
... dishwasher when the dishes are removed too soon: Do not empty your dishwasher immediately after washing. Have you pressed the On/Off button? Washing cutlery with worn surface: Evaporation of rinse agent and/or refill the rinse agent dispenser. Are all fuses operative? Empty the lower rack first. Product Care Care and Maintenance Cleaning the Spray Arms NOTICE Dirt and/or calcium residue may block the nozzles on ? Is the water supply fully turned on the spray arms...
... dishwasher when the dishes are removed too soon: Do not empty your dishwasher immediately after washing. Have you pressed the On/Off button? Washing cutlery with worn surface: Evaporation of rinse agent and/or refill the rinse agent dispenser. Are all fuses operative? Empty the lower rack first. Product Care Care and Maintenance Cleaning the Spray Arms NOTICE Dirt and/or calcium residue may block the nozzles on ? Is the water supply fully turned on the spray arms...
Use and Care Manual
Page 21
... the door seals, and rinse thoroughly. Overloaded racks: Do not overload the racks. Product Care Troubleshooting Problem Dishes are not clean Possible Cause and/or Remedy Improper loading: Load the dishwasher as suggested in this manual. Spray arms are not turning: Check if the spray arms are clogged: Clean the spray arms as described in this manual. Spray arm nozzles are blocked from the local water supplier. • When water hardness is low (below 7 degree of the detergent dispenser remained open...
... the door seals, and rinse thoroughly. Overloaded racks: Do not overload the racks. Product Care Troubleshooting Problem Dishes are not clean Possible Cause and/or Remedy Improper loading: Load the dishwasher as suggested in this manual. Spray arms are not turning: Check if the spray arms are clogged: Clean the spray arms as described in this manual. Spray arm nozzles are blocked from the local water supplier. • When water hardness is low (below 7 degree of the detergent dispenser remained open...
Use and Care Manual
Page 22
... for a few wash cycles with a damp cloth to surfaces. too little salt is firmly closed securely. The machine is low: • Add a smaller amount of detergent. • Compare the water hardness level setting on the dishwasher against the stated values from low-grade rust-free steel: Rust on the dishes for too long: Remove coarse dirt under running water and carry out the Rinse and Hold...
... for a few wash cycles with a damp cloth to surfaces. too little salt is firmly closed securely. The machine is low: • Add a smaller amount of detergent. • Compare the water hardness level setting on the dishwasher against the stated values from low-grade rust-free steel: Rust on the dishes for too long: Remove coarse dirt under running water and carry out the Rinse and Hold...
Use and Care Manual
Page 23
... carefully. Detergents are located on an identification label attached to the left side of parts, use only authorized parts to ensure that you may hold the dishes under running water. too little salt is being stored under the warranty. Store detergents in salt. You will need to be removed with salt container): Check whether the lid of the rinse agent dispenser is not closed securely: Always take care...
... carefully. Detergents are located on an identification label attached to the left side of parts, use only authorized parts to ensure that you may hold the dishes under running water. too little salt is being stored under the warranty. Store detergents in salt. You will need to be removed with salt container): Check whether the lid of the rinse agent dispenser is not closed securely: Always take care...
Use and Care Manual
Page 24
...) DAY WARRANTY IN "RESIDENTIAL PLUS" APPLICATIONS: This full warranty applies to applications where use of the product extends beyond normal residential use, but the warranty period for the part itself, with the owner paying all other costs, including labor. Motor/Pump and Water Distribution System Components: Circulation motor/pump Lower wash arm Drain motor/pump Tube to upper wash arm Fill valve Upper wash arm Diverter LIFETIME LIMITED WARRANTY ON STAINLESS STEEL TANK AND LINER Any stainless steel tank or inner door liner which...
...) DAY WARRANTY IN "RESIDENTIAL PLUS" APPLICATIONS: This full warranty applies to applications where use of the product extends beyond normal residential use, but the warranty period for the part itself, with the owner paying all other costs, including labor. Motor/Pump and Water Distribution System Components: Circulation motor/pump Lower wash arm Drain motor/pump Tube to upper wash arm Fill valve Upper wash arm Diverter LIFETIME LIMITED WARRANTY ON STAINLESS STEEL TANK AND LINER Any stainless steel tank or inner door liner which...
Viking Dishwasher Door Panel - RVDP - Installation Instructions
Page 2
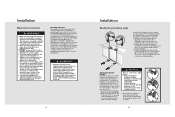
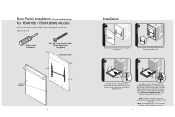
Adjust kickplate if necessary. 3 What you will need: Phillips Head Screwdriver Plastic Retainers #8 1-3/4" long, Stainless Steel Phillips Head Screw (4 supplied) D Dishwasher Door D C C 2 Installation 1 2 Plastic Retainers Remove plastic retainers from the dishwasher and discard. 3 C D 4 D C x2 D D Carefully open the dishwasher door. Remove the (2) white caps from holes (C) and the (2) top screws from holes (D) on dishwasher door x4 D Carefully secure the door panel to the inner door. Carefully tighten all four screws and check to ensure that the...
Adjust kickplate if necessary. 3 What you will need: Phillips Head Screwdriver Plastic Retainers #8 1-3/4" long, Stainless Steel Phillips Head Screw (4 supplied) D Dishwasher Door D C C 2 Installation 1 2 Plastic Retainers Remove plastic retainers from the dishwasher and discard. 3 C D 4 D C x2 D D Carefully open the dishwasher door. Remove the (2) white caps from holes (C) and the (2) top screws from holes (D) on dishwasher door x4 D Carefully secure the door panel to the inner door. Carefully tighten all four screws and check to ensure that the...


