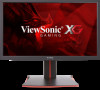
XG2701 Datasheet English
Page 2
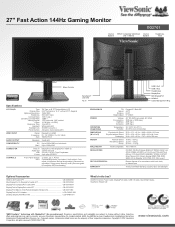
...Wall Mount Kit LCD-WMK-001 What's in accordance with DisplayPort 1.2a connection port. Copyright © 2016 ViewSonic Corporation. see your ViewSonic representative for complete OSD functionality) ERGONOMICS POWER OPERATING CONDITIONS DIMENSIONS (W x H x D) WEIGHT WALL MOUNT ...adjust, Information, Manual image adjust, Advanced image adjust, Setup menu, Memory recall (See user guide for complete details. XG2701 monitor, Power cable, DisplayPort cable, USB 3.0 cable, Quick Start Guide, ViewSonic Wizard CD ViewSonic Corporation's QMS & EMS have been registered to ISO ...
...Wall Mount Kit LCD-WMK-001 What's in accordance with DisplayPort 1.2a connection port. Copyright © 2016 ViewSonic Corporation. see your ViewSonic representative for complete OSD functionality) ERGONOMICS POWER OPERATING CONDITIONS DIMENSIONS (W x H x D) WEIGHT WALL MOUNT ...adjust, Information, Manual image adjust, Advanced image adjust, Setup menu, Memory recall (See user guide for complete details. XG2701 monitor, Power cable, DisplayPort cable, USB 3.0 cable, Quick Start Guide, ViewSonic Wizard CD ViewSonic Corporation's QMS & EMS have been registered to ISO ...

XG2701K User Guide English
Page 13
...Setup.exe file and follow the onscreen instructions to a wall-mounted display, do the following: 4. Wall Mounting (Optional) NOTE: For use only with the base mounting kit. c. 75mm 100mm 200mm 100mm 75mm 100mm 100mm 8. Double click on a towel or blanket. 6. To obtain a wall-mounting kit or height adjustment base, contact ViewSonic... base. (Screws removal might be required.) 7. Attach the mounting bracket from a desk-mounted to complete the simple installation. Load the ViewSonic CD on the back of the following the instructions in the wall-mounting kit. 5
...Setup.exe file and follow the onscreen instructions to a wall-mounted display, do the following: 4. Wall Mounting (Optional) NOTE: For use only with the base mounting kit. c. 75mm 100mm 200mm 100mm 75mm 100mm 100mm 8. Double click on a towel or blanket. 6. To obtain a wall-mounting kit or height adjustment base, contact ViewSonic... base. (Screws removal might be required.) 7. Attach the mounting bracket from a desk-mounted to complete the simple installation. Load the ViewSonic CD on the back of the following the instructions in the wall-mounting kit. 5
XG2701K User Guide English
Page 15
Also a shortcut to scroll up or down in the setup menu. 2. To display the Main Menu, press button [1]. To select a control to adjust, press ▲ or ▼ to toggle analog and digital connection. To save ...
Also a shortcut to scroll up or down in the setup menu. 2. To display the Main Menu, press button [1]. To select a control to adjust, press ▲ or ▼ to toggle analog and digital connection. To save ...

XG2701K User Guide English
Page 17
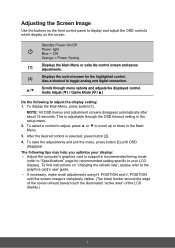
...the refresh rate is operating in a factory Preset Timing Mode listed in the computer, the LCD model number, the serial number, and the ViewSonic® website URL. You can manually set a variety of no signal input. 9 Input Select toggles between inputs if you have more than...guide for instructions on changing the resolution and refresh rate (vertical frequency). M Manual Image Adjust displays the Manual Image Adjust menu. S Setup Menu adjusts On-screen Display (OSD) settings. Power Management This product will enter to the LCD display. Memory Recall returns the adjustments back...
...the refresh rate is operating in a factory Preset Timing Mode listed in the computer, the LCD model number, the serial number, and the ViewSonic® website URL. You can manually set a variety of no signal input. 9 Input Select toggles between inputs if you have more than...guide for instructions on changing the resolution and refresh rate (vertical frequency). M Manual Image Adjust displays the Manual Image Adjust menu. S Setup Menu adjusts On-screen Display (OSD) settings. Power Management This product will enter to the LCD display. Memory Recall returns the adjustments back...