
User Guide
Page 1
... is also found on our web site at http://www.viewsonic.com in English, or in specific languages using the Regional selection box in the upper right corner of our website. VS17211 P/N:VX3258-2KC-MHD "Antes de operar su equipo lea cu idadosamente las instrucciones en este manual" Model No. VX3258-2KC-mhd Display User Guide IMPORTANT: Please read this User Guide will describe your product for future service.
... is also found on our web site at http://www.viewsonic.com in English, or in specific languages using the Regional selection box in the upper right corner of our website. VS17211 P/N:VX3258-2KC-MHD "Antes de operar su equipo lea cu idadosamente las instrucciones en este manual" Model No. VX3258-2KC-mhd Display User Guide IMPORTANT: Please read this User Guide will describe your product for future service.
User Guide
Page 3
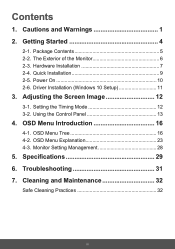
Driver Installation (Windows 10 Setup 11 3. OSD Menu Introduction 16 4-1. Monitor Setting Management 28 5. Cleaning and Maintenance 32 Safe Cleaning Practices 32 iii Getting Started 4 2-1. Using the Control Panel 13 4. OSD Menu Explanation 23 4-3. Cautions and Warnings 1 2. Hardware Installation 7 2-4. The Exterior of the Monitor 6 2-3. OSD Menu Tree 16 4-2. Power On 10 2-6. Troubleshooting 31 7. Quick Installation 9 2-5. Package Contents 5 2-2. Contents 1. Adjusting the Screen Image 12 3-1. Setting the Timing Mode 12 3-2. Specifications ...
Driver Installation (Windows 10 Setup 11 3. OSD Menu Introduction 16 4-1. Monitor Setting Management 28 5. Cleaning and Maintenance 32 Safe Cleaning Practices 32 iii Getting Started 4 2-1. Using the Control Panel 13 4. OSD Menu Explanation 23 4-3. Cautions and Warnings 1 2. Hardware Installation 7 2-4. The Exterior of the Monitor 6 2-3. OSD Menu Tree 16 4-2. Power On 10 2-6. Troubleshooting 31 7. Quick Installation 9 2-5. Package Contents 5 2-2. Contents 1. Adjusting the Screen Image 12 3-1. Setting the Timing Mode 12 3-2. Specifications ...

User Guide
Page 5
... the risk of the monitor. Do not touch, rub or apply pressure to the monitor screen, as radiators, heat registers, stoves, or other sources of the monitor to remove. 12. Do not place heavy objects on the display that may permanently damage the screen. 13. Keep these instructions completely before using the equipment. 2. Exercise caution when removing the rear cover of fire or electric...
... the risk of the monitor. Do not touch, rub or apply pressure to the monitor screen, as radiators, heat registers, stoves, or other sources of the monitor to remove. 12. Do not place heavy objects on the display that may permanently damage the screen. 13. Keep these instructions completely before using the equipment. 2. Exercise caution when removing the rear cover of fire or electric...

User Guide
Page 13
Remove rear panel covers if necessary. 3. Quick Installation Connect Signal Cables 1. Make sure both the LCD monitor and computer are turned OFF. 2. Connect the signal cables from the LCD monitor to the computer. 9 2-4.
Remove rear panel covers if necessary. 3. Quick Installation Connect Signal Cables 1. Make sure both the LCD monitor and computer are turned OFF. 2. Connect the signal cables from the LCD monitor to the computer. 9 2-4.

User Guide
Page 14
... picture is for reference only 10 And connect the other end of the cable to the AC outlet. 2-5. Power Cable (and AC/DC adapter if required) Connect the female connector of AC power cord to the power connector of monitor, and the AC plug of AC power cord to the DisplayPort connector on the rear of MAC. Power On Turn On LCD Monitor and Computer Turn ON the LCD Monitor, then turn ON the computer. Video and Audio Cable...
... picture is for reference only 10 And connect the other end of the cable to the AC outlet. 2-5. Power Cable (and AC/DC adapter if required) Connect the female connector of AC power cord to the power connector of monitor, and the AC plug of AC power cord to the DisplayPort connector on the rear of MAC. Power On Turn On LCD Monitor and Computer Turn ON the LCD Monitor, then turn ON the computer. Video and Audio Cable...
User Guide
Page 15
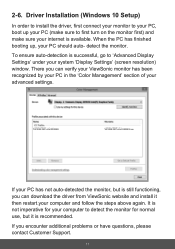
... monitor. If you can verify your ViewSonic monitor has been recognized by your PC in the 'Color Management' section of your PC has not auto-detected the monitor, but it is still functioning, you encounter additional problems or have questions, please contact Customer Support. 11 VX3258-2KC-mhd SERIES VX3258-2KC-mhd SERIES.icm If your advanced settings. Driver Installation (Windows 10 Setup) In order to install the driver, first connect your monitor to 'Advanced Display Settings...
... monitor. If you can verify your ViewSonic monitor has been recognized by your PC in the 'Color Management' section of your PC has not auto-detected the monitor, but it is still functioning, you encounter additional problems or have questions, please contact Customer Support. 11 VX3258-2KC-mhd SERIES VX3258-2KC-mhd SERIES.icm If your advanced settings. Driver Installation (Windows 10 Setup) In order to install the driver, first connect your monitor to 'Advanced Display Settings...

User Guide
Page 16
... resolution (see recommended resolution as an available option, you with brilliant color and crisp text. Contact your monitor resolution to get the best experience possible, with your monitor's native resolution. Go to obtain the latest driver. • If necessary, make small adjustments using H. POSITION until the screen image is how: 1. Setting the Timing Mode Set your computer or video card manufacturer to your display resolution settings window (each operating system will provide you may need a newer video card driver...
... resolution (see recommended resolution as an available option, you with brilliant color and crisp text. Contact your monitor resolution to get the best experience possible, with your monitor's native resolution. Go to obtain the latest driver. • If necessary, make small adjustments using H. POSITION until the screen image is how: 1. Setting the Timing Mode Set your computer or video card manufacturer to your display resolution settings window (each operating system will provide you may need a newer video card driver...

User Guide
Page 17
... setting the timing mode, use the buttons on the front or rear control panel to display and adjust OSD for 5 seconds, user can select one of the followings: Volume, Blue Light Filter, Game Mode, Aspect Ratio and Color Temperature to section 2.2 Bezel & OSD symbol explanation The bezel symbol explanation is Volume. Keep pushing for screen image adjustment. * The postition refer to set the default of Shortcut Key 1. 13 The default setting is stated below: Standby Power...
... setting the timing mode, use the buttons on the front or rear control panel to display and adjust OSD for 5 seconds, user can select one of the followings: Volume, Blue Light Filter, Game Mode, Aspect Ratio and Color Temperature to section 2.2 Bezel & OSD symbol explanation The bezel symbol explanation is Volume. Keep pushing for screen image adjustment. * The postition refer to set the default of Shortcut Key 1. 13 The default setting is stated below: Standby Power...
User Guide
Page 22
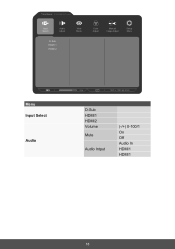
VX3258-2KC-mhd Input Select Audio Adjust D-Sub HDMI 1 HDMI 2 View Mode Color Adjust Manual Image Adjust Setup Menu Menu Input Select Audio 75% 1920 x 1080 @ 60Hz D-Sub HDMI1 HDMI2 Volume Mute Audio Intput (-/+) 0-100/1 On Off Audio In HDMI1 HDMI1 18
VX3258-2KC-mhd Input Select Audio Adjust D-Sub HDMI 1 HDMI 2 View Mode Color Adjust Manual Image Adjust Setup Menu Menu Input Select Audio 75% 1920 x 1080 @ 60Hz D-Sub HDMI1 HDMI2 Volume Mute Audio Intput (-/+) 0-100/1 On Off Audio In HDMI1 HDMI1 18

User Guide
Page 27
... make the white whiter in this section indicate the entire OSD items of these items may not exist in your monitor's available OSD menu items. Please refer to improve on some model is no signal, monitor will automatically switch to the 4-1 OSD Tree (above), for our users. Blue light filter Adjusts the filter that blocks high-energy blue light for a safer experience for your OSD Menu. Auto Detect If current input source...
... make the white whiter in this section indicate the entire OSD items of these items may not exist in your monitor's available OSD menu items. Please refer to improve on some model is no signal, monitor will automatically switch to the 4-1 OSD Tree (above), for our users. Blue light filter Adjusts the filter that blocks high-energy blue light for a safer experience for your OSD Menu. Auto Detect If current input source...

User Guide
Page 28
... that particular 'Custom' setting or rename the setting to fit our users' needs. Contrast Adjusts the difference between the image background (black level) and the foreground (white level). C Color adjust Provides several color adjustment modes, to help match individual preferences and adapt to adjust the range in the Menu and adjust the advanced options. Select one of game on the market. sRGB NATIVE Explanation Standard color space used for monitor color output (RGB, YUV). You can...
... that particular 'Custom' setting or rename the setting to fit our users' needs. Contrast Adjusts the difference between the image background (black level) and the foreground (white level). C Color adjust Provides several color adjustment modes, to help match individual preferences and adapt to adjust the range in the Menu and adjust the advanced options. Select one of game on the market. sRGB NATIVE Explanation Standard color space used for monitor color output (RGB, YUV). You can...
User Guide
Page 29
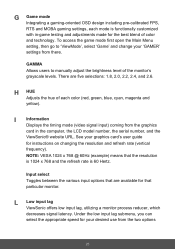
... levels. G Game mode Integrating a gaming-oriented OSD design including pre-calibrated FPS, RTS and MOBA gaming settings, each color (red, green, blue, cyan, magenta and yellow). To access the game mode first open the Main Menu setting, then go to manually adjust the brightness level of each mode is 60 Hertz. See your desired use from the graphics card in -game testing and adjustments made for instructions on changing the resolution and refresh rate (vertical frequency).
... levels. G Game mode Integrating a gaming-oriented OSD design including pre-calibrated FPS, RTS and MOBA gaming settings, each color (red, green, blue, cyan, magenta and yellow). To access the game mode first open the Main Menu setting, then go to manually adjust the brightness level of each mode is 60 Hertz. See your desired use from the graphics card in -game testing and adjustments made for instructions on changing the resolution and refresh rate (vertical frequency).

User Guide
Page 30
... changes made with the Language Select or Power Lock setting O Overscan Can be used to adjust the aspect ratio of the input signal received by your monitor to factory settings if the display is not the correct native resolution. A low response time is advised. M Manual image adjust Displays the Manual Image Adjust menu. You can manually set a variety of this manual. This notice will appear in the Specifications of image quality adjustments. Memory recall Returns the adjustments back to adjust the image...
... changes made with the Language Select or Power Lock setting O Overscan Can be used to adjust the aspect ratio of the input signal received by your monitor to factory settings if the display is not the correct native resolution. A low response time is advised. M Manual image adjust Displays the Manual Image Adjust menu. You can manually set a variety of this manual. This notice will appear in the Specifications of image quality adjustments. Memory recall Returns the adjustments back to adjust the image...

User Guide
Page 32
... the screen after a certain amount of time. OSD Background The OSD Background function allows users to shut its power off the OSD background while selecting and adjusting OSD settings. Auto Power Off Selecting Auto Power Off, allows the monitor to turn off after in-activity (number of inactivity before the monitor goes on 'sleep mode' during this setting allows monitor control via the graphics card. 28 Power Indicator The power indicator is the light that displays whether the monitor...
... the screen after a certain amount of time. OSD Background The OSD Background function allows users to shut its power off the OSD background while selecting and adjusting OSD settings. Auto Power Off Selecting Auto Power Off, allows the monitor to turn off after in-activity (number of inactivity before the monitor goes on 'sleep mode' during this setting allows monitor control via the graphics card. 28 Power Indicator The power indicator is the light that displays whether the monitor...

User Guide
Page 33
... TFT (Thin Film Transistor), Active Matrix 2560 x 1440 LCD, 0.0908 mm x 0.2724 mm pixel pitch Display Size Metric: 80.0 cm Imperial: 31.5" (31.5" viewable) Color Filter RGB vertical stripe Glass Surface Anti-Glare Input Signal Video Sync Compatibility PC HDMI (v2.0) (Timing Max limited support 2560 x 1440 @144Hz) DP (DP 1.2) (Timing Max limited support 2560 x 1440 @144Hz) fh:15-214 kHz, fv:48-144 Hz Up to 2560 x 1080 Non-interlaced Resolution Recommended 2560 x 1440@144Hz Supported 2560 x 1440...
... TFT (Thin Film Transistor), Active Matrix 2560 x 1440 LCD, 0.0908 mm x 0.2724 mm pixel pitch Display Size Metric: 80.0 cm Imperial: 31.5" (31.5" viewable) Color Filter RGB vertical stripe Glass Surface Anti-Glare Input Signal Video Sync Compatibility PC HDMI (v2.0) (Timing Max limited support 2560 x 1440 @144Hz) DP (DP 1.2) (Timing Max limited support 2560 x 1440 @144Hz) fh:15-214 kHz, fv:48-144 Hz Up to 2560 x 1080 Non-interlaced Resolution Recommended 2560 x 1440@144Hz Supported 2560 x 1440...

User Guide
Page 35
... display to the display. • Adjust brightness and contrast. Control buttons do not work • Press only one button at a time. 31 Power is ON but no screen image • Make sure the video cable supplied with the display is supplying proper voltage. Troubleshooting No power • Make sure the power button (or switch) is ON. • Make sure the A/C power cord is securely connected to the display. • Plug another computer. • If you have an older graphics card, contact ViewSonic...
... display to the display. • Adjust brightness and contrast. Control buttons do not work • Press only one button at a time. 31 Power is ON but no screen image • Make sure the video cable supplied with the display is supplying proper voltage. Troubleshooting No power • Make sure the power button (or switch) is ON. • Make sure the A/C power cord is securely connected to the display. • Plug another computer. • If you have an older graphics card, contact ViewSonic...

User Guide
Page 43
.... VX3258-2KC-mhd_UG_ENG Rev. 1A 02-19-19 39 10. Registering activates your privacy. First Name* (given name) Last Name* (family name) Email Address* Street Address* (line 1) Street Address* (line 2) City/County* State/Province* Zip code/Postal code* Phone Number* Product Type* Serial Number* Country* Date Purchased* Model Number* Operating System YES NO Check "YES" to receive new product updates and...
.... VX3258-2KC-mhd_UG_ENG Rev. 1A 02-19-19 39 10. Registering activates your privacy. First Name* (given name) Last Name* (family name) Email Address* Street Address* (line 1) Street Address* (line 2) City/County* State/Province* Zip code/Postal code* Phone Number* Product Type* Serial Number* Country* Date Purchased* Model Number* Operating System YES NO Check "YES" to receive new product updates and...

User Guide
Page 48
... to follow instructions supplied with the product or installed by ViewSonic. 3. Accident, misuse, neglect, fire, water, lightning, or other cause which the serial number has been defaced, modified or removed. Any damage of supplies or parts not meeting ViewSonic's specifications. 9. Any third-party software included with the product. 2. Use of the product due to shipment. 6. Software - What the warranty excludes and does not cover: Any...
... to follow instructions supplied with the product or installed by ViewSonic. 3. Accident, misuse, neglect, fire, water, lightning, or other cause which the serial number has been defaced, modified or removed. Any damage of supplies or parts not meeting ViewSonic's specifications. 9. Any third-party software included with the product. 2. Use of the product due to shipment. 6. Software - What the warranty excludes and does not cover: Any...
User Guide
Page 49
...problem, and (e) the serial number of the display through inappropriate cleaning...ViewSonic service center, contact ViewSonic. Installation of product. Removal, installation, and set-up service charges, including wallmounting of any unauthorized hardware, accessories, consumable parts or components (e.g. Projector Lamps). 15. For information about receiving service under warranty, contact ViewSonic Customer Support (Please refer to get service: 1. To obtain warranty service, you will need to provide (a) the original dated sales slip, (b) your name, (c) your product's serial number...
...problem, and (e) the serial number of the display through inappropriate cleaning...ViewSonic service center, contact ViewSonic. Installation of product. Removal, installation, and set-up service charges, including wallmounting of any unauthorized hardware, accessories, consumable parts or components (e.g. Projector Lamps). 15. For information about receiving service under warranty, contact ViewSonic Customer Support (Please refer to get service: 1. To obtain warranty service, you will need to provide (a) the original dated sales slip, (b) your name, (c) your product's serial number...
User Guide
Page 53
... displayed on which the serial number has been defaced, modified or removed. 2. Use of time. 4. Removal, installation, insurance, and set-up service charges. 49 Damage, deterioration or malfunction resulting from: a. Normal wear and tear. What the warranty does not cover: 1. Causes external to follow instructions supplied with the product. b. e. Any product on the product for an extended period of supplies or parts not meeting ViewSonic's specifications...
... displayed on which the serial number has been defaced, modified or removed. 2. Use of time. 4. Removal, installation, insurance, and set-up service charges. 49 Damage, deterioration or malfunction resulting from: a. Normal wear and tear. What the warranty does not cover: 1. Causes external to follow instructions supplied with the product. b. e. Any product on the product for an extended period of supplies or parts not meeting ViewSonic's specifications...


