
VT1601 Datasheet Hi Res (English, US)
Page 2
...-play, high-end connectivity for complete details. see your LCD TV with support for HDMI with batteries, User Guide, Quick Start Guide ViewSonic Corporation's QMS & EMS have been registered to ISO 9001 & ISO 14001, respectively, by country; 16" (15.6" Viewable) LED Premium HDTV Display VT1601LED Controls Wall Mount-Ready Component Expand Your Options with...
...-play, high-end connectivity for complete details. see your LCD TV with support for HDMI with batteries, User Guide, Quick Start Guide ViewSonic Corporation's QMS & EMS have been registered to ISO 9001 & ISO 14001, respectively, by country; 16" (15.6" Viewable) LED Premium HDTV Display VT1601LED Controls Wall Mount-Ready Component Expand Your Options with...

VT1601LED User Guide M Region (English)
Page 1
... website. "Antes de operar su equipo lea cu idadosamente las instrucciones en este manual" Model No. VT1601LED LCD TV User Guide IMPORTANT: Please read this User Guide will describe your product for future service. viewsonic.com in English, or in specific languages using your product in a safe manner, as well as ...registering your limited coverage from ViewSonic Corporation, which is also found on installing and using the Regional selection box in this User Guide to obtain important information on our...
... website. "Antes de operar su equipo lea cu idadosamente las instrucciones en este manual" Model No. VT1601LED LCD TV User Guide IMPORTANT: Please read this User Guide will describe your product for future service. viewsonic.com in English, or in specific languages using your product in a safe manner, as well as ...registering your limited coverage from ViewSonic Corporation, which is also found on installing and using the Regional selection box in this User Guide to obtain important information on our...

VT1601LED User Guide M Region (English)
Page 6
... not place this TV in use strong...TV in a place where medical equipment is in a vehicle. CARRYING THE TV Carry the TV as instructed To prevent dropping the TV... This TV contains... not install this TV, unplug the AC...solution of the LCD TV. Antenna grounding ... the TV set When cleaning this TV in...Section 810 of the TV. If the plug ...TV set is not designed...LCD panel and the frame around the screen. • When carrying the TV, do not expose the TV...TV. • Carrying the large size TV requires at night. If not, it to be installed, leave some TVs...the LED TV is operating, unplug the TV and ...
... not place this TV in use strong...TV in a place where medical equipment is in a vehicle. CARRYING THE TV Carry the TV as instructed To prevent dropping the TV... This TV contains... not install this TV, unplug the AC...solution of the LCD TV. Antenna grounding ... the TV set When cleaning this TV in...Section 810 of the TV. If the plug ...TV set is not designed...LCD panel and the frame around the screen. • When carrying the TV, do not expose the TV...TV. • Carrying the large size TV requires at night. If not, it to be installed, leave some TVs...the LED TV is operating, unplug the TV and ...

VT1601LED User Guide M Region (English)
Page 8
... cause damage. • Do not make prolonged contact with high-precision technology. The image may be uneven or the LCD panel may be damaged. • If the TV is not caused by the manufacturer) to determine that have the same characteristics as the temperature rises. • When ...dark environment without an input source or a blank screen. This is a structural property of the LCD panel and is not a malfunction. • The LCD screen is set to maximize the brightness of repairs to the TV, ask the service technician to perform routine safety checks (as specified by a failure. To ...
... cause damage. • Do not make prolonged contact with high-precision technology. The image may be uneven or the LCD panel may be damaged. • If the TV is not caused by the manufacturer) to determine that have the same characteristics as the temperature rises. • When ...dark environment without an input source or a blank screen. This is a structural property of the LCD panel and is not a malfunction. • The LCD screen is set to maximize the brightness of repairs to the TV, ask the service technician to perform routine safety checks (as specified by a failure. To ...

VT1601LED User Guide M Region (English)
Page 10
...put a piece of soft cloth on the table on which the screen will be set . (see Figure 1) 2. Unpack the stand, one hand hold the TV and one hand pull stand with arm together. (see Figure 3) 2 Then, you shall successfully uninstall the stand. (see Figure 2) 3. Remove the 4 ...screws on which the screen will be set . (see Figure 1) 2. ENGLISH Getting Started Installing the LCD TV Installing the Stand 1. To prevent the TV from being scratched, put a piece of soft cloth on the table on the hinge, then pull up . (see Figure 2) 3. Lay ...
...put a piece of soft cloth on the table on which the screen will be set . (see Figure 1) 2. Unpack the stand, one hand hold the TV and one hand pull stand with arm together. (see Figure 3) 2 Then, you shall successfully uninstall the stand. (see Figure 2) 3. Remove the 4 ...screws on which the screen will be set . (see Figure 1) 2. ENGLISH Getting Started Installing the LCD TV Installing the Stand 1. To prevent the TV from being scratched, put a piece of soft cloth on the table on the hinge, then pull up . (see Figure 2) 3. Lay ...

VT1601LED User Guide M Region (English)
Page 11
...the device to the wall. Ensure there is working. • If your LCD TV to allow adequate cooling during operation. • Hang the LCD TV wall mount plate to the wall mount bracket, completing installation. Enjoy your ViewSonic LCD TV! 3 The wall-mount screw type is already set up for indoor use... screws found in a free standing position or wall-mounted. ENGLISH Getting Started Mounting ViewSonic LCD TV to the wall The LCD TV can be a service need. • Install the wall mount plate to the LCD TV using screws NO LONGER than 10mm, as you need the serial number to request service...
...the device to the wall. Ensure there is working. • If your LCD TV to allow adequate cooling during operation. • Hang the LCD TV wall mount plate to the wall mount bracket, completing installation. Enjoy your ViewSonic LCD TV! 3 The wall-mount screw type is already set up for indoor use... screws found in a free standing position or wall-mounted. ENGLISH Getting Started Mounting ViewSonic LCD TV to the wall The LCD TV can be a service need. • Install the wall mount plate to the LCD TV using screws NO LONGER than 10mm, as you need the serial number to request service...

VT1601LED User Guide M Region (English)
Page 12
... D Product Family LCD TV inch 16 19 ~ 24 26 ~ 27 32 ~ 37 42 ~ 47 52 VESA Spec. (A x B) Standard Screw (C x D) Quantity 75 x 75 mm M4 x L10 4 100 x 100 mm M4 x L10 4 200 x 100 mm M4 x L10 4 400 x 100 mm M6 x L10 4 600 x 200 mm M6 x L10 4 400 x 200 mm M6 x L10 4 • ViewSonic provides the... standard dimensions for wall mount kits as shown in the table above. • To find the perfect mount, please browse www.viewsonic.com or call our service team: United States 1-800-688-6688, Canada 1-866-463-4775. • When purchasing our wall mount kit, a detailed install ...
... D Product Family LCD TV inch 16 19 ~ 24 26 ~ 27 32 ~ 37 42 ~ 47 52 VESA Spec. (A x B) Standard Screw (C x D) Quantity 75 x 75 mm M4 x L10 4 100 x 100 mm M4 x L10 4 200 x 100 mm M4 x L10 4 400 x 100 mm M6 x L10 4 600 x 200 mm M6 x L10 4 400 x 200 mm M6 x L10 4 • ViewSonic provides the... standard dimensions for wall mount kits as shown in the table above. • To find the perfect mount, please browse www.viewsonic.com or call our service team: United States 1-800-688-6688, Canada 1-866-463-4775. • When purchasing our wall mount kit, a detailed install ...

VT1601LED User Guide M Region (English)
Page 14
... will be muted. 2 PC Audio input Connect the RGB Audio Out on your computer to the RGB Audio on the rear of the LCD TV. 3 TV Input Jack Connect this jack to your Cable or VHF/UHF antenna. 4 VGA signal input Connect a 15-pin D-sub RGB cable to the RGB output ...of your computer and the other end to the RGB input on the rear of the LCD TV. 5 Composite Video input Connect this jack to the composite video output connectors on your A/V equipment. 6 AV Audio input (left/ right) Connect the Audio in cable...
... will be muted. 2 PC Audio input Connect the RGB Audio Out on your computer to the RGB Audio on the rear of the LCD TV. 3 TV Input Jack Connect this jack to your Cable or VHF/UHF antenna. 4 VGA signal input Connect a 15-pin D-sub RGB cable to the RGB output ...of your computer and the other end to the RGB input on the rear of the LCD TV. 5 Composite Video input Connect this jack to the composite video output connectors on your A/V equipment. 6 AV Audio input (left/ right) Connect the Audio in cable...

VT1601LED User Guide M Region (English)
Page 15
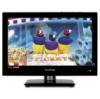
...Getting Started Connecting the LCD TV Cable System or VHF/UHF Antenna System Enjoy the high-definition and standard-definition digital programming along with audio) input on the back of TV VHF/UHF/CABLE input ☼ • Remember to set the TV/CATV setting in the TV menu to Air or...cable input using a 75-ohm coaxial cable (not supplied) to your LCD TV. A-B RF switch Cable Antenna Rear of your TV via the HDMI or component video (with standarddefinition analog programming. ☼ • This TV is capable of TV HD cable box/ HD satellite box HDMI cable HDMI cable 7 CATV/...
...Getting Started Connecting the LCD TV Cable System or VHF/UHF Antenna System Enjoy the high-definition and standard-definition digital programming along with audio) input on the back of TV VHF/UHF/CABLE input ☼ • Remember to set the TV/CATV setting in the TV menu to Air or...cable input using a 75-ohm coaxial cable (not supplied) to your LCD TV. A-B RF switch Cable Antenna Rear of your TV via the HDMI or component video (with standarddefinition analog programming. ☼ • This TV is capable of TV HD cable box/ HD satellite box HDMI cable HDMI cable 7 CATV/...

VT1601LED User Guide M Region (English)
Page 17
The LCD TV can also be connected to GTF® 1366 x 768 @ 60 Hz) 9 PC Timing Reference Chart Mode Standard ...1366x768 1366x768 1366x768 1366x768 Compatible Input RGB Yes Yes Yes Yes Yes Yes Yes Yes Yes Yes ☼ • This TV's PC VGA input does not support interlaced signals. • For the best picture quality, we recommend that you use ...the signals (boldfaced) in the above chart with DVI or VGA output. ENGLISH Getting Started Personal Computer Use the LCD TV as the monitor of TV Audio cable (stereo mini plugs) VGA 15 Pin cable ☼ • Connect the PC IN jack to...
The LCD TV can also be connected to GTF® 1366 x 768 @ 60 Hz) 9 PC Timing Reference Chart Mode Standard ...1366x768 1366x768 1366x768 1366x768 Compatible Input RGB Yes Yes Yes Yes Yes Yes Yes Yes Yes Yes ☼ • This TV's PC VGA input does not support interlaced signals. • For the best picture quality, we recommend that you use ...the signals (boldfaced) in the above chart with DVI or VGA output. ENGLISH Getting Started Personal Computer Use the LCD TV as the monitor of TV Audio cable (stereo mini plugs) VGA 15 Pin cable ☼ • Connect the PC IN jack to...

VT1601LED User Guide M Region (English)
Page 18
... cover. This may result in creaking or leakage, which may pose a risk of the LCD TV. 10 Press it again to return to the standby mode. 13 2 AUTO PC source...• Only use the specified AAA batteries. • Do not mix new and old batteries. Remote Control and TV Controls Buttons located at the side of the battery in leakage, which may pose a risk of fire or lead ...to personal injury. • Dispose of the LCD TV will not to the (+) and (-) markings on the cover. 2. Insert the batteries, corresponding to be used for ...
... cover. This may result in creaking or leakage, which may pose a risk of the LCD TV. 10 Press it again to return to the standby mode. 13 2 AUTO PC source...• Only use the specified AAA batteries. • Do not mix new and old batteries. Remote Control and TV Controls Buttons located at the side of the battery in leakage, which may pose a risk of fire or lead ...to personal injury. • Dispose of the LCD TV will not to the (+) and (-) markings on the cover. 2. Insert the batteries, corresponding to be used for ...
VT1601LED User Guide M Region (English)
Page 19
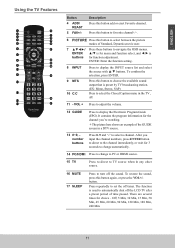
... select a channel. The function is buttons for 3 seconds to change automatically. 14 PC/HDMI Press to change to PC or HDMI source. 15 TV Press to direct to TV source when in any other source. 16 MUTE 17 SLEEP Press to turn off the sound. Off, 5 Min, 10 Min, 15 Min, 30... INPUT source list and select the source with ▲/▼ buttons. ENTER: Enter the function setting. 8 INPUT 9 MTS 10 C.C Press to set the off the LCD TV after a preset period of the GUIDE screen in the TV , AV. 11 - ENTER ▲/▼ is for choice - To confirm the selection, press ENTER.
... select a channel. The function is buttons for 3 seconds to change automatically. 14 PC/HDMI Press to change to PC or HDMI source. 15 TV Press to direct to TV source when in any other source. 16 MUTE 17 SLEEP Press to turn off the sound. Off, 5 Min, 10 Min, 15 Min, 30... INPUT source list and select the source with ▲/▼ buttons. ENTER: Enter the function setting. 8 INPUT 9 MTS 10 C.C Press to set the off the LCD TV after a preset period of the GUIDE screen in the TV , AV. 11 - ENTER ▲/▼ is for choice - To confirm the selection, press ENTER.

VT1601LED User Guide M Region (English)
Page 22
... or press VOL +/- Channels erased or not memorized will be shown. 2. Viewing the Displayed Information To display the current information of the LCD TV: Press INFO, and the current state will not be displayed on the screen. (It shows all channels that have been memorized. Using ...the INFO screen in ATV mode. Press 8 → press 0 → press "-" → press 3. *Return to change channels, and the TV changes channels in DTV. Directly press the number buttons to select channels. (2) DTV Use "-" button to adjust volume. Adjusting the Volume Press VOL +/- To...
... or press VOL +/- Channels erased or not memorized will be shown. 2. Viewing the Displayed Information To display the current information of the LCD TV: Press INFO, and the current state will not be displayed on the screen. (It shows all channels that have been memorized. Using ...the INFO screen in ATV mode. Press 8 → press 0 → press "-" → press 3. *Return to change channels, and the TV changes channels in DTV. Directly press the number buttons to select channels. (2) DTV Use "-" button to adjust volume. Adjusting the Volume Press VOL +/- To...

VT1601LED User Guide M Region (English)
Page 34
ENGLISH Other Information Troubleshooting Please contact ViewSonic service team directly if you have been pressed, try pressing this button again. • Check your audio settings, your TV audio may be scrambled or encoded. Please contact your local cable operator. • Make sure that connection to ...://www.ViewSonic.com Or call our service team: United States 1-800-688-6688 Canada 1-866-463-4775 Problem No power No picture Strange color, light color, or color misalignment No sound Possible Solution • Make sure the power cord is properly connected to the LCD TV AC power...
ENGLISH Other Information Troubleshooting Please contact ViewSonic service team directly if you have been pressed, try pressing this button again. • Check your audio settings, your TV audio may be scrambled or encoded. Please contact your local cable operator. • Make sure that connection to ...://www.ViewSonic.com Or call our service team: United States 1-800-688-6688 Canada 1-866-463-4775 Problem No power No picture Strange color, light color, or color misalignment No sound Possible Solution • Make sure the power cord is properly connected to the LCD TV AC power...

VT1601LED User Guide M Region (English)
Page 35
please check all the CATV connections. • The cable TV service is interrupted; Unit cannot be operated • External influences such as necessary. Please set ...only one button at the remote control sensor on the TV. • Press the POWER button on the remote control to see if there is a MENU shown on the power of the LCD TV and the AVC System, or unplug the AC cord for... the operation you want to see if you can get the picture you can turn on the TV. • Press MENU button on the...
please check all the CATV connections. • The cable TV service is interrupted; Unit cannot be operated • External influences such as necessary. Please set ...only one button at the remote control sensor on the TV. • Press the POWER button on the remote control to see if there is a MENU shown on the power of the LCD TV and the AVC System, or unplug the AC cord for... the operation you want to see if you can get the picture you can turn on the TV. • Press MENU button on the...

VT1601LED User Guide M Region (English)
Page 36
...Model VT1601LED LCD (LED Backlight) Input signal Type 16" TFT Active Matrix RGB 0.252(H) x 0.252(V) mm pixel Color Pixel Arrangement RGB vertical strip Surface Treatment AG type, 3H hard coating, Haze 25 RGB RF Video RGB analog (0.7/1.0 Vp-p, 75 ohms) Separate Sync, fh: 30-82 kHz, fv:55-76 Hz TV ... Stand by < 25 W [Max] (blue LED) < 0.5 W @ 115 Vac only (orange LED) Warning: Do not set the graphics card in permanent damage to the LCD TV. doing so may result in your computer to change without notice. 28 Note: Product Specifications are subject to exceed these refresh rates;
...Model VT1601LED LCD (LED Backlight) Input signal Type 16" TFT Active Matrix RGB 0.252(H) x 0.252(V) mm pixel Color Pixel Arrangement RGB vertical strip Surface Treatment AG type, 3H hard coating, Haze 25 RGB RF Video RGB analog (0.7/1.0 Vp-p, 75 ohms) Separate Sync, fh: 30-82 kHz, fv:55-76 Hz TV ... Stand by < 25 W [Max] (blue LED) < 0.5 W @ 115 Vac only (orange LED) Warning: Do not set the graphics card in permanent damage to the LCD TV. doing so may result in your computer to change without notice. 28 Note: Product Specifications are subject to exceed these refresh rates;


