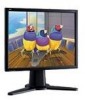
User Guide
Page 2
Content Compliance Information 1 Important Safety Instructions 2 Product Registration 3 For Your Records 3 Getting Started Package Contents 4 Precautions 4 Quick Installation 5 Landscape/Portrait Modes 6 To Raise and Lower the display 6 Installation of Wall Mount (Optional 7 Using the LCD Display Setting the Timing Mode 8 OSD and Power Lock Settings 8 Adjusting the Screen Image 9 Main Menu Controls 10 Other Information Specifications 15 Troubleshooting 16 Customer Support 17 Cleaning the LCD Display 18 Limited Warranty 19 ViewSonic VP191b/VP191s
Content Compliance Information 1 Important Safety Instructions 2 Product Registration 3 For Your Records 3 Getting Started Package Contents 4 Precautions 4 Quick Installation 5 Landscape/Portrait Modes 6 To Raise and Lower the display 6 Installation of Wall Mount (Optional 7 Using the LCD Display Setting the Timing Mode 8 OSD and Power Lock Settings 8 Adjusting the Screen Image 9 Main Menu Controls 10 Other Information Specifications 15 Troubleshooting 16 Customer Support 17 Cleaning the LCD Display 18 Limited Warranty 19 ViewSonic VP191b/VP191s

User Guide
Page 9
... screws from the VESA compatible wall mounting kit (100 mm x 100 mm distance). 6. Refer to a wall-mounted display, do the following the instructions in the wall-mounting kit. Disconnect Power. 2. Attach the LCD display to the wall, following : Remove four screws 1. ViewSonic VP191b/VP191s 7 Installation of Wall Mount (Optional) To obtain a wall-mounting kit, contact ViewSonic or your LCD display from a desk-mounted to the instructions that...
... screws from the VESA compatible wall mounting kit (100 mm x 100 mm distance). 6. Refer to a wall-mounted display, do the following the instructions in the wall-mounting kit. Disconnect Power. 2. Attach the LCD display to the wall, following : Remove four screws 1. ViewSonic VP191b/VP191s 7 Installation of Wall Mount (Optional) To obtain a wall-mounting kit, contact ViewSonic or your LCD display from a desk-mounted to the instructions that...


