
User Manual
Page 2
... trademarks of VESA. Keep this User Guide as it becomes available, please register your purchase to help with identification in this product. ViewSonic VE170/VE170b 1 ENERGY STAR is a registered trademark of theft or loss. Information in the event of the Video Electronics Standards Association. Electronic Warranty Registration To meet your future needs, and to change without notice. Microsoft, Windows, Windows NT, and...
... trademarks of VESA. Keep this User Guide as it becomes available, please register your purchase to help with identification in this product. ViewSonic VE170/VE170b 1 ENERGY STAR is a registered trademark of theft or loss. Information in the event of the Video Electronics Standards Association. Electronic Warranty Registration To meet your future needs, and to change without notice. Microsoft, Windows, Windows NT, and...

User Manual
Page 3
... using the ViewPanel 4 G Precautions 4 L I Quick Installation 5 S H Using the ViewPanel Setting the Timing Mode 6 Preset Timing Modes 6 Maximum Refresh Rates 6 Adjusting the Screen Image 7 Other Information Specifications 14 Troubleshooting 15 Customer Support 16 Cleaning the ViewPanel 17 Warranty 18 Appendix Power Cord Safety Guidelines 19 FCC Information 20 CE Conformity 20 *To meet your future needs, and to receive any additional product information as it becomes available, please register your monitor...
... using the ViewPanel 4 G Precautions 4 L I Quick Installation 5 S H Using the ViewPanel Setting the Timing Mode 6 Preset Timing Modes 6 Maximum Refresh Rates 6 Adjusting the Screen Image 7 Other Information Specifications 14 Troubleshooting 15 Customer Support 16 Cleaning the ViewPanel 17 Warranty 18 Appendix Power Cord Safety Guidelines 19 FCC Information 20 CE Conformity 20 *To meet your future needs, and to receive any additional product information as it becomes available, please register your monitor...

User Manual
Page 4
... you install both files as shown in this user guide refers to receive Analog RGB video signal from PC • ViewSonic® Wizard CD-ROM Includes User Guide PDF files and INF/ ICM Display Optimization files* *NOTE: The supplied INF file assures compatibility with Windows operating systems, and the ICM file (Image Color Matching) ensures accurate on your purchase of the ViewPanel (the DC In port). ViewSonic VE170/VE170b Getting Started 3 Getting Started...
... you install both files as shown in this user guide refers to receive Analog RGB video signal from PC • ViewSonic® Wizard CD-ROM Includes User Guide PDF files and INF/ ICM Display Optimization files* *NOTE: The supplied INF file assures compatibility with Windows operating systems, and the ICM file (Image Color Matching) ensures accurate on your purchase of the ViewPanel (the DC In port). ViewSonic VE170/VE170b Getting Started 3 Getting Started...
User Manual
Page 5
... from making adjustments unnecessarily. Do not place anything on the voltage parts. This will prevent you adjust the ViewPanel. injury if you touch these parts. • Avoid exposing the ViewPanel to remove. • Ensure the area around the ViewPanel is • NEVER REMOVE THE REAR clean and free of heat. COVER. area. Oils from the dissipation of moisture. E Precautions N G • For best viewing...
... from making adjustments unnecessarily. Do not place anything on the voltage parts. This will prevent you adjust the ViewPanel. injury if you touch these parts. • Avoid exposing the ViewPanel to remove. • Ensure the area around the ViewPanel is • NEVER REMOVE THE REAR clean and free of heat. COVER. area. Oils from the dissipation of moisture. E Precautions N G • For best viewing...

User Manual
Page 6
To order an E N G L I S H ViewSonic VE170/VE170b 5 Macintosh® users: Connect a Macintosh adapter (part No. Connect the video cable from the back of the display. VMAC-1) to the video cable, then to the video input on the back of your computer to the ViewPanel. 1 Connect video cable Make sure that both the ViewPanel® and the computer are powered OFF.
To order an E N G L I S H ViewSonic VE170/VE170b 5 Macintosh® users: Connect a Macintosh adapter (part No. Connect the video cable from the back of the display. VMAC-1) to the video cable, then to the video input on the back of your computer to the ViewPanel. 1 Connect video cable Make sure that both the ViewPanel® and the computer are powered OFF.

User Manual
Page 7
... illuminated "active area" of the resolution and refresh rate (vertical frequency). Doing so may result in permanent damage to exceed the maximum refresh rate for this section to make small adjustments using H POSITION and V POSITION, then PHASE, until the screen image is : E 1280 x 1024 @ 60Hz. The recommended timing mode for each resolution shown below in your computer to your graphic card's user guide for an optimal screen image, select a timing mode from the IMAGE ADJUST menu.
... illuminated "active area" of the resolution and refresh rate (vertical frequency). Doing so may result in permanent damage to exceed the maximum refresh rate for this section to make small adjustments using H POSITION and V POSITION, then PHASE, until the screen image is : E 1280 x 1024 @ 60Hz. The recommended timing mode for each resolution shown below in your computer to your graphic card's user guide for an optimal screen image, select a timing mode from the IMAGE ADJUST menu.

User Manual
Page 8
... o r t c u t : T h e [▲] b u t t o n g o e s d ir e c lt y t o t h e B R I G H T N E S S c o n rt o l s c r e e n , t h e n b u t to n [2 ] to g gle s to select from the menus and make adjustments. P o w er o n /o f f ViewSonic V E 1 7 0 / V E 1 7 0 b U sin g t h e V ie w P a n el ® 7 S e e th e n e x t fe w p a g e s f o r d e s c ri p it c a lly . it o n s . For descriptions of each control see the next few pages. Adjusting the Screen Image Adjust the screen image using the buttons on the Front Control Panel to th e C O N T R A S T c o n rt o l s c r e e n .
... o r t c u t : T h e [▲] b u t t o n g o e s d ir e c lt y t o t h e B R I G H T N E S S c o n rt o l s c r e e n , t h e n b u t to n [2 ] to g gle s to select from the menus and make adjustments. P o w er o n /o f f ViewSonic V E 1 7 0 / V E 1 7 0 b U sin g t h e V ie w P a n el ® 7 S e e th e n e x t fe w p a g e s f o r d e s c ri p it c a lly . it o n s . For descriptions of each control see the next few pages. Adjusting the Screen Image Adjust the screen image using the buttons on the Front Control Panel to th e C O N T R A S T c o n rt o l s c r e e n .

User Manual
Page 9
Adjusting the Screen Image..continued The following steps show an example of how to access the OnView® Main Menu and sub-menus in order to make adjustments to s ele c t a m e n u o p it o n . A c o n rt o l s c r e e n lik e t h e s a m p l e s h o w n b e l o w a p p e ars (s e e S te p 4 A ) . E N G L 2 P r e s s t h e [ ▼] o r [▲] b u t t o n t o I S H s c r o ll d o w n o r u p t h e m e n u t o t h e d e sir e d o p it o n . T h e n , p r e s s t h e [ 2 ] b u t t o n t o g o t o t h e c o n rt o l s c r e e n . For more information on each control see...
Adjusting the Screen Image..continued The following steps show an example of how to access the OnView® Main Menu and sub-menus in order to make adjustments to s ele c t a m e n u o p it o n . A c o n rt o l s c r e e n lik e t h e s a m p l e s h o w n b e l o w a p p e ars (s e e S te p 4 A ) . E N G L 2 P r e s s t h e [ ▼] o r [▲] b u t t o n t o I S H s c r o ll d o w n o r u p t h e m e n u t o t h e d e sir e d o p it o n . T h e n , p r e s s t h e [ 2 ] b u t t o n t o g o t o t h e c o n rt o l s c r e e n . For more information on each control see...

User Manual
Page 10
ViewSonic V E 1 7 0 / V E 1 7 0 b U sin g t h e V ie w P a n el ® 9 Main Menu The Main Menu is shown below. BRIGHTNESS adjusts background black level of the screen image. [▼] decreases brightness, [▲] increases brightness. E N G L I S H CONTRAST adjusts the difference between the image background (black level) and the foreground (white level). [▼] decreases contrast, [▲] increases contrast.
ViewSonic V E 1 7 0 / V E 1 7 0 b U sin g t h e V ie w P a n el ® 9 Main Menu The Main Menu is shown below. BRIGHTNESS adjusts background black level of the screen image. [▼] decreases brightness, [▲] increases brightness. E N G L I S H CONTRAST adjusts the difference between the image background (black level) and the foreground (white level). [▼] decreases contrast, [▲] increases contrast.
User Manual
Page 11
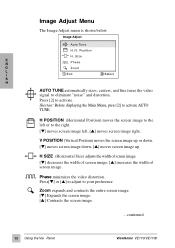
... n el ® ViewSonic V E 1 7 0 / V E 1 7 0 b Phase minimizes the video distortion. H POSITION (Horizontal Position) moves the screen image to the left or to activate AUTO TUNE. H SIZE (Horizontal Size) adjusts the width of screen image. [▼] decreases the width of screen image, [▲] increases the width of screen image. V POSITION (Vertical Position) moves the screen image up or down. [▼] moves screen image down, [▲] moves screen image up. Image Adjust Menu The Image Adjust menu is shown below. Shortcut: Before displaying the Main Menu, press [2] to the...
... n el ® ViewSonic V E 1 7 0 / V E 1 7 0 b Phase minimizes the video distortion. H POSITION (Horizontal Position) moves the screen image to the left or to activate AUTO TUNE. H SIZE (Horizontal Size) adjusts the width of screen image. [▼] decreases the width of screen image, [▲] increases the width of screen image. V POSITION (Vertical Position) moves the screen image up or down. [▼] moves screen image down, [▲] moves screen image up. Image Adjust Menu The Image Adjust menu is shown below. Shortcut: Before displaying the Main Menu, press [2] to the...

User Manual
Page 12
... The number next to the screen image for a darker color. 5000K - The factory setting for a darker color. Adds blue to the status bar changes accordingly. 3 To save your selection. 9300K - User Color - Adds green to it. 2 To adjust a highlighted color, press [▼] or [▲]. Adds red to the screen image for red, green, and blue. 1 From the USER COLOR screen, press [▼] or [▲] to highlight red, green, or blue, then press button [2] to the screen image for cooler white (used in...
... The number next to the screen image for a darker color. 5000K - The factory setting for a darker color. Adds blue to the status bar changes accordingly. 3 To save your selection. 9300K - User Color - Adds green to it. 2 To adjust a highlighted color, press [▼] or [▲]. Adds red to the screen image for red, green, and blue. 1 From the USER COLOR screen, press [▼] or [▲] to highlight red, green, or blue, then press button [2] to the screen image for cooler white (used in...

User Manual
Page 13
...; ViewSonic V E 1 7 0 / V E 1 7 0 b See page 6 for instructions on changing the refresh rate (vertical frequency). Example: VESA® 1280 x 1024 @ 60Hz (recommended) means that the height and width of the screen image. Advanced Menu Selecting the Advanced Menu from the graphics card in your graphic card's user guide for instructions on changing the resolution. Press [▼] or [▲] to the menu shown below. ViewMeter® displays the timing mode (video signal input) coming from the Main Menu takes you to adjust...
...; ViewSonic V E 1 7 0 / V E 1 7 0 b See page 6 for instructions on changing the refresh rate (vertical frequency). Example: VESA® 1280 x 1024 @ 60Hz (recommended) means that the height and width of the screen image. Advanced Menu Selecting the Advanced Menu from the graphics card in your graphic card's user guide for instructions on changing the resolution. Press [▼] or [▲] to the menu shown below. ViewMeter® displays the timing mode (video signal input) coming from the Main Menu takes you to adjust...

User Manual
Page 14
... Italian). E N G L I S H Language Select allows you to the menu shown below ) to move the OSD. OSD Timeout sets the length of some controls (see below . The controls affected by MEMORY RECALL are: CONTRAST, BRIGHTNESS, H (Horizontal) POSITION, V (Vertical) POSITION, H (Horizontal) SIZE, PHASE, ZOOM, OSD TIME OUT, and OSD POSITION. Press [▼] or [▲] to move the on -screen display screen is not pushed within 30 seconds, the display screen disappears. For example, with the USER COLOR control. ViewSonic V E 1 7 0 / V E 1 7 0 b U sin...
... Italian). E N G L I S H Language Select allows you to the menu shown below ) to move the OSD. OSD Timeout sets the length of some controls (see below . The controls affected by MEMORY RECALL are: CONTRAST, BRIGHTNESS, H (Horizontal) POSITION, V (Vertical) POSITION, H (Horizontal) SIZE, PHASE, ZOOM, OSD TIME OUT, and OSD POSITION. Press [▼] or [▲] to move the on -screen display screen is not pushed within 30 seconds, the display screen disappears. For example, with the USER COLOR control. ViewSonic V E 1 7 0 / V E 1 7 0 b U sin...

User Manual
Page 15
...TFT (Thin Film Transistor), Active Matrix SXGA LCD, 0.264mm pixel pitch Color Filter RGB vertical stripe E Glass surface Anti-Glare N M a x im u m Horizontal 1600 CR>10 G V ie w in g Vertical 1600 CR>10 L A n g le s I S I n p u t S ig n a l RGB analog (0.7 /1.0 Vp-p, 75 ohms) H V id e o S y n c Separate Sync fh: 30-80 kHz, fv: 50-85 Hz C o m p a t ib il it y PC Macintosh1 Up to 1280 x 1024 NI Power...u l a t io n s UL, CSA, FCC-B, ENERGY STAR®, DOC-B, CB, CE, TUV/ERGO (covers ISO 13406-2 & MPRII), TUV/GS, TCO '99, E2000, VCCI, BSMI, NEMKO, SEMKO, DEMKO, FIMKO, B-...
...TFT (Thin Film Transistor), Active Matrix SXGA LCD, 0.264mm pixel pitch Color Filter RGB vertical stripe E Glass surface Anti-Glare N M a x im u m Horizontal 1600 CR>10 G V ie w in g Vertical 1600 CR>10 L A n g le s I S I n p u t S ig n a l RGB analog (0.7 /1.0 Vp-p, 75 ohms) H V id e o S y n c Separate Sync fh: 30-80 kHz, fv: 50-85 Hz C o m p a t ib il it y PC Macintosh1 Up to 1280 x 1024 NI Power...u l a t io n s UL, CSA, FCC-B, ENERGY STAR®, DOC-B, CB, CE, TUV/ERGO (covers ISO 13406-2 & MPRII), TUV/GS, TCO '99, E2000, VCCI, BSMI, NEMKO, SEMKO, DEMKO, FIMKO, B-...

User Manual
Page 16
... short cables are installed see Installation section. ViewSonic VE170/VE170b Other Information 1 5 H W r o n g o r a b n o r m a l c o lo r s • If any colors (red, green, or blue) are missing, check the video cable to make sure it to the ViewPanel. Loose or broken pins in g N o p ow er • Press Power button ON. • Make sure AC power cord is securely connected to the DC power supply and the power supply is firmly connected to the ViewPanel®. • Plug another power source, graphics card...
... short cables are installed see Installation section. ViewSonic VE170/VE170b Other Information 1 5 H W r o n g o r a b n o r m a l c o lo r s • If any colors (red, green, or blue) are missing, check the video cable to make sure it to the ViewPanel. Loose or broken pins in g N o p ow er • Press Power button ON. • Make sure AC power cord is securely connected to the DC power supply and the power supply is firmly connected to the ViewPanel®. • Plug another power source, graphics card...

User Manual
Page 19
.... Removal, installation, and set-up service charges. S . Rev. 9/20/99 1 8 Other Information ViewSonic VE170/VE170b If a product proves to follow instructions supplied with a like product. g. For additional information or the name of the product. a n d C a n a d a: For warranty information and service on implied warranties and/or do not allow limitations on V i e w S o n i c products sold outside of supplies or parts not meeting V i e w S o n i c 's specifications. Replacement product or parts may...
.... Removal, installation, and set-up service charges. S . Rev. 9/20/99 1 8 Other Information ViewSonic VE170/VE170b If a product proves to follow instructions supplied with a like product. g. For additional information or the name of the product. a n d C a n a d a: For warranty information and service on implied warranties and/or do not allow limitations on V i e w S o n i c products sold outside of supplies or parts not meeting V i e w S o n i c 's specifications. Replacement product or parts may...
User Manual
Page 20
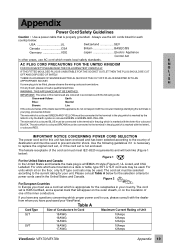
... AN S APPROPRIATE SOCKET. Figure 2 For European Countries In Europe you must be used to replace the original cord set, or if the cord set is coloured GREEN-AND-YELLOW must use a cord set for the receptacles in the plug which meets local safety standards. Use the following code: Green-and-Yellow: Earth Blue: Neutral Brown: Live If the coloured wires of the mains lead of...
... AN S APPROPRIATE SOCKET. Figure 2 For European Countries In Europe you must be used to replace the original cord set, or if the cord set is coloured GREEN-AND-YELLOW must use a cord set for the receptacles in the plug which meets local safety standards. Use the following code: Green-and-Yellow: Earth Blue: Neutral Brown: Live If the coloured wires of the mains lead of...
User Manual
Page 21
E N FCC Warning: G To assure continued FCC compliance, the user must use the equipment according to the instruction manual. Also, for ergonomic reasons, we recommend that interference will not occur in accordance with the instructions, may cause harmful interference to radio communications. Install and use grounded power supply cord and the L provided shielded video interface cable with bonded ferrite cores. High voltage: Max. 30...
E N FCC Warning: G To assure continued FCC compliance, the user must use the equipment according to the instruction manual. Also, for ergonomic reasons, we recommend that interference will not occur in accordance with the instructions, may cause harmful interference to radio communications. Install and use grounded power supply cord and the L provided shielded video interface cable with bonded ferrite cores. High voltage: Max. 30...

Brochure
Page 1
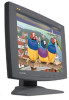
...-eyes viewing. ViewMatch allows the user to adjust color temperature and individual color intensity for easy-on -screen menu using simple controls. If you're looking for a wide variety of 1280 x 1024 for screen-to-print matching. • VESA® wall mount compliant Hang the flat panel on most walls with sharp, crisp text. The ViewSonic VE170, with its slim 3.5"panel profile, delivers brilliant, color-rich images along with ViewSonic's optional wall mount kit...
...-eyes viewing. ViewMatch allows the user to adjust color temperature and individual color intensity for easy-on -screen menu using simple controls. If you're looking for a wide variety of 1280 x 1024 for screen-to-print matching. • VESA® wall mount compliant Hang the flat panel on most walls with sharp, crisp text. The ViewSonic VE170, with its slim 3.5"panel profile, delivers brilliant, color-rich images along with ViewSonic's optional wall mount kit...

Brochure
Page 2
... limited warranty and customer service included 24/7 free technical support. 17" VIEWABLE COLOR TFT LCD DISPLAY IN CHOICE OF TWO COLORS VIEWPANEL Type SXGA TFT active matrix (16.7 million colors) Display Area 13.3" horizontal x 10.6" vertical, 17.0" diagonal Contrast Ratio 300:1 (typ) Viewing Angle 120° horizontal, 100° vertical (typ) Light Source 50,000 hour (typ) Brightness 220 cd/m2 (typ) Glass Surface Anti-glare coat INPUT SIGNAL Video Frequency Sync RGB Analog (75 ohms, 0.7 Vk...
... limited warranty and customer service included 24/7 free technical support. 17" VIEWABLE COLOR TFT LCD DISPLAY IN CHOICE OF TWO COLORS VIEWPANEL Type SXGA TFT active matrix (16.7 million colors) Display Area 13.3" horizontal x 10.6" vertical, 17.0" diagonal Contrast Ratio 300:1 (typ) Viewing Angle 120° horizontal, 100° vertical (typ) Light Source 50,000 hour (typ) Brightness 220 cd/m2 (typ) Glass Surface Anti-glare coat INPUT SIGNAL Video Frequency Sync RGB Analog (75 ohms, 0.7 Vk...


