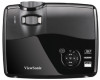
PRO8300 User Guide
Page 7
... ...21 Maintenance 29 Cleaning the Lens ...29 Cleaning the Projector Housing ...29 Cleaning the Filter Cover ...30 Replacing the Lamp ...31 Specifications 33 Dimensions ...34 Ceiling mount installation ...34 Appendix 35 LED Indicator Messages! ...35 Compatibility Modes ...36 Troubleshooting ...38 RS-232 Command and Configuration 39 IR Control Code ...41 vi
... ...21 Maintenance 29 Cleaning the Lens ...29 Cleaning the Projector Housing ...29 Cleaning the Filter Cover ...30 Replacing the Lamp ...31 Specifications 33 Dimensions ...34 Ceiling mount installation ...34 Appendix 35 LED Indicator Messages! ...35 Compatibility Modes ...36 Troubleshooting ...38 RS-232 Command and Configuration 39 IR Control Code ...41 vi

PRO8300 User Guide
Page 11
Security bar Note • This projector can be used with a ceiling mount for information to mount the projector on a ceiling. 4 4 Rear View 1 2 34 56 1. Rear IR remote control sensor 5. Tilt-adjustment feet 3. Connection ports 2. The ceiling mount is not included in the package. • Contact your dealer for support. Ventilation holes (exhaust) 3 2 1. Ceiling mount holes (M4*8) 2. Speaker 6. Kensington lock Bottom View 1 4. AC power socket 3.
Security bar Note • This projector can be used with a ceiling mount for information to mount the projector on a ceiling. 4 4 Rear View 1 2 34 56 1. Rear IR remote control sensor 5. Tilt-adjustment feet 3. Connection ports 2. The ceiling mount is not included in the package. • Contact your dealer for support. Ventilation holes (exhaust) 3 2 1. Ceiling mount holes (M4*8) 2. Speaker 6. Kensington lock Bottom View 1 4. AC power socket 3.
PRO8300 User Guide
Page 26
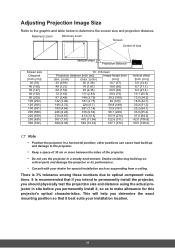
Adjusting Projection Image Size Refer to the graphic and table below to make allowance for special installation such as suspending from a ceiling. other positions can cause heat build-up on critical parts and damage the projector or its performance/ • Consult with your installation location...20.2 (51.3) 25.2 (64.1) 33.6 (85.4) 37.0 (94.0) 42.0 (106.8) 50.5 (128.2) Note • Position the projector in situ before you determine the exact mounting position so that if you intend to the projector. • Keep a space of 30 cm or more between the sides of lens Screen size Diagonal...
Adjusting Projection Image Size Refer to the graphic and table below to make allowance for special installation such as suspending from a ceiling. other positions can cause heat build-up on critical parts and damage the projector or its performance/ • Consult with your installation location...20.2 (51.3) 25.2 (64.1) 33.6 (85.4) 37.0 (94.0) 42.0 (106.8) 50.5 (128.2) Note • Position the projector in situ before you determine the exact mounting position so that if you intend to the projector. • Keep a space of 30 cm or more between the sides of lens Screen size Diagonal...
PRO8300 User Guide
Page 39
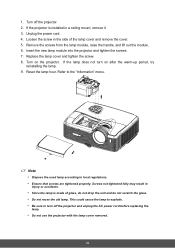
...; Ensure that screws are tightened properly. Remove the screws from the lamp module, raise the handle, and lift out the module. 6. Loosen the screw in a ceiling mount, remove it 3. Reset the lamp hour. Unplug the power cord. 4. Insert the new lamp module into the projector and tighten the screws. 7. Turn off the...
...; Ensure that screws are tightened properly. Remove the screws from the lamp module, raise the handle, and lift out the module. 6. Loosen the screw in a ceiling mount, remove it 3. Reset the lamp hour. Unplug the power cord. 4. Insert the new lamp module into the projector and tighten the screws. 7. Turn off the...

PRO8300 User Guide
Page 41
L = 8 mm) Unit: mm 34 34 Dimensions 335 mm (W) x 267 mm (D) x 132 mm (H) 335 267 64.5 132 84.9 Ceiling mount installation 227 174 103 Ceiling mount screws: M4 x 8 (Max.
L = 8 mm) Unit: mm 34 34 Dimensions 335 mm (W) x 267 mm (D) x 132 mm (H) 335 267 64.5 132 84.9 Ceiling mount installation 227 174 103 Ceiling mount screws: M4 x 8 (Max.

