

PRO8300 User Guide
Page 6
... your AC plug type with the graphics below and ensure that your sales dealer. This projector is used. Please ensure that the proper AC Power Cord is equipped with a grounding type AC line plug to prevent signal interference due to voltage fluctuations. We highly recommend using a video source device also equipped with... your AC outlet, please contact your outlet fits the plug. Notes on the AC power cord AC Power Cord must meet the requirement of this projector.
... your AC plug type with the graphics below and ensure that your sales dealer. This projector is used. Please ensure that the proper AC Power Cord is equipped with a grounding type AC line plug to prevent signal interference due to voltage fluctuations. We highly recommend using a video source device also equipped with... your AC outlet, please contact your outlet fits the plug. Notes on the AC power cord AC Power Cord must meet the requirement of this projector.
PRO8300 User Guide
Page 15
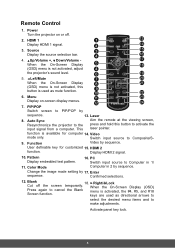
... menu is not activated, this button to activate the laser pointer. function is not activated, adjust 4 the projector's sound level. 6 19 5. Switch input source to the input signal from a computer. Confirmed selections. 12. keys are used as directional arrows to select the desired menu items and... to PIP/POP by sequence. Auto Sync Resynchronize the projector to Composite/S- 9. This Aim the remote at the ...
... menu is not activated, this button to activate the laser pointer. function is not activated, adjust 4 the projector's sound level. 6 19 5. Switch input source to the input signal from a computer. Confirmed selections. 12. keys are used as directional arrows to select the desired menu items and... to PIP/POP by sequence. Auto Sync Resynchronize the projector to Composite/S- 9. This Aim the remote at the ...
PRO8300 User Guide
Page 19
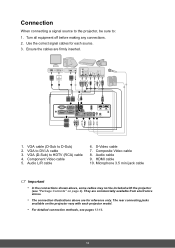
... cable Important • In the connections shown above are firmly inserted. 1 2 18 3 5 6 7 78 9 4 10 8 1. Use the correct signal cables for reference only. Component Video cable 5. HDMI cable 10. Connection When connecting a signal source to the projector, be included with each source. 3. VGA to HDTV (RCA) cable 4. S-Video cable 7. VGA cable (D-Sub to : 1. The...
... cable Important • In the connections shown above are firmly inserted. 1 2 18 3 5 6 7 78 9 4 10 8 1. Use the correct signal cables for reference only. Component Video cable 5. HDMI cable 10. Connection When connecting a signal source to the projector, be included with each source. 3. VGA to HDTV (RCA) cable 4. S-Video cable 7. VGA cable (D-Sub to : 1. The...
PRO8300 User Guide
Page 20
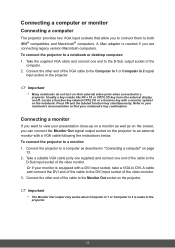
.... Take a suitable VGA cable (only one supplied) and connect one end to the Computer in 1 or Computer in 2 signal input socket on the projector. Connecting a monitor If you can connect the Monitor Out signal output socket on /off. Important • The Monitor Out output only works when Computer in 1 or Computer in "Connecting...
.... Take a suitable VGA cable (only one supplied) and connect one end to the Computer in 1 or Computer in 2 signal input socket on the projector. Connecting a monitor If you can connect the Monitor Out signal output socket on /off. Important • The Monitor Out output only works when Computer in 1 or Computer in "Connecting...
PRO8300 User Guide
Page 22
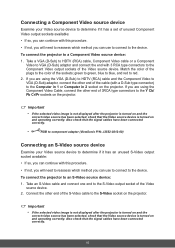
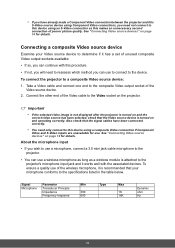
Match the color of the plugs to the color of the Video source device. 2. Also check that the signal cables have been connected correctly. • RGB to component adapter (ViewSonic P/N: J2552-0212-00) Connecting an S-Video source device Examine your Video source device to determine if it has an...can use to connect to the device. Connect the other end of 3RCA type connectors to the Y Cb/ Pb Cr/Pr sockets on the projector. Connecting a Component Video source device Examine your Video source device to determine if it has a set of unused Component Video output sockets available:...
Match the color of the plugs to the color of the Video source device. 2. Also check that the signal cables have been connected correctly. • RGB to component adapter (ViewSonic P/N: J2552-0212-00) Connecting an S-Video source device Examine your Video source device to determine if it has an...can use to connect to the device. Connect the other end of 3RCA type connectors to the Y Cb/ Pb Cr/Pr sockets on the projector. Connecting a Component Video source device Examine your Video source device to determine if it has a set of unused Component Video output sockets available:...
PRO8300 User Guide
Page 23
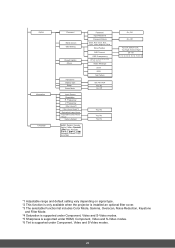
... connect to this device using an S-Video connection as a wireless module is recommended that the signal cables have already made a Component Video connection between the projector and this S-Video source device using a composite Video connection if Component Video and S-Video inputs... 2. See "Connecting Video source devices" on the projector. About the microphone input • If you wish to use a microphone, connect a 3.5 mini jack cable microphone to a composite Video source device: 1. Signal Parameter Min Microphone Transducer Principle Impedance 300 Frequency response 600...
... connect to this device using an S-Video connection as a wireless module is recommended that the signal cables have already made a Component Video connection between the projector and this S-Video source device using a composite Video connection if Component Video and S-Video inputs... 2. See "Connecting Video source devices" on the projector. About the microphone input • If you wish to use a microphone, connect a 3.5 mini jack cable microphone to a composite Video source device: 1. Signal Parameter Min Microphone Transducer Principle Impedance 300 Frequency response 600...
PRO8300 User Guide
Page 24
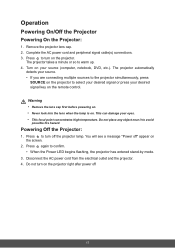
... when the lamp is on the projector right after power off 17 Powering Off the Projector: 1. Remove the projector lens cap. 2. Press again to warm up. 4. Do not turn on . Turn on your desired signal key on the projector to select your desired signal or press your source (computer, notebook..., DVD, etc.). Do not place any object near it to turn on the screen. 2. The projector automatically detects your source. • If you are...
... when the lamp is on the projector right after power off 17 Powering Off the Projector: 1. Remove the projector lens cap. 2. Press again to warm up. 4. Do not turn on . Turn on your desired signal key on the projector to select your desired signal or press your source (computer, notebook..., DVD, etc.). Do not place any object near it to turn on the screen. 2. The projector automatically detects your source. • If you are...
PRO8300 User Guide
Page 29
... Hours*2 Filter Hours Reset*2 Equivalent Lamp Hours Equivalent Lamp Hours Reset Factory Default *1 Adjustable range and default setting vary depending on signal type. *2 This function is only available when the projector is installed an optional filter cover. *3 The selectable Function list includes Color Mode, Gamma, Overscan, Noise Reduction, Keystone and Filter Mode...
... Hours*2 Filter Hours Reset*2 Equivalent Lamp Hours Equivalent Lamp Hours Reset Factory Default *1 Adjustable range and default setting vary depending on signal type. *2 This function is only available when the projector is installed an optional filter cover. *3 The selectable Function list includes Color Mode, Gamma, Overscan, Noise Reduction, Keystone and Filter Mode...
PRO8300 User Guide
Page 31
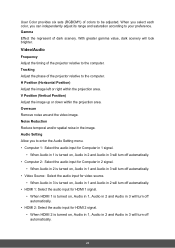
Audio Setting Allow you can independently adjust its range and saturation according to your preference. Gamma Effect the represent of the projector relative to the computer. H Position (Horizontal Position) Adjust the image left or right within the projection area. Overscan Remove noise around the...phase of dark scenery. When you select each color, you to enter the Audio Setting menu. • Computer 1:!Select the audio input for Computer in 1 signal. • When Audio in 1 is turned on, Audio in 2 and Audio in 3 will turn off automatically. • Computer 2:!Select the audio ...
Audio Setting Allow you can independently adjust its range and saturation according to your preference. Gamma Effect the represent of the projector relative to the computer. H Position (Horizontal Position) Adjust the image left or right within the projection area. Overscan Remove noise around the...phase of dark scenery. When you select each color, you to enter the Audio Setting menu. • Computer 1:!Select the audio input for Computer in 1 signal. • When Audio in 1 is turned on, Audio in 2 and Audio in 3 will turn off automatically. • Computer 2:!Select the audio ...

PRO8300 User Guide
Page 32
...Keystone will automatically turn off the sound temporarily. Invert or reverse the image accordingly. Auto Source Automatically scan through all the input source. Signal Type Specify the source to the Computer in 1/Computer in 2 terminal that it is displayed in the center of or behind the ...from an angled projection. Microphone Volume Adjust the microphone's volume level. Mute Cut off . Projection Adjust the picture to match the orientation of the projector: upright or upside-down, in front of the screen with a 1.85:1 aspect ratio. • ANAMORPHIC 2: Scale an image so that you...
...Keystone will automatically turn off the sound temporarily. Invert or reverse the image accordingly. Auto Source Automatically scan through all the input source. Signal Type Specify the source to the Computer in 1/Computer in 2 terminal that it is displayed in the center of or behind the ...from an angled projection. Microphone Volume Adjust the microphone's volume level. Mute Cut off . Projection Adjust the picture to match the orientation of the projector: upright or upside-down, in front of the screen with a 1.85:1 aspect ratio. • ANAMORPHIC 2: Scale an image so that you...

PRO8300 User Guide
Page 33
...; This function will require to achieve proper high altitude cooling of the projector. Quick Power On • On: The projector will turn on in 2 terminals. • RGB: For VGA signal • YCbCr:For component signal ECO Mode Use this function to change the transparency level of OSD menu.... • Menu Position: Choose the menu location on . • Auto: Automatically detect the input signal type from Computer in 1 and Computer in 3 seconds. • Off: The projector will shut down following normal power on procedure. When the password function is active. High Altitude Use this...
...; This function will require to achieve proper high altitude cooling of the projector. Quick Power On • On: The projector will turn on in 2 terminals. • RGB: For VGA signal • YCbCr:For component signal ECO Mode Use this function to change the transparency level of OSD menu.... • Menu Position: Choose the menu location on . • Auto: Automatically detect the input signal type from Computer in 1 and Computer in 3 seconds. • Off: The projector will shut down following normal power on procedure. When the password function is active. High Altitude Use this...


