User Guide
Page 5
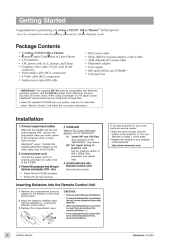
...Drivers," and follow the on-screen instructions. CAUTION: • Only use AA (LRG) type of the arrow shown below. 2 Insert the batteries (Alkaline type) with Windows operating systems, and the ICM file (Image Color Matching) ensures accurate on purchasing a ViewSonic PJL855 Office TheaterTM LCD projector...! To be careful to insert them according to the correct polarities (+,-). • If not using a computer as the signal source, ViewSonic® recommends that may damage the unit, ...
...Drivers," and follow the on-screen instructions. CAUTION: • Only use AA (LRG) type of the arrow shown below. 2 Insert the batteries (Alkaline type) with Windows operating systems, and the ICM file (Image Color Matching) ensures accurate on purchasing a ViewSonic PJL855 Office TheaterTM LCD projector...! To be careful to insert them according to the correct polarities (+,-). • If not using a computer as the signal source, ViewSonic® recommends that may damage the unit, ...
User Guide
Page 14
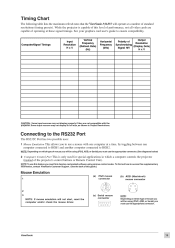
... VESA VGA-3 640 x 480@73Hz VESA VGA-3 640 x 480@75Hz VESA VGA-3 640 x 480@85Hz VESA SVGA 800 x 600@56Hz VESA SVGA 800 x 600@ 60Hz VESA SVGA 800 x 600@ 72Hz VESA SVGA 800 x 600@75Hz VESA SVGA 800 x 600@85Hz Mac 16" 832 x 624@75Hz VESA XGA 1024 x 768@60Hz VESA XGA 1024 x... Chart The following table lists the maximum refresh rates that the ViewSonic PJL855 will not start, reset the computer and/or check the mouse driver. See your graphics card user's guide to the right). 2 Disconnect the existing mouse. 3 Power ON the projector, then power ON the computer. NOTE: Depending on which type...
... VESA VGA-3 640 x 480@73Hz VESA VGA-3 640 x 480@75Hz VESA VGA-3 640 x 480@85Hz VESA SVGA 800 x 600@56Hz VESA SVGA 800 x 600@ 60Hz VESA SVGA 800 x 600@ 72Hz VESA SVGA 800 x 600@75Hz VESA SVGA 800 x 600@85Hz Mac 16" 832 x 624@75Hz VESA XGA 1024 x 768@60Hz VESA XGA 1024 x... Chart The following table lists the maximum refresh rates that the ViewSonic PJL855 will not start, reset the computer and/or check the mouse driver. See your graphics card user's guide to the right). 2 Disconnect the existing mouse. 3 Power ON the projector, then power ON the computer. NOTE: Depending on which type...