
User Guide
Page 1
... idadosamente las instrucciones en este manual" Model No. PJD6350/PJD6351LS/PJD6352/ PJD6352LS/PJD6550LW/ PJD6551LWS/PJD6552LW/ PJD6552LWS DLP Projector User Guide IMPORTANT: Please read this User Guide will describe your product for future service. Warranty information contained in this User Guide to obtain important information on our web site at http:// www.viewsonic.com in English, or in specific languages using your product in a safe manner...
... idadosamente las instrucciones en este manual" Model No. PJD6350/PJD6351LS/PJD6352/ PJD6352LS/PJD6550LW/ PJD6551LWS/PJD6552LW/ PJD6552LWS DLP Projector User Guide IMPORTANT: Please read this User Guide will describe your product for future service. Warranty information contained in this User Guide to obtain important information on our web site at http:// www.viewsonic.com in English, or in specific languages using your product in a safe manner...

User Guide
Page 7
... lamp in this product contains mercury which can be dangerous to you to working and living green. For additional information, please see the "Customer Support" section in this guide. The ViewSonic CD also provides an opportunity for you and the environment. Product Name: Model Number: Document Number: Serial Number: Purchase Date: For Your Records PJD6350/PJD6351LS/PJD6352/PJD6352LS/ PJD6550LW/PJD6551LWS/PJD6552LW/ PJD6552LWS ViewSonic DLP Projector...
... lamp in this product contains mercury which can be dangerous to you to working and living green. For additional information, please see the "Customer Support" section in this guide. The ViewSonic CD also provides an opportunity for you and the environment. Product Name: Model Number: Document Number: Serial Number: Purchase Date: For Your Records PJD6350/PJD6351LS/PJD6352/PJD6352LS/ PJD6550LW/PJD6551LWS/PJD6552LW/ PJD6552LWS ViewSonic DLP Projector...

User Guide
Page 8
... a location 12 Projection dimensions 13 Connection 17 Connecting a computer or monitor .... 18 Connecting Video source devices ...... 19 Playing sound through the projector .. 21 Using the cable management cover ... 22 Operation 23 Starting up the projector 23 Using the menus 24 Utilizing the password function ......... 25 Switching input signal 27 Adjusting the projected image 28 Magnifying and searching for details. 30 Selecting the aspect ratio 30 Optimizing the image 32 Setting the presentation timer 35 Hiding the image 36 Locking control...
... a location 12 Projection dimensions 13 Connection 17 Connecting a computer or monitor .... 18 Connecting Video source devices ...... 19 Playing sound through the projector .. 21 Using the cable management cover ... 22 Operation 23 Starting up the projector 23 Using the menus 24 Utilizing the password function ......... 25 Switching input signal 27 Adjusting the projected image 28 Magnifying and searching for details. 30 Selecting the aspect ratio 30 Optimizing the image 32 Setting the presentation timer 35 Hiding the image 36 Locking control...

User Guide
Page 9
... windows rolled up. - However, to removing the lamp assembly for future reference. 2. The only user serviceable part is the lamp which may fluctuate or cut out, it for replacement. 8. Allow at the projector lens during operation. Locations where excessive humidity, dust, or cigarette smoke may fall, sustaining serious damage. 11. Please read this manual before you connect your projector through a power stabilizer, surge protector or uninterruptible power supply...
... windows rolled up. - However, to removing the lamp assembly for future reference. 2. The only user serviceable part is the lamp which may fluctuate or cut out, it for replacement. 8. Allow at the projector lens during operation. Locations where excessive humidity, dust, or cigarette smoke may fall, sustaining serious damage. 11. Please read this manual before you connect your projector through a power stabilizer, surge protector or uninterruptible power supply...

User Guide
Page 11
...-key auto-adjustment to display the best picture quality • Digital 2D keystone correction and 4 corner adjustment to correct distorted images • Adjustable color management control for data/video display • Ability to display 1.07 billion colors • Multi-language On-Screen Display (OSD) menus • Switchable normal and economic modes to reduce the power consumption • Component HDTV compatibility (YPbPr) • HDMI CEC (Consumer Electronics Control) function allows synchronized power ON/ OFF operation...
...-key auto-adjustment to display the best picture quality • Digital 2D keystone correction and 4 corner adjustment to correct distorted images • Adjustable color management control for data/video display • Ability to display 1.07 billion colors • Multi-language On-Screen Display (OSD) menus • Switchable normal and economic modes to reduce the power consumption • Component HDTV compatibility (YPbPr) • HDMI CEC (Consumer Electronics Control) function allows synchronized power ON/ OFF operation...

User Guide
Page 12
Soft carry case 3. Replacement lamp (RLC-092 for PJD6552Lw/ PJD6552Lws.) 2. Dust filter 5 RLC-098 for PJD6350/PJD6351Ls. RLC-097 for your place of purchase. VGA-Component adapter 4. PJD6350/PJD6352 PJD6550Lw/PJD6552Lw PJD6351Ls/PJD6352Ls PJD6551Lws/PJD6552Lws Projector Power Cord VGA Cable Multi-language User Manual CD Quick Start Guide Remote Control & Batteries Cable management cover Optional accessories 1. Standard accessories The supplied accessories will be suitable for PJD6352/PJD6352Ls. RLC-093 for PJD6550Lw/ PJD6551Lws...
Soft carry case 3. Replacement lamp (RLC-092 for PJD6552Lw/ PJD6552Lws.) 2. Dust filter 5 RLC-098 for PJD6350/PJD6351Ls. RLC-097 for your place of purchase. VGA-Component adapter 4. PJD6350/PJD6352 PJD6550Lw/PJD6552Lw PJD6351Ls/PJD6352Ls PJD6551Lws/PJD6552Lws Projector Power Cord VGA Cable Multi-language User Manual CD Quick Start Guide Remote Control & Batteries Cable management cover Optional accessories 1. Standard accessories The supplied accessories will be suitable for PJD6352/PJD6352Ls. RLC-093 for PJD6550Lw/ PJD6551Lws...

User Guide
Page 13
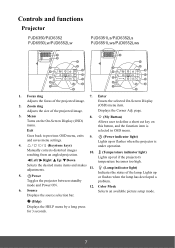
... device in the fixed wiring, or connect the power plug to switch the power supply off, or disconnect the power plug. 6 Focus and Zoom rings (for PJD6255/PJD6350/PJD6555w/ PJD6550Lw) Focus ring (for PJD6385s/ PJD6351Ls/PJD6585ws/ PJD6551Lws) 7. Audio signal input socket 2/ Microphone 12. Video input socket 15. HDMI port 16. RGB (PC)/Component video (YPbPr/YCbCr) signal input socket-2 18. Mini USB port 20. RS-232 control port 21. RJ45 LAN input port 22. AC power cord inlet 23.
... device in the fixed wiring, or connect the power plug to switch the power supply off, or disconnect the power plug. 6 Focus and Zoom rings (for PJD6255/PJD6350/PJD6555w/ PJD6550Lw) Focus ring (for PJD6385s/ PJD6351Ls/PJD6585ws/ PJD6551Lws) 7. Audio signal input socket 2/ Microphone 12. Video input socket 15. HDMI port 16. RGB (PC)/Component video (YPbPr/YCbCr) signal input socket-2 18. Mini USB port 20. RS-232 control port 21. RJ45 LAN input port 22. AC power cord inlet 23.
User Guide
Page 14
.../ (Keystone keys) under operation. Manually corrects distorted images resulting from an angled projection. Displays the source selection bar. (Help) Displays the HELP menu by a long press for 3 seconds. 7 Enacts the selected On-Screen Display (OSD) menu item. Selects the desired menu items and makes adjustments. 11. (Lamp indicator light) Indicates the status of the lamp. Color Mode 6. page. 3. Lights up or flashes when the projector is selected in OSD menu. Source Selects an available picture setup mode. Controls and functions Projector PJD6350/PJD6352 PJD6550Lw...
.../ (Keystone keys) under operation. Manually corrects distorted images resulting from an angled projection. Displays the source selection bar. (Help) Displays the HELP menu by a long press for 3 seconds. 7 Enacts the selected On-Screen Display (OSD) menu item. Selects the desired menu items and makes adjustments. 11. (Lamp indicator light) Indicates the status of the lamp. Color Mode 6. page. 3. Lights up or flashes when the projector is selected in OSD menu. Source Selects an available picture setup mode. Controls and functions Projector PJD6350/PJD6352 PJD6550Lw...
User Guide
Page 16
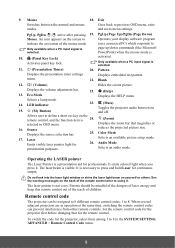
.... Source reduces the projected picture size. See the warning messages on yourself or others. Displays the volume adjustment bar. 22. (Help) 13. Set the remote control code for the projector first before changing that magnifies or 16. Displays the zoom bar that for Selects an available picture setup mode. 26. Displays the source selection bar. 25. It emits colored light when you press it . Mouse 18. Goes back to 8 in operation at the same time, switching the remote control codes...
.... Source reduces the projected picture size. See the warning messages on yourself or others. Displays the volume adjustment bar. 22. (Help) 13. Set the remote control code for the projector first before changing that magnifies or 16. Displays the zoom bar that for Selects an available picture setup mode. 26. Displays the source selection bar. 25. It emits colored light when you press it . Mouse 18. Goes back to 8 in operation at the same time, switching the remote control codes...

User Guide
Page 25
... screen, you can connect the MONITOR OUT signal output socket on the projector. See "Using the remote mouse control" on the notebook. Locate a function key labeled CRT/LCD or a function key with a VGA cable following the instructions below: 1. Refer to your monitor is equipped with a DVI input socket, take a USB cable and connect the larger end to the USB port of the computer. 2. Take a suitable VGA cable (only one supplied) and connect...
... screen, you can connect the MONITOR OUT signal output socket on the projector. See "Using the remote mouse control" on the notebook. Locate a function key labeled CRT/LCD or a function key with a VGA cable following the instructions below: 1. Refer to your monitor is equipped with a DVI input socket, take a USB cable and connect the larger end to the USB port of the computer. 2. Take a suitable VGA cable (only one supplied) and connect...

User Guide
Page 27
..., check that sound system, instead of the cable to the HDMI input port on page 27 for details. Connecting an HDMI device You should use to connect to the device. 1. Connecting a Component Video source device Examine your Video source device to that the Video source device is connected. In the unlikely event that the signal cables have a separate sound system, you connect the projector to a DVD player via the projector's HDMI input and the projected picture displays wrong colors, please change...
..., check that sound system, instead of the cable to the HDMI input port on page 27 for details. Connecting an HDMI device You should use to connect to the device. 1. Connecting a Component Video source device Examine your Video source device to that the Video source device is connected. In the unlikely event that the signal cables have a separate sound system, you connect the projector to a DVD player via the projector's HDMI input and the projected picture displays wrong colors, please change...

User Guide
Page 28
... the Video source device is turned on and operating correctly. If the selected video image is not displayed after the projector is turned on and the correct video source has been selected, check that the Video source device is turned on and operating correctly. If you have already made a Component Video connection between the projector and this SVideo source device using Component Video connections, you can be controlled by the projector On-Screen Display (OSD) menus. See "Connecting Video source...
... the Video source device is turned on and operating correctly. If the selected video image is not displayed after the projector is turned on and the correct video source has been selected, check that the Video source device is turned on and operating correctly. If you have already made a Component Video connection between the projector and this SVideo source device using Component Video connections, you can be controlled by the projector On-Screen Display (OSD) menus. See "Connecting Video source...

User Guide
Page 30
... input signals. If the projector is still hot from previous activity, it will continue to adjust the image clearness. Press Power to start to a lower setting. Plug the power cord into the projector and into a wall socket. The Power indicator light stays blue when the projector is compatible with the projector's resolution or set the input signal to search for the first time, select your desired input signal. Please change to an input signal which is on -screen instructions...
... input signals. If the projector is still hot from previous activity, it will continue to adjust the image clearness. Press Power to start to a lower setting. Plug the power cord into the projector and into a wall socket. The Power indicator light stays blue when the projector is compatible with the projector's resolution or set the input signal to search for the first time, select your desired input signal. Please change to an input signal which is on -screen instructions...
User Guide
Page 32
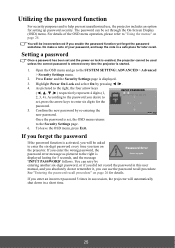
... represent 4 digits (1, INPUT PASSWORD 2, 3, 4). As pictured to the SYSTEM SETTING: ADVANCED > Advanced > Security Settings menu. 2. If you enter an incorrect password 5 times in a safe place for setting up password security. You can use , the projector includes an option for later recall. If you enter the wrong password, the Password Error password error message as pictured to enter six digits for the password. 5. Highlight Power On Lock and select On by entering another six-digit password, or...
... represent 4 digits (1, INPUT PASSWORD 2, 3, 4). As pictured to the SYSTEM SETTING: ADVANCED > Advanced > Security Settings menu. 2. If you enter an incorrect password 5 times in a safe place for setting up password security. You can use , the projector includes an option for later recall. If you enter the wrong password, the Password Error password error message as pictured to enter six digits for the password. 5. Highlight Power On Lock and select On by entering another six-digit password, or...

User Guide
Page 33
... of Power On Lock. The message 'INPUT PASSWORD' is displayed. 3. Press and hold Auto Sync on the screen. 2. Seek help from the local service center to enter the new password next time the projector is correct, the OSD menu returns to the SYSTEM SETTING: ADVANCED > Advanced > Security Settings > Change Password menu. 2. Open the OSD menu and go to select Off. 3. Enter the current password. • If the password is started. 7. Write down the recall code, and contact ViewSonic...
... of Power On Lock. The message 'INPUT PASSWORD' is displayed. 3. Press and hold Auto Sync on the screen. 2. Seek help from the local service center to enter the new password next time the projector is correct, the OSD menu returns to the SYSTEM SETTING: ADVANCED > Advanced > Security Settings > Change Password menu. 2. Open the OSD menu and go to select Off. 3. Enter the current password. • If the password is started. 7. Write down the recall code, and contact ViewSonic...

User Guide
Page 44
... capture action may display auto shut-down symptoms, which is a picture projected from your projector from either a computer or video source. 2. Operating in locked status the next time it happens, please set as your startup screen from over cooled, if you use the High Altitude Mode if your altitude is between 0 m and 1500 m and temperature is saved as Screen Capture and have been set the resolution of the input signal is between 1500...
... capture action may display auto shut-down symptoms, which is a picture projected from your projector from either a computer or video source. 2. Operating in locked status the next time it happens, please set as your startup screen from over cooled, if you use the High Altitude Mode if your altitude is between 0 m and 1500 m and temperature is saved as Screen Capture and have been set the resolution of the input signal is between 1500...
User Guide
Page 45
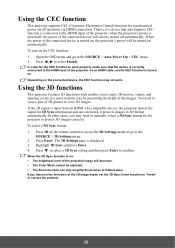
...: 1. Using the CEC function This projector supports CEC (Consumer Electronics Control) function for synchronized power on the remote control to access the 3D Settings menu or go to the SOURCE > Auto Power On > CEC menu. 2. The 3D Settings page is turned off automatically. Press to select a 3D Sync setting and then press Enter to select Enable. Press 3D on /off operation via an HDMI cable, and its CEC function is input...
...: 1. Using the CEC function This projector supports CEC (Consumer Electronics Control) function for synchronized power on the remote control to access the 3D Settings menu or go to the SOURCE > Auto Power On > CEC menu. 2. The 3D Settings page is turned off automatically. Press to select a 3D Sync setting and then press Enter to select Enable. Press 3D on /off operation via an HDMI cable, and its CEC function is input...

User Guide
Page 50
... for the projector. ii. vi. You can name the projector, keep track of its location and the person in the list blow: Category Item Crestron Control Projector Network Configuration User Password Admin Password Input Length IP Address IP ID Port Projector Name Location Assigned To DHCP (Enabled) IP Address Subnet Mask Default Gateway DNS Server Enabled New Password Confirm Enabled New Password Confirm Maximum Number of it. Once set , access to the remote network operation page.
... for the projector. ii. vi. You can name the projector, keep track of its location and the person in the list blow: Category Item Crestron Control Projector Network Configuration User Password Admin Password Input Length IP Address IP ID Port Projector Name Location Assigned To DHCP (Enabled) IP Address Subnet Mask Default Gateway DNS Server Enabled New Password Confirm Enabled New Password Confirm Maximum Number of it. Once set , access to the remote network operation page.

User Guide
Page 62
...: Keystone, Aspect Ratio, OverScan, Language, Projector Position, High Altitude Mode, Security Settings, Remote Control Code. 5. This function is only available when a Composite video or S-Video input signal is selected and its system format is installed. To view captions, select CC1, CC2, CC3, or CC4 (CC1 displays captions in the primary language in TV listings). Security Settings See "Utilizing the password function" on page 36 for details. Panel Key Lock See "Locking control...
...: Keystone, Aspect Ratio, OverScan, Language, Projector Position, High Altitude Mode, Security Settings, Remote Control Code. 5. This function is only available when a Composite video or S-Video input signal is selected and its system format is installed. To view captions, select CC1, CC2, CC3, or CC4 (CC1 displays captions in the primary language in TV listings). Security Settings See "Utilizing the password function" on page 36 for details. Panel Key Lock See "Locking control...

User Guide
Page 70
... the power cord. Remove the obstacle. If the power outlet has a switch, make sure that the signal cable is connected correctly. The remote control code on . Adjust the remote control code. 63 Cause Remedy There is not consistent. Blurred image Cause Remedy The projection lens is not turned on and check that it is an obstacle between the remote control and the projector. No picture Cause Remedy The video source is not correctly focused. Turn the video source on or connected...
... the power cord. Remove the obstacle. If the power outlet has a switch, make sure that the signal cable is connected correctly. The remote control code on . Adjust the remote control code. 63 Cause Remedy There is not consistent. Blurred image Cause Remedy The projection lens is not turned on and check that it is an obstacle between the remote control and the projector. No picture Cause Remedy The video source is not correctly focused. Turn the video source on or connected...


