User Guide
Page 11
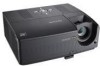
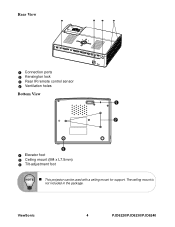
Rear View 1 2 3 4 1 Connection ports 2 Kensington lock 3 Rear IR remote control sensor 4 Ventilation holes Bottom View 1 2 3 1 Elevator foot 2 Ceiling mount (M4 x L7.5mm) 3 Tilt-adjustment foot „ This projector can be used with a ceiling mount for support. ViewSonic 4 PJD6220/PJD6230/PJD6240 The ceiling mount is not included in the package.
Rear View 1 2 3 4 1 Connection ports 2 Kensington lock 3 Rear IR remote control sensor 4 Ventilation holes Bottom View 1 2 3 1 Elevator foot 2 Ceiling mount (M4 x L7.5mm) 3 Tilt-adjustment foot „ This projector can be used with a ceiling mount for support. ViewSonic 4 PJD6220/PJD6230/PJD6240 The ceiling mount is not included in the package.
User Guide
Page 39
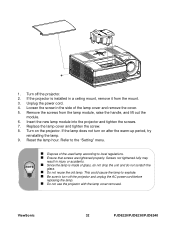
...lamp. Remove the screws from the mount. 3. If the lamp does not turn off the projector. 2. Loosen the screw in a ceiling mount, remove it from the lamp module, raise the handle, and lift out the module. 6. Refer to turn on the projector. ViewSonic 32 PJD6220/PJD6230/PJD6240 Replace the lamp cover and..." menu. „ Dispose of the lamp cover and remove the cover. 5. Turn off the projector and unplug the AC power cord before replacing the lamp. „ Do not use the projector with the lamp cover removed. Unplug the power cord. 4. Insert the new lamp module into the...
...lamp. Remove the screws from the mount. 3. If the lamp does not turn off the projector. 2. Loosen the screw in a ceiling mount, remove it from the lamp module, raise the handle, and lift out the module. 6. Refer to turn on the projector. ViewSonic 32 PJD6220/PJD6230/PJD6240 Replace the lamp cover and..." menu. „ Dispose of the lamp cover and remove the cover. 5. Turn off the projector and unplug the AC power cord before replacing the lamp. „ Do not use the projector with the lamp cover removed. Unplug the power cord. 4. Insert the new lamp module into the...

