

PJD5153 User Guide English
Page 1
.../ VS15876 "Antes de operar su equipo lea cu idadosamente las instrucciones en este manual" Model No. PJD5151/PJD5153/PJD5155/ PJD5250/PJD5253/PJD5255/ PJD5555w_Tiger DLP Projector User Guide IMPORTANT: Please read this User Guide will describe your limited coverage from ViewSonic Corporation, which is also found on installing and using the Regional selection box in a safe manner, as well as registering your...
.../ VS15876 "Antes de operar su equipo lea cu idadosamente las instrucciones en este manual" Model No. PJD5151/PJD5153/PJD5155/ PJD5250/PJD5253/PJD5255/ PJD5555w_Tiger DLP Projector User Guide IMPORTANT: Please read this User Guide will describe your limited coverage from ViewSonic Corporation, which is also found on installing and using the Regional selection box in a safe manner, as well as registering your...

PJD5153 User Guide English
Page 7
... Name: Model Number: Document Number: Serial Number: Purchase Date: For Your Records PJD5151/PJD5153/PJD5155/PJD5250/PJD5253/ PJD5255/PJD5555w ViewSonic DLP Projector VS15871/VS15872/VS15873/VS15874/VS14115/ VS15875/VS15876 PJD5151/PJD5153/PJD5155/PJD5250/PJD5253/ PJD5255/PJD5555w_UG_ENG Rev. 1B 12-18-14 Product disposal at end of product life The lamp in this guide. For additional information, please see the "Customer Support" section in...
... Name: Model Number: Document Number: Serial Number: Purchase Date: For Your Records PJD5151/PJD5153/PJD5155/PJD5250/PJD5253/ PJD5255/PJD5555w ViewSonic DLP Projector VS15871/VS15872/VS15873/VS15874/VS14115/ VS15875/VS15876 PJD5151/PJD5153/PJD5155/PJD5250/PJD5253/ PJD5255/PJD5555w_UG_ENG Rev. 1B 12-18-14 Product disposal at end of product life The lamp in this guide. For additional information, please see the "Customer Support" section in...
PJD5153 User Guide English
Page 9
... safety instructions Your projector is designed and tested to meet the latest standards for replacement. 8. However, to ensure safe use of lamps beyond the rated lamp life. Refer servicing to disassemble this manual and marked on the projector or remote control. 7. Excessive operation of this product on . 5. Do not place this product, it is poorly ventilated or confined. Space that you connect your projector. Locations where...
... safety instructions Your projector is designed and tested to meet the latest standards for replacement. 8. However, to ensure safe use of lamps beyond the rated lamp life. Refer servicing to disassemble this manual and marked on the projector or remote control. 7. Excessive operation of this product on . 5. Do not place this product, it is poorly ventilated or confined. Space that you connect your projector. Locations where...

PJD5153 User Guide English
Page 10
... , the lamp. 15. 13. Safety instructions for ceiling mounting of displaying inverted pictures for mounting the projector and ensure it . Do not place this projector with a commercially available theft prevention cable. Liquids spilled into the projector may cause the projector to fall from the place you ensure it to person and property. Do not use an inappropriate projector ceiling mount kit, there is securely and safely installed. Do...
... , the lamp. 15. 13. Safety instructions for ceiling mounting of displaying inverted pictures for mounting the projector and ensure it . Do not place this projector with a commercially available theft prevention cable. Liquids spilled into the projector may cause the projector to fall from the place you ensure it to person and property. Do not use an inappropriate projector ceiling mount kit, there is securely and safely installed. Do...
PJD5153 User Guide English
Page 11
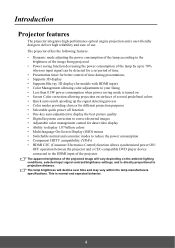
... of time during presentations • Supports 3D display • Supports Blu-ray 3D display (for models with HDMI input) • Color Management allowing color adjustments to your liking • Less than 0.5W power consumption when power saving mode is turned on • Screen Color correction allowing projection on the ambient lighting conditions, selected input signal contrast/brightness settings, and is normal and expected behavior. 4 Introduction Projector features The projector integrates high-performance optical engine projection and a user...
... of time during presentations • Supports 3D display • Supports Blu-ray 3D display (for models with HDMI input) • Color Management allowing color adjustments to your liking • Less than 0.5W power consumption when power saving mode is turned on • Screen Color correction allowing projection on the ambient lighting conditions, selected input signal contrast/brightness settings, and is normal and expected behavior. 4 Introduction Projector features The projector integrates high-performance optical engine projection and a user...
PJD5153 User Guide English
Page 14
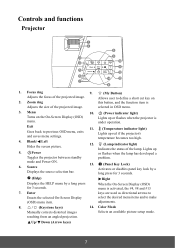
Exit 11. (Temperature indicator light) Goes back to Enacts the selected On-Screen Display (OSD) menu item. Power or flashes when the lamp has developed a Toggles the projector between standby problem. When the On-Screen Display (OSD) menu is Adjusts the size of the projected image. Enter keys are used as directional arrows to previous OSD menu, exits and saves menu settings. Up/ Down (Arrow keys) 7 Zoom ring this button, and the function item is activated...
Exit 11. (Temperature indicator light) Goes back to Enacts the selected On-Screen Display (OSD) menu item. Power or flashes when the lamp has developed a Toggles the projector between standby problem. When the On-Screen Display (OSD) menu is Adjusts the size of the projected image. Enter keys are used as directional arrows to previous OSD menu, exits and saves menu settings. Up/ Down (Arrow keys) 7 Zoom ring this button, and the function item is activated...
PJD5153 User Guide English
Page 16
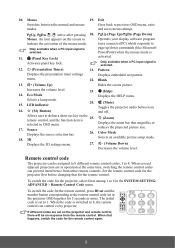
... lock. selected in the SYSTEM SETTING: ADVANCED > Remote Control Code menu. When the code is selected. 12. (Presentation Timer) 21. 10. Mouse 19. PgUp, PgDn, , : active after pressing 20. page up/down commands (like Microsoft PowerPoint) when the mouse mode is set in COMP1 COMP2 HDMI Auto Sync Source the projector OSD together for the projector, select from other remote controls. Blank 13. (Volume Up) Hides the screen picture. Eco Mode Displays the HELP menu. LED indicator...
... lock. selected in the SYSTEM SETTING: ADVANCED > Remote Control Code menu. When the code is selected. 12. (Presentation Timer) 21. 10. Mouse 19. PgUp, PgDn, , : active after pressing 20. page up/down commands (like Microsoft PowerPoint) when the mouse mode is set in COMP1 COMP2 HDMI Auto Sync Source the projector OSD together for the projector, select from other remote controls. Blank 13. (Volume Up) Hides the screen picture. Eco Mode Displays the HELP menu. LED indicator...
PJD5153 User Guide English
Page 23
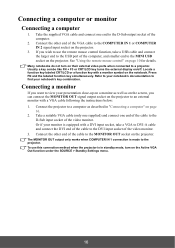
... OUT signal output socket on the projector. Refer to your notebook's documentation to an external monitor with a VGA cable following the instructions below: 1. Or if your notebook's key combination. To use the remote mouse control function, take a VGA to DVI-A cable and connect the DVI end of the cable to the MONITOR OUT socket on the Active VGA Out function under the SOURCE > Standby Settings menu. 16...
... OUT signal output socket on the projector. Refer to your notebook's documentation to an external monitor with a VGA cable following the instructions below: 1. Or if your notebook's key combination. To use the remote mouse control function, take a VGA to DVI-A cable and connect the DVI end of the cable to the MONITOR OUT socket on the Active VGA Out function under the SOURCE > Standby Settings menu. 16...
PJD5153 User Guide English
Page 25
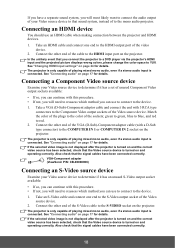
... can use an HDMI cable when making connection between the projector and HDMI devices. 1. Also check that the signal cables have been connected correctly. 18 If the selected video image is not displayed after the projector is turned on and the correct video source has been selected, check that the Video source device is turned on the projector. Connect the other end of the cable to the HDMI input port on and operating correctly. If you have a separate sound...
... can use an HDMI cable when making connection between the projector and HDMI devices. 1. Also check that the signal cables have been connected correctly. 18 If the selected video image is not displayed after the projector is turned on and the correct video source has been selected, check that the Video source device is turned on the projector. Connect the other end of the cable to the HDMI input port on and operating correctly. If you have a separate sound...

PJD5153 User Guide English
Page 26
... selected video image is not displayed after the projector is turned on and operating correctly. See "Connecting Video source devices" on page 17 for use to connect to this device using an S-Video connection as this device using a composite Video connection if Component Video and S-Video inputs are properly connected to this makes an unnecessary second connection of playing mixed mono audio, even if a stereo audio input is turned on and the correct video source has been selected, check...
... selected video image is not displayed after the projector is turned on and operating correctly. See "Connecting Video source devices" on page 17 for use to connect to this device using an S-Video connection as this device using a composite Video connection if Component Video and S-Video inputs are properly connected to this makes an unnecessary second connection of playing mixed mono audio, even if a stereo audio input is turned on and the correct video source has been selected, check...
PJD5153 User Guide English
Page 27
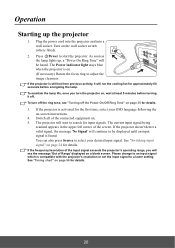
... before energizing the lamp. The Power indicator light stays blue when the projector is compatible with the projector's resolution or set the input signal to an input signal which is on page 56 for details. To turn the projector on a blank screen. If the projector doesn't detect a valid signal, the message 'No Signal' will be displayed until an input signal is found. Please change to a lower setting. See "Timing chart" on . (If necessary) Rotate the focus ring to...
... before energizing the lamp. The Power indicator light stays blue when the projector is compatible with the projector's resolution or set the input signal to an input signal which is on page 56 for details. To turn the projector on a blank screen. If the projector doesn't detect a valid signal, the message 'No Signal' will be displayed until an input signal is found. Please change to a lower setting. See "Timing chart" on . (If necessary) Rotate the focus ring to...
PJD5153 User Guide English
Page 29
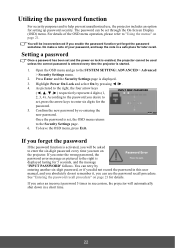
... menu, press Exit. The password can use , the projector includes an option for later recall. If you turn on page 21. As pictured to "Using the menus" on the projector. For details of your password, and keep the note in a short time. 22 Confirm the new password by pressing / . 4. MENU Back Once the password is activated, you enter the wrong password, the Password Error password error message as pictured to the Security Settings...
... menu, press Exit. The password can use , the projector includes an option for later recall. If you turn on page 21. As pictured to "Using the menus" on the projector. For details of your password, and keep the note in a short time. 22 Confirm the new password by pressing / . 4. MENU Back Once the password is activated, you enter the wrong password, the Password Error password error message as pictured to the Security Settings...
PJD5153 User Guide English
Page 30
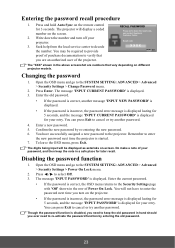
... Settings > Power On Lock menu. 2. Open the OSD menu and go to the projector. The message 'INPUT PASSWORD' is disabled, you are an authorized user of your retry. Entering the password recall procedure 1. Press Enter. To leave the OSD menu, press Exit. The digits being input will display a coded number on different projector models. Though the password function is displayed. Press and hold Auto Sync on -screen. You may be displayed as asterisks on the remote control for...
... Settings > Power On Lock menu. 2. Open the OSD menu and go to the projector. The message 'INPUT PASSWORD' is disabled, you are an authorized user of your retry. Entering the password recall procedure 1. Press Enter. To leave the OSD menu, press Exit. The digits being input will display a coded number on different projector models. Though the password function is displayed. Press and hold Auto Sync on -screen. You may be displayed as asterisks on the remote control for...
PJD5153 User Guide English
Page 40
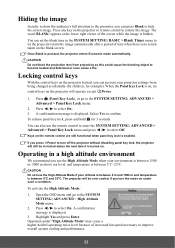
... SYSTEM SETTING: BASIC > Blank Timer menu to let the projector return the image automatically after a period of the screen while the image is displayed. A confirmation message is hidden. Open the OSD menu and go to the SYSTEM SETTING: ADVANCED > Advanced > Panel Key Lock menu 2. Press / to confirm. Mode menu. 2. The word 'BLANK' appears at the lower right corner of time when there is no control keys on the remote control are...
... SYSTEM SETTING: BASIC > Blank Timer menu to let the projector return the image automatically after a period of the screen while the image is displayed. A confirmation message is hidden. Open the OSD menu and go to the SYSTEM SETTING: ADVANCED > Advanced > Panel Key Lock menu 2. Press / to confirm. Mode menu. 2. The word 'BLANK' appears at the lower right corner of time when there is no control keys on the remote control are...
PJD5153 User Guide English
Page 41
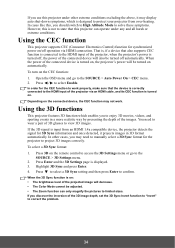
... that this projector under any and all harsh or extreme conditions. In cases like this, you should switch to High Altitude Mode to solve these symptoms. However, this is not to state that also supports CEC function is connected to the HDMI input of the 3D image depth, set the 3D Sync Invert function to "Invert" to the SOURCE > Auto Power On > CEC menu. 2. Open the OSD menu and...
... that this projector under any and all harsh or extreme conditions. In cases like this, you should switch to High Altitude Mode to solve these symptoms. However, this is not to state that also supports CEC function is connected to the HDMI input of the 3D image depth, set the 3D Sync Invert function to "Invert" to the SOURCE > Auto Power On > CEC menu. 2. Open the OSD menu and...
PJD5153 User Guide English
Page 46
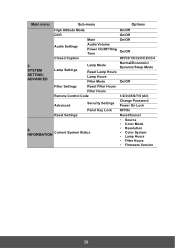
... Settings Lamp Mode Reset Lamp Hours Lamp Hours Filter Mode Normal/Economic/ Dynamic/Sleep Mode On/Off Filter Settings Reset Filter Hours Filter Hours Remote Control Code 1/2/3/4/5/6/7/8 (All) Advanced Security Settings Change Password Power On Lock Panel Key Lock Off/On Reset Settings Reset/Cancel • Source • Color Mode 6. INFORMATION Current System Status • Resolution • Color System • Lamp Hours • Filter Hours • Firmware Version 39 Main menu Sub-menu Options High Altitude Mode On/Off DCR On/Off Mute On/Off Audio Settings...
... Settings Lamp Mode Reset Lamp Hours Lamp Hours Filter Mode Normal/Economic/ Dynamic/Sleep Mode On/Off Filter Settings Reset Filter Hours Filter Hours Remote Control Code 1/2/3/4/5/6/7/8 (All) Advanced Security Settings Change Password Power On Lock Panel Key Lock Off/On Reset Settings Reset/Cancel • Source • Color Mode 6. INFORMATION Current System Status • Resolution • Color System • Lamp Hours • Filter Hours • Firmware Version 39 Main menu Sub-menu Options High Altitude Mode On/Off DCR On/Off Mute On/Off Audio Settings...

PJD5153 User Guide English
Page 51
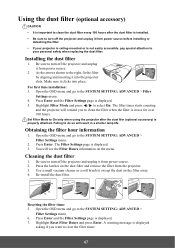
... area). This function is only available when a Composite video or S-Video input signal with NTSC system is installed. For changing the lamp, please contact qualified service personnel. See "Using the dust filter (optional accessory)" on page 48 for details. 5. Returns all settings to know the lamp hour" on page 47 for details. The following settings will still remain: Keystone, OverScan, Language, Projector Position, High Altitude Mode, Security Settings, Remote Control Code. 44
... area). This function is only available when a Composite video or S-Video input signal with NTSC system is installed. For changing the lamp, please contact qualified service personnel. See "Using the dust filter (optional accessory)" on page 48 for details. 5. Returns all settings to know the lamp hour" on page 47 for details. The following settings will still remain: Keystone, OverScan, Language, Projector Position, High Altitude Mode, Security Settings, Remote Control Code. 44
PJD5153 User Guide English
Page 54
... menu. Installing the dust filter 1. Open the OSD menu and go to do so will see the Filter Hours information on the dust filter and remove the filter from power source. 2. The Filter Settings page is installed. • Be sure to reset the filter timer. 47 Be sure to turn off the projector and unplug it clicks into the projector slots. Using the dust filter (optional accessory) CAUTION • It is important to clean...
... menu. Installing the dust filter 1. Open the OSD menu and go to do so will see the Filter Hours information on the dust filter and remove the filter from power source. 2. The Filter Settings page is installed. • Be sure to reset the filter timer. 47 Be sure to turn off the projector and unplug it clicks into the projector slots. Using the dust filter (optional accessory) CAUTION • It is important to clean...

PJD5153 User Guide English
Page 59
... input signal with a new one. Replace the battery with the Source key on the projector or remote control. If the power outlet has a switch, make sure that the signal cable is not correctly connected to turn on. Adjust the focus of the projector if necessary. Attempting to the input signal device. Blurred image Cause Remedy The projection lens is out of power. Stand within 8 meters (26 feet) from the power cord. Troubleshooting The projector does not turn the projector...
... input signal with a new one. Replace the battery with the Source key on the projector or remote control. If the power outlet has a switch, make sure that the signal cable is not correctly connected to turn on. Adjust the focus of the projector if necessary. Attempting to the input signal device. Blurred image Cause Remedy The projection lens is out of power. Stand within 8 meters (26 feet) from the power cord. Troubleshooting The projector does not turn the projector...
PJD5555W Datasheet English
Page 2
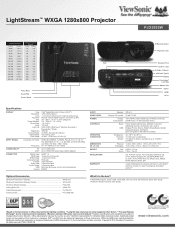
... 6.4 300 7.6 Focus Ring Zoom Ring Control Panel Vent IR Remote Sensor Projection Lens Elevation Foot Audio In / Out S-Video / Video In USB mini Type B RS232 Kensington® Lock Slot Monitor Out VGA In HDMI AC In Specifications DISPLAY INPUT SIGNAL COMPATIBILITY CONNECTOR Type Resolution Lens Keystone Size Throw Distance Throw Ratio Lamp Light Life Brightness Contrast Ratio Aspect Ratio Color Depth Computer and Video Frequency PC Mac® Digital Input RGB Input RGB Output Composite Input S-Video Audio Input Audio Output USB Control 0.65" Digital Micromirror Device (DLP™) 1280...
... 6.4 300 7.6 Focus Ring Zoom Ring Control Panel Vent IR Remote Sensor Projection Lens Elevation Foot Audio In / Out S-Video / Video In USB mini Type B RS232 Kensington® Lock Slot Monitor Out VGA In HDMI AC In Specifications DISPLAY INPUT SIGNAL COMPATIBILITY CONNECTOR Type Resolution Lens Keystone Size Throw Distance Throw Ratio Lamp Light Life Brightness Contrast Ratio Aspect Ratio Color Depth Computer and Video Frequency PC Mac® Digital Input RGB Input RGB Output Composite Input S-Video Audio Input Audio Output USB Control 0.65" Digital Micromirror Device (DLP™) 1280...


