

PJD5152, PJD5352 User Guide (English)
Page 1
... cuidadosamente las instrucciones en este manual" - Guide de l'utilisateur - Bedienungsanleitung - Guía del usuario - Käyttöopas Podręcznik użytkownika - ViewSonic® PJD5152 / PJD5352 DLP Projector IMPORTANT: Please read this User Guide will describe your product for future service. Kullanιcι kιlavuzu Model No. : VS13307 / VS13147 Warranty information...
... cuidadosamente las instrucciones en este manual" - Guide de l'utilisateur - Bedienungsanleitung - Guía del usuario - Käyttöopas Podręcznik użytkownika - ViewSonic® PJD5152 / PJD5352 DLP Projector IMPORTANT: Please read this User Guide will describe your product for future service. Kullanιcι kιlavuzu Model No. : VS13307 / VS13147 Warranty information...

PJD5152, PJD5352 User Guide (English)
Page 4
...: Model Number: Document Number: Serial Number: Purchase Date: For Your Records PJD5152 / PJD5352 ViewSonic DLP Projector VS13307 / VS13147 PJD5152_PJD5352_UG_ENG Rev. 1B 03-05-10 The lamp in this product. Copyright Information Copyright© ViewSonic® Corporation, 2010. No part of ViewSonic Corporation. Macintosh and Power Macintosh are registered trademarks of this product contains mercury. In...
...: Model Number: Document Number: Serial Number: Purchase Date: For Your Records PJD5152 / PJD5352 ViewSonic DLP Projector VS13307 / VS13147 PJD5152_PJD5352_UG_ENG Rev. 1B 03-05-10 The lamp in this product. Copyright Information Copyright© ViewSonic® Corporation, 2010. No part of ViewSonic Corporation. Macintosh and Power Macintosh are registered trademarks of this product contains mercury. In...

PJD5152, PJD5352 User Guide (English)
Page 5
... 12 Connection 13 Connecting a computer or monitor .... 13 Connecting Video source devices ...... 15 Operation 19 Starting up the projector 19 Using the menus 21 Utilizing the password function ......... 22 Switching input signal 24 Adjusting the projected image 25 Magnifying ... in a high altitude environment 34 Personalizing the projector menu display 35 Shutting down the projector 35 Menu operation 36 Maintenance 43 Care of the projector 43 Lamp information 44 Troubleshooting 50 Specifications 51 Projector specifications 51 Dimensions 52 Ceiling mount installation 52 ...
... 12 Connection 13 Connecting a computer or monitor .... 13 Connecting Video source devices ...... 15 Operation 19 Starting up the projector 19 Using the menus 21 Utilizing the password function ......... 22 Switching input signal 24 Adjusting the projected image 25 Magnifying ... in a high altitude environment 34 Personalizing the projector menu display 35 Shutting down the projector 35 Menu operation 36 Maintenance 43 Care of the projector 43 Lamp information 44 Troubleshooting 50 Specifications 51 Projector specifications 51 Dimensions 52 Ceiling mount installation 52 ...

PJD5152, PJD5352 User Guide (English)
Page 6
...windows rolled up. - Safety Instructions 1. Please read this manual before you follow the instructions mentioned in any objects when the projector is under operation as the inside which has its own removable cover. Refer servicing to suitably qualified professional service personnel. 12....assembly for safety of this product on the product. Important safety instructions 3 Locations where temperatures may contaminate optical components, shortening the projector's life span and darkening the picture. - The product may fluctuate or cut out, it for future reference. 2. In ...
...windows rolled up. - Safety Instructions 1. Please read this manual before you follow the instructions mentioned in any objects when the projector is under operation as the inside which has its own removable cover. Refer servicing to suitably qualified professional service personnel. 12....assembly for safety of this product on the product. Important safety instructions 3 Locations where temperatures may contaminate optical components, shortening the projector's life span and darkening the picture. - The product may fluctuate or cut out, it for future reference. 2. In ...

PJD5152, PJD5352 User Guide (English)
Page 7
...any objects upon it is a safety risk that you purchased your local service center to the projector, doing so may result in damage to person and property. If the projector does become loose. 4 Important safety instructions It is not fully horizontal may sense some heated ...to an improper attachment through the use of displaying inverted pictures for ceiling mount installation. Always place the projector on end vertically. Do not use an inappropriate projector ceiling mount kit, there is securely and safely installed. Use only qualified ceiling mount kit for mounting...
...any objects upon it is a safety risk that you purchased your local service center to the projector, doing so may result in damage to person and property. If the projector does become loose. 4 Important safety instructions It is not fully horizontal may sense some heated ...to an improper attachment through the use of displaying inverted pictures for ceiling mount installation. Always place the projector on end vertically. Do not use an inappropriate projector ceiling mount kit, there is securely and safely installed. Use only qualified ceiling mount kit for mounting...

PJD5152, PJD5352 User Guide (English)
Page 8
...; Up to 8 sets of picture modes providing multiple choices for different projection purposes • Selectable quick cooling function makes the projector cool in a shorter time • One-key auto-adjustment to display the best picture quality • Digital keystone correction to... • Component HDTV compatibility (YPbPr) • High quality manual zoom lens • The apparent brightness of use. The projector offers the following features. • Screen Color correction allowing projection on the ambient lighting conditions, selected input signal contrast/brightness settings...
...; Up to 8 sets of picture modes providing multiple choices for different projection purposes • Selectable quick cooling function makes the projector cool in a shorter time • One-key auto-adjustment to display the best picture quality • Digital keystone correction to... • Component HDTV compatibility (YPbPr) • High quality manual zoom lens • The apparent brightness of use. The projector offers the following features. • Screen Color correction allowing projection on the ambient lighting conditions, selected input signal contrast/brightness settings...

PJD5152, PJD5352 User Guide (English)
Page 9
Soft carry case (for your place of the items shown below. Ceiling mount 2. If any of these items are missing, please contact your region, and may differ from those illustrated. Projector Power Cord VGA Cable Multi-language user manual DVD Quick Start Guide Remote Control & Battery Pull the tab before using the remote control. Replacement lamp 6 Introduction Standard accessories The supplied accessories will be suitable for the PJD5352) Optional accessories 1. Shipping contents Carefully unpack and verify that you have all of purchase.
Soft carry case (for your place of the items shown below. Ceiling mount 2. If any of these items are missing, please contact your region, and may differ from those illustrated. Projector Power Cord VGA Cable Multi-language user manual DVD Quick Start Guide Remote Control & Battery Pull the tab before using the remote control. Replacement lamp 6 Introduction Standard accessories The supplied accessories will be suitable for the PJD5352) Optional accessories 1. Shipping contents Carefully unpack and verify that you have all of purchase.
PJD5152, PJD5352 User Guide (English)
Page 10
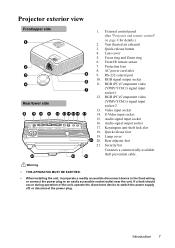
... 15. RGB (PC)/Component video (YPbPr/YCbCr) signal input socket-2 12 13 14 15 16 17 13. Projector exterior view Front/upper side 1 2 3 4 Rear/lower side 8 9 10 11 18 1. Lens cover 5. External control panel (See "Projector and remote control" on page 8 for details.) 2. Kensington anti-theft lock slot 18. Front IR remote...
... 15. RGB (PC)/Component video (YPbPr/YCbCr) signal input socket-2 12 13 14 15 16 17 13. Projector exterior view Front/upper side 1 2 3 4 Rear/lower side 8 9 10 11 18 1. Lens cover 5. External control panel (See "Projector and remote control" on page 8 for details.) 2. Kensington anti-theft lock slot 18. Front IR remote...

PJD5152, PJD5352 User Guide (English)
Page 11
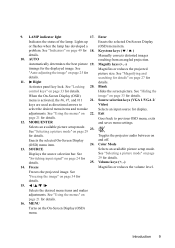
... page 26 for details. II POWER Adjusts the focus of the image. See "Using the menus" on page 19 and "Shutting down 2. Controls and functions Projector and remote control 14 20 5 10 1 15 2 3 21 4 9 16 5 6 10 17 13 7 22 11 8 23 12 18 6 24 13 19 25 1. Focus... ring 5. See "Indicators" on page 35 for becomes too high. Zoom ring the projector" on page details. 49 for details. Adjusts the size of the projected image. MENU/EXIT Turns on page 26 for details. 4. POWER indicator light ...
... page 26 for details. II POWER Adjusts the focus of the image. See "Using the menus" on page 19 and "Shutting down 2. Controls and functions Projector and remote control 14 20 5 10 1 15 2 3 21 4 9 16 5 6 10 17 13 7 22 11 8 23 12 18 6 24 13 19 25 1. Focus... ring 5. See "Indicators" on page 35 for becomes too high. Zoom ring the projector" on page details. 49 for details. Adjusts the size of the projected image. MENU/EXIT Turns on page 26 for details. 4. POWER indicator light ...
PJD5152, PJD5352 User Guide (English)
Page 12
..." on Enacts the selected On-Screen Display and off. (OSD) menu item. 24. See "Magnifying and details. Volume keys (+, -) 14. Keystone keys ( / ) details. Toggles the projector audio between on page 25 for details. 21. Freeze Magnifies or reduces the volume level. Enter Indicates the status of the lamp.
..." on Enacts the selected On-Screen Display and off. (OSD) menu item. 24. See "Magnifying and details. Volume keys (+, -) 14. Keystone keys ( / ) details. Toggles the projector audio between on page 25 for details. 21. Freeze Magnifies or reduces the volume level. Enter Indicates the status of the lamp.
PJD5152, PJD5352 User Guide (English)
Page 13
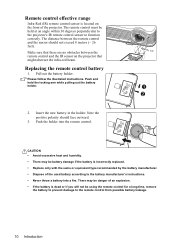
... the battery holder. 2. Approx. 15° 1 2 CAUTION • Avoid excessive heat and humidity. • There may be danger of the projector. Please follow the illustrated instructions. Pull out the battery holder. Push the holder into a fire. The distance between the remote control and the IR ... the positive polarity should not exceed 8 meters (~ 26 feet). There may be held at an angle within 30 degrees perpendicular to the projector's IR remote control sensor to function correctly. Remote control effective range Infra-Red (IR) remote control sensor is dead or if you will...
... the battery holder. 2. Approx. 15° 1 2 CAUTION • Avoid excessive heat and humidity. • There may be danger of the projector. Please follow the illustrated instructions. Pull out the battery holder. Push the holder into a fire. The distance between the remote control and the IR ... the positive polarity should not exceed 8 meters (~ 26 feet). There may be held at an angle within 30 degrees perpendicular to the projector's IR remote control sensor to function correctly. Remote control effective range Infra-Red (IR) remote control sensor is dead or if you will...
PJD5152, PJD5352 User Guide (English)
Page 14
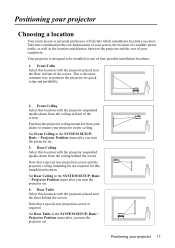
...position of your screen, the location of a suitable power outlet, as well as the location and distance between the projector and the rest of the screen. Purchase the projector ceiling mount kit from the ceiling behind the screen. Set Rear Table in the SYSTEM SETUP: Basic...personal preference will dictate which installation location you turn the projector on . Front Ceiling Select this location with the projector suspended upside-down from your dealer to mount your equipment. Set Rear Ceiling in front of your projector on . 4. Note that a special rear projection screen ...
...position of your screen, the location of a suitable power outlet, as well as the location and distance between the projector and the rest of the screen. Purchase the projector ceiling mount kit from the ceiling behind the screen. Set Rear Table in the SYSTEM SETUP: Basic...personal preference will dictate which installation location you turn the projector on . Front Ceiling Select this location with the projector suspended upside-down from your dealer to mount your equipment. Set Rear Ceiling in front of your projector on . 4. Note that a special rear projection screen ...
PJD5152, PJD5352 User Guide (English)
Page 15
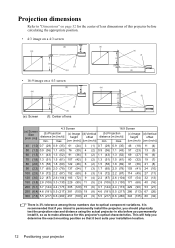
... 3% tolerance among these numbers due to optical component variations. This will help you permanently install it best suits your installation location. 12 Positioning your projector max. (c) Image (d) Vertical height offset [cm (inch) [cm (inch)] 40 (1.0) 0.7 (29) 0.9 (35) 61 (24) 3...; 16:9 image on a 4:3 screen (b) (a) (d) (e): Screen (c) (f) (e) (f): Center of this projector's optical characteristics. Projection dimensions Refer to "Dimensions" on page 52 for this projector before you determine the exact mounting position so that it , so as to make allowance for the center...
... 3% tolerance among these numbers due to optical component variations. This will help you permanently install it best suits your installation location. 12 Positioning your projector max. (c) Image (d) Vertical height offset [cm (inch) [cm (inch)] 40 (1.0) 0.7 (29) 0.9 (35) 61 (24) 3...; 16:9 image on a 4:3 screen (b) (a) (d) (e): Screen (c) (f) (e) (f): Center of this projector's optical characteristics. Projection dimensions Refer to "Dimensions" on page 52 for this projector before you determine the exact mounting position so that it , so as to make allowance for the center...

PJD5152, PJD5352 User Guide (English)
Page 16
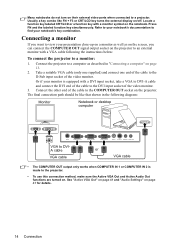
... Notebook or desktop computer Speakers VGA cable or Audio cable Audio cable Connection 13 The final connection path should be controlled by the projector On-Screen Display (OSD) menus. Use the correct signal cables for each source. 3. Ensure the cables are connecting legacy version ...Macintosh computers. Connecting a computer or monitor Connecting a computer The projector provides two VGA input sockets that shown in your external speakers (not supplied). A Mac adapter is needed if you can be like ...
... Notebook or desktop computer Speakers VGA cable or Audio cable Audio cable Connection 13 The final connection path should be controlled by the projector On-Screen Display (OSD) menus. Use the correct signal cables for each source. 3. Ensure the cables are connecting legacy version ...Macintosh computers. Connecting a computer or monitor Connecting a computer The projector provides two VGA input sockets that shown in your external speakers (not supplied). A Mac adapter is needed if you can be like ...
PJD5152, PJD5352 User Guide (English)
Page 17
... Connection Connecting a monitor If you can connect the COMPUTER OUT signal output socket on . Usually a key combo like that shown in "Connecting a computer" on the projector. Take a suitable VGA cable (only one supplied) and connect one end of the cable to a monitor: 1. See "Active VGA Out" on page 41 and "Audio... Settings" on /off. Or if your monitor is made to the projector. • To use this connection method, make sure the Active VGA Out and Active Audio Out functions are turned on the...
... Connection Connecting a monitor If you can connect the COMPUTER OUT signal output socket on . Usually a key combo like that shown in "Connecting a computer" on the projector. Take a suitable VGA cable (only one supplied) and connect one end of the cable to a monitor: 1. See "Active VGA Out" on page 41 and "Audio... Settings" on /off. Or if your monitor is made to the projector. • To use this connection method, make sure the Active VGA Out and Active Audio Out functions are turned on the...
PJD5152, PJD5352 User Guide (English)
Page 18
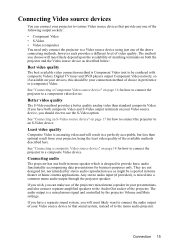
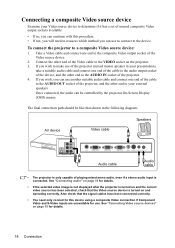
... depend upon the availability of matching terminals on both composite Video and S-Video output terminals on page 17 for how to connect the projector to a component video device. If you have a separate sound system, you choose will result in your presentations, and also connect ...should be expected in preference to (composite) Video. The audio output is mixed into a common mono audio output through the projector speaker. Connecting audio The projector has one of the above connecting methods, however each provides a different level of video quality. Digital TV tuner and DVD players...
... depend upon the availability of matching terminals on both composite Video and S-Video output terminals on page 17 for how to connect the projector to a component video device. If you have a separate sound system, you choose will result in your presentations, and also connect ...should be expected in preference to (composite) Video. The audio output is mixed into a common mono audio output through the projector speaker. Connecting audio The projector has one of the above connecting methods, however each provides a different level of video quality. Digital TV tuner and DVD players...
PJD5152, PJD5352 User Guide (English)
Page 19
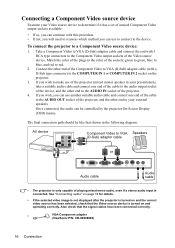
...(D-Sub) adaptor cable or Audio cable Audio cable • The projector is turned on and the correct video source has been selected, check that the signal cables have been connected correctly. • VGA-Component adapter (ViewSonic P/N: CB-00008906) 16 Connection See "Connecting audio" on page ...15 for details. • If the selected video image is not displayed after the projector is only capable of the sockets; Also check that the ...
...(D-Sub) adaptor cable or Audio cable Audio cable • The projector is turned on and the correct video source has been selected, check that the signal cables have been connected correctly. • VGA-Component adapter (ViewSonic P/N: CB-00008906) 16 Connection See "Connecting audio" on page ...15 for details. • If the selected video image is not displayed after the projector is only capable of the sockets; Also check that the ...

PJD5152, PJD5352 User Guide (English)
Page 20
...and operating correctly. See "Connecting audio" on page 15 for details. • If the selected video image is not displayed after the projector is turned on and the correct video source has been selected, check that the Video source device is connected. Connection 17 Connect the other... audio can be like that the signal cables have been connected correctly. • If you have already made a Component Video connection between the projector and this S-Video source device using Component Video connections, you need not connect to this device using an S-Video connection as this procedure. ...
...and operating correctly. See "Connecting audio" on page 15 for details. • If the selected video image is not displayed after the projector is turned on and the correct video source has been selected, check that the Video source device is connected. Connection 17 Connect the other... audio can be like that the signal cables have been connected correctly. • If you have already made a Component Video connection between the projector and this S-Video source device using Component Video connections, you need not connect to this device using an S-Video connection as this procedure. ...
PJD5152, PJD5352 User Guide (English)
Page 21
... should be like that the signal cables have been connected correctly. • You need to reassess which method you can be controlled by the projector On-Screen Display (OSD) menus. Also check that shown in your presentations, take a suitable audio cable and connect one end of the cable... can use another suitable audio cable and connect one end to the composite Video output socket of the Video source device. 2. To connect the projector to the VIDEO socket on and operating correctly. Connecting a composite Video source device Examine your Video source device to determine if it has a ...
... should be like that the signal cables have been connected correctly. • You need to reassess which method you can be controlled by the projector On-Screen Display (OSD) menus. Also check that shown in your presentations, take a suitable audio cable and connect one end of the cable... can use another suitable audio cable and connect one end to the composite Video output socket of the Video source device. 2. To connect the projector to the VIDEO socket on and operating correctly. Connecting a composite Video source device Examine your Video source device to determine if it has a ...
PJD5152, PJD5352 User Guide (English)
Page 22
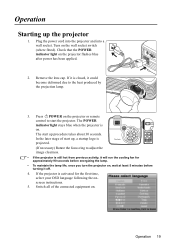
...seconds. If it is activated for approximately 90 seconds before energizing the lamp. • To maintain the lamp life, once you turn the projector on . In the later stage of the connected equipment on , wait at least 5 minutes before turning it could become deformed due to start...by the projection lamp. 3. Plug the power cord into the projector and into a wall socket. The start the projector. Operation 19 Remove the lens cap. If the projector is closed, it off. 4. Press II POWER on . Turn on the projector flashes blue after power has been applied. 2. The POWER ...
...seconds. If it is activated for approximately 90 seconds before energizing the lamp. • To maintain the lamp life, once you turn the projector on . In the later stage of the connected equipment on , wait at least 5 minutes before turning it could become deformed due to start...by the projection lamp. 3. Plug the power cord into the projector and into a wall socket. The start the projector. Operation 19 Remove the lens cap. If the projector is closed, it off. 4. Press II POWER on . Turn on the projector flashes blue after power has been applied. 2. The POWER ...


