

PJD5350LS User Guide English
Page 1
...to obtain important information on our web site at http:// www.viewsonic.com in English, or in specific languages using your product for future service. PJD5155L/PJD5255L/ PJD5555LW/PJD5350LS/ PJD5550LWS DLP Projector User Guide IMPORTANT: Please read this User Guide will describe ...your limited coverage from ViewSonic Corporation, which is also found on installing and using the Regional...
...to obtain important information on our web site at http:// www.viewsonic.com in English, or in specific languages using your product for future service. PJD5155L/PJD5255L/ PJD5555LW/PJD5350LS/ PJD5550LWS DLP Projector User Guide IMPORTANT: Please read this User Guide will describe ...your limited coverage from ViewSonic Corporation, which is also found on installing and using the Regional...

PJD5350LS User Guide English
Page 7
.... Product Name: Model Number: Document Number: Serial Number: Purchase Date: For Your Records PJD5155L/PJD5255L/PJD5555LW/PJD5350LS/ PJD5550LWS ViewSonic DLP Projector VS15903/VS15906/VS15908/VS15918/VS15921 PJD5155L/PJD5255L/PJD5555LW/PJD5350LS/ PJD5550LWS_UG_ENG Rev. 1A 11-13-14 Product disposal at end of product ...". Registering your registration form, use care and dispose of Smarter, Greener Computing. Please visit ViewSonic website to a respective ViewSonic office. Please print this user guide and fill the information in accordance with local, state or federal laws...
.... Product Name: Model Number: Document Number: Serial Number: Purchase Date: For Your Records PJD5155L/PJD5255L/PJD5555LW/PJD5350LS/ PJD5550LWS ViewSonic DLP Projector VS15903/VS15906/VS15908/VS15918/VS15921 PJD5155L/PJD5255L/PJD5555LW/PJD5350LS/ PJD5550LWS_UG_ENG Rev. 1A 11-13-14 Product disposal at end of product ...". Registering your registration form, use care and dispose of Smarter, Greener Computing. Please visit ViewSonic website to a respective ViewSonic office. Please print this user guide and fill the information in accordance with local, state or federal laws...
PJD5350LS User Guide English
Page 8
...monitor ...14 Connecting Video source devices ...14 Operation 16 Powering on/off the projector ...16 Adjusting the projector height ...17 Adjusting the projector zoom and focus 17 Adjusting projection image size ...18 Securing the projector ...20 Locking control keys ...22 Setting the presentation timer ...23 Menu operation... ...24 Maintenance 39 Cleaning the lens ...39 Cleaning the projector housing ...39 Installing the dust filter (optional accessory 40 Installing the cable management cover (optional accessory 41 Replacing the...
...monitor ...14 Connecting Video source devices ...14 Operation 16 Powering on/off the projector ...16 Adjusting the projector height ...17 Adjusting the projector zoom and focus 17 Adjusting projection image size ...18 Securing the projector ...20 Locking control keys ...22 Setting the presentation timer ...23 Menu operation... ...24 Maintenance 39 Cleaning the lens ...39 Cleaning the projector housing ...39 Installing the dust filter (optional accessory 40 Installing the cable management cover (optional accessory 41 Replacing the...

PJD5350LS User Guide English
Page 9
... and a user - friendly design to change without notices. • The reproduction, transfer or copy of all or any part of use. The projector offers the following features: • Compatibility with Macintosh® computers • Compatibility with NTSC, PAL, SECAM and HDTV • D-Sub 15-...• HDMI CEC (Consumer Electronics Control) function allows synchronized power ON/OFF operation between the projector and a CEC-compatible DVD player device connected to the HDMI input of the projector Note • The information in this manual is subject to deliver high reliability and ease of...
... and a user - friendly design to change without notices. • The reproduction, transfer or copy of all or any part of use. The projector offers the following features: • Compatibility with Macintosh® computers • Compatibility with NTSC, PAL, SECAM and HDTV • D-Sub 15-...• HDMI CEC (Consumer Electronics Control) function allows synchronized power ON/OFF operation between the projector and a CEC-compatible DVD player device connected to the HDMI input of the projector Note • The information in this manual is subject to deliver high reliability and ease of...

PJD5350LS User Guide English
Page 10
... sure you need to ship it was originally packed at the factory if you have all these components: PJD5155L/PJD5255L/ PJD5555LW projector PJD5350LS/ PJD5550LWS projector Power COMP1 COMP2 HDMI Auto Sync Source Enter Menu 3D Exit PgUp PgDn Mouse ID set Pattern 1 Blank 2 3 4 5 ... (AAA *2 PCS) AC power cord Quick start guide VGA cable (D-SUB to D-SUB) ViewSonic CD wizard Optional accessories 1. Cable management cover (rear cable cover) 2. Lens cap for PJD5155L/PJD5255L/PJD5555LW Note • Contact you dealer immediately if any items are missing, appear damaged,...
... sure you need to ship it was originally packed at the factory if you have all these components: PJD5155L/PJD5255L/ PJD5555LW projector PJD5350LS/ PJD5550LWS projector Power COMP1 COMP2 HDMI Auto Sync Source Enter Menu 3D Exit PgUp PgDn Mouse ID set Pattern 1 Blank 2 3 4 5 ... (AAA *2 PCS) AC power cord Quick start guide VGA cable (D-SUB to D-SUB) ViewSonic CD wizard Optional accessories 1. Cable management cover (rear cable cover) 2. Lens cap for PJD5155L/PJD5255L/PJD5555LW Note • Contact you dealer immediately if any items are missing, appear damaged,...
PJD5350LS User Guide English
Page 11
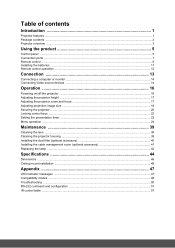
Ventilation holes 7. Lens cover 4. Control panel 3 Zoom ring 9. Focus ring 8. Speaker 6. Projector overview Front view 9 8 76 1 9 8 3 6 5 PJD5155L/PJD5255L/ 4 PJD5555LW 5 4 PJD5350LS/PJD5550LWS 12 3 1. Lamp cover 2. Projection lens 5. Front IR remote control sensor 3.
Ventilation holes 7. Lens cover 4. Control panel 3 Zoom ring 9. Focus ring 8. Speaker 6. Projector overview Front view 9 8 76 1 9 8 3 6 5 PJD5155L/PJD5255L/ 4 PJD5555LW 5 4 PJD5350LS/PJD5550LWS 12 3 1. Lamp cover 2. Projection lens 5. Front IR remote control sensor 3.
PJD5350LS User Guide English
Page 12
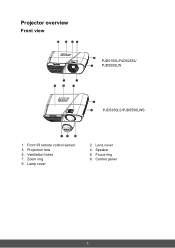
Kensington lock Bottom View 65.89 1 113.54 60.01 2 Ceiling mount screws: M4 x 8 (Max. Ceiling mount holes Note • This projector can be used with a ceiling mount for information to mount the projector on a ceiling. 4 Rear View RS-232 COMPUTER IN HDMI MINI USB 1 2 3 1. AC power socket 2. L = 8 mm) Unit: mm 1. Connection ports 3. The ceiling mount is not included in the package. • Contact your dealer for support. Security bar 2.
Kensington lock Bottom View 65.89 1 113.54 60.01 2 Ceiling mount screws: M4 x 8 (Max. Ceiling mount holes Note • This projector can be used with a ceiling mount for information to mount the projector on a ceiling. 4 Rear View RS-232 COMPUTER IN HDMI MINI USB 1 2 3 1. AC power socket 2. L = 8 mm) Unit: mm 1. Connection ports 3. The ceiling mount is not included in the package. • Contact your dealer for support. Security bar 2.

PJD5350LS User Guide English
Page 13
... images resulting from an angled projection. 5. Color Mode 12 4 11 1. Using the product Control panel 3 4 6 2 5 7 Menu 8 Exit 9 1 Blank Enter 10 Power Source / ? POWER Turn the projector on -screen display menus. Blank/ Left key Hide the screen picture. 3.
... images resulting from an angled projection. 5. Color Mode 12 4 11 1. Using the product Control panel 3 4 6 2 5 7 Menu 8 Exit 9 1 Blank Enter 10 Power Source / ? POWER Turn the projector on -screen display menus. Blank/ Left key Hide the screen picture. 3.
PJD5350LS User Guide English
Page 15
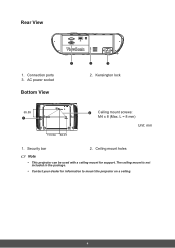
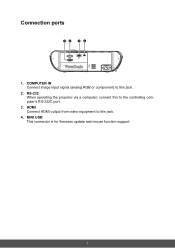
Connection ports 12 34 RS-232 COMPUTER IN HDMI MINI USB 1. HDMI Connect HDMI output from video equipment to the controlling computer's RS-232C port. 3. MINI USB This connector is for firmware update and mouse function support. 7 RS-232 When operating the projector via a computer, connect this to this jack. 2. COMPUTER IN Connect image input signal (analog RGB or component) to this jack. 4.
Connection ports 12 34 RS-232 COMPUTER IN HDMI MINI USB 1. HDMI Connect HDMI output from video equipment to the controlling computer's RS-232C port. 3. MINI USB This connector is for firmware update and mouse function support. 7 RS-232 When operating the projector via a computer, connect this to this jack. 2. COMPUTER IN Connect image input signal (analog RGB or component) to this jack. 4.
PJD5350LS User Guide English
Page 16
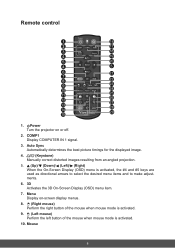
... an angled projection. 5. (Up)/ (Down)/ (Left)/ (Right) When the On-Screen Display (OSD) menu is activated. 10. COMP1 Display COMPUTER IN 1 signal. 3. Power Turn the projector on -screen display menus. 8. (Right mouse) Perform the right button of the mouse when mouse mode is activated. 9. (Left mouse) Perform the left button of...
... an angled projection. 5. (Up)/ (Down)/ (Left)/ (Right) When the On-Screen Display (OSD) menu is activated. 10. COMP1 Display COMPUTER IN 1 signal. 3. Power Turn the projector on -screen display menus. 8. (Right mouse) Perform the right button of the mouse when mouse mode is activated. 9. (Left mouse) Perform the left button of...

PJD5350LS User Guide English
Page 17
... is activated. 24. Enter Enacts the selected On-Screen Display (OSD) menu item. 21. Color Mode Select the picture setup mode. 29. (Mute) Toggles the projector audio between the normal and mouse modes. 11. (Lock)/ID Set Lock: Activates or disables panel key lock. HDMI Display HDMI signal. 18. ID Set...
... is activated. 24. Enter Enacts the selected On-Screen Display (OSD) menu item. 21. Color Mode Select the picture setup mode. 29. (Mute) Toggles the projector audio between the normal and mouse modes. 11. (Lock)/ID Set Lock: Activates or disables panel key lock. HDMI Display HDMI signal. 18. ID Set...
PJD5350LS User Guide English
Page 18
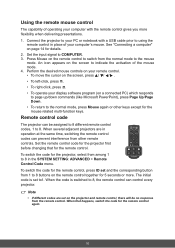
... to the normal mode, press Mouse again or other remote controls. Set the remote control code for the projector first before changing that happens, switch the code for the projector, select from 1 to indicate the activation of operating your PC or notebook with the remote control gives you...8226; To right-click, press . • To operate your computer's mouse. When that for the mouse related multi-function keys. When several adjacent projectors are set to1. To switch the code for the remote control again. 10 Using the remote mouse control The capability of the mouse mode. 4. ...
... to the normal mode, press Mouse again or other remote controls. Set the remote control code for the projector first before changing that happens, switch the code for the projector, select from 1 to indicate the activation of operating your PC or notebook with the remote control gives you...8226; To right-click, press . • To operate your computer's mouse. When that for the mouse related multi-function keys. When several adjacent projectors are set to1. To switch the code for the remote control again. 10 Using the remote mouse control The capability of the mouse mode. 4. ...
PJD5350LS User Guide English
Page 20
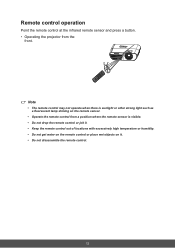
Remote control operation Point the remote control at the infrared remote sensor and press a button. • Operating the projector from the front. 15 15 5m 8m 7m Note • The remote control may not operate when there is sunlight or other strong light such ...
Remote control operation Point the remote control at the infrared remote sensor and press a button. • Operating the projector from the front. 15 15 5m 8m 7m Note • The remote control may not operate when there is sunlight or other strong light such ...
PJD5350LS User Guide English
Page 21
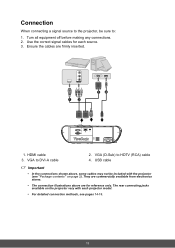
Ensure the cables are for each projector model. • For detailed connection methods, see "Package contents" on the projector vary with the projector (see pages 14-16. 13 USB cable Important • In the connections shown above are firmly inserted. 1 2 34 RS-...232 COMPUTER IN HDMI MINI USB 1. Connection When connecting a signal source to the projector, be included with each source. 3. HDMI cable 3. The rear connecting jacks available on page 2). VGA to : 1. VGA (D-Sub) to HDTV (RCA) ...
Ensure the cables are for each projector model. • For detailed connection methods, see "Package contents" on the projector vary with the projector (see pages 14-16. 13 USB cable Important • In the connections shown above are firmly inserted. 1 2 34 RS-...232 COMPUTER IN HDMI MINI USB 1. Connection When connecting a signal source to the projector, be included with each source. 3. HDMI cable 3. The rear connecting jacks available on page 2). VGA to : 1. VGA (D-Sub) to HDTV (RCA) ...
PJD5350LS User Guide English
Page 22
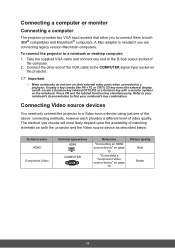
... two VGA input sockets that allow you to connect them to find your notebook's documentation to both the projector and the Video source device as described below: Terminal name HDMI Component Video Terminal appearance HDMI COMPUTER Reference "Connecting an HDMI source... when connected to the D-Sub output socket of the VGA cable to a notebook or desktop computer: 1. To connect the projector to the COMPUTER signal input socket on the projector. Connect the other end of the computer. 2. Press FN and the labeled function key simultaneously. Important • Many notebooks...
... two VGA input sockets that allow you to connect them to find your notebook's documentation to both the projector and the Video source device as described below: Terminal name HDMI Component Video Terminal appearance HDMI COMPUTER Reference "Connecting an HDMI source... when connected to the D-Sub output socket of the VGA cable to a notebook or desktop computer: 1. To connect the projector to the COMPUTER signal input socket on the projector. Connect the other end of the computer. 2. Press FN and the labeled function key simultaneously. Important • Many notebooks...
PJD5350LS User Guide English
Page 23
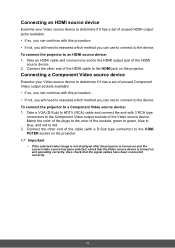
...green, blue to blue, and red to an HDMI source device: 1. Connect the other end of the HDMI cable to the HDMI jack on the projector. Connecting an HDMI source device Examine your Video source device to determine if it has a set of unused Component Video output sockets available: • If... need to reassess which method you can use to connect to the device. Important • If the selected video image is not displayed after the projector is turned on and the correct video source has been selected, check that the signal cables have been connected correctly. 15 Also check that the...
...green, blue to blue, and red to an HDMI source device: 1. Connect the other end of the HDMI cable to the HDMI jack on the projector. Connecting an HDMI source device Examine your Video source device to determine if it has a set of unused Component Video output sockets available: • If... need to reassess which method you can use to connect to the device. Important • If the selected video image is not displayed after the projector is turned on and the correct video source has been selected, check that the signal cables have been connected correctly. 15 Also check that the...
PJD5350LS User Guide English
Page 24
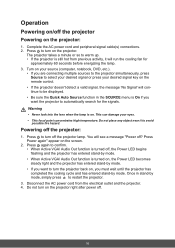
... Active VGA/ Audio Out function is turned off . 16 Do not place any object near it will run the cooling fan for the signals. The projector takes a minute or so to automatically search for approximately 60 seconds before energizing the lamp. 3. You will continue to be displayed. • Be ...sure the Quick Auto Source function in stand-by mode. • If you want to turn on the projector right after power off , the Power LED begins flashing and the projector has entered stand-by mode. • When Active VGA/ Audio Out function is turned on the screen. 2. Warning &#...
... Active VGA/ Audio Out function is turned off . 16 Do not place any object near it will run the cooling fan for the signals. The projector takes a minute or so to automatically search for approximately 60 seconds before energizing the lamp. 3. You will continue to be displayed. • Be ...sure the Quick Auto Source function in stand-by mode. • If you want to turn on the projector right after power off , the Power LED begins flashing and the projector has entered stand-by mode. • When Active VGA/ Audio Out function is turned on the screen. 2. Warning &#...
PJD5350LS User Guide English
Page 25
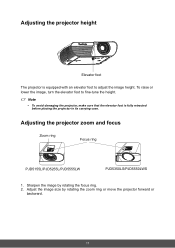
... image by rotating the zoom ring or move the projector forward or backward. 17 Adjusting the projector zoom and focus Zoom ring Focus ring PJD5155L/PJD5255L/PJD5555LW PJD5350LS/PJD5550LWS 1. Adjust the image size by rotating the focus ring. 2. Note • To avoid damaging the projector, make sure that the elevator foot is equipped with...
... image by rotating the zoom ring or move the projector forward or backward. 17 Adjusting the projector zoom and focus Zoom ring Focus ring PJD5155L/PJD5255L/PJD5555LW PJD5350LS/PJD5550LWS 1. Adjust the image size by rotating the focus ring. 2. Note • To avoid damaging the projector, make sure that the elevator foot is equipped with...
PJD5350LS User Guide English
Page 27
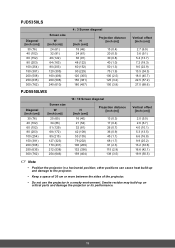
...; Keep a space of 30 cm or more between the sides of the projector. • Do not use the projector in a horizontal position; PJD5350LS Diagonal [inch (cm)] 30 (76) 40 (102) 60 (152) 80 (203) 100 (254) 150 (381) 200 (508) 250 (635) 300 (762) ... (0.4) 26 (0.7) 36 (0.9) 45 (1.1) 68 (1.7) 91 (2.3) 115 (2.9) 138 (3.5) Vertical offset [inch (cm)] 2.0 (5.0) 2.6 (6.7) 4.0 (10.1) 5.3 (13.5) 6.6 (16.8) 9.9 (25.2) 13.2 (33.6) 16.6 (42.1) 19.9 (50.5) Note • Position the projector in a smoky environment. other positions can cause heat build-up on critical parts and damage the...
...; Keep a space of 30 cm or more between the sides of the projector. • Do not use the projector in a horizontal position; PJD5350LS Diagonal [inch (cm)] 30 (76) 40 (102) 60 (152) 80 (203) 100 (254) 150 (381) 200 (508) 250 (635) 300 (762) ... (0.4) 26 (0.7) 36 (0.9) 45 (1.1) 68 (1.7) 91 (2.3) 115 (2.9) 138 (3.5) Vertical offset [inch (cm)] 2.0 (5.0) 2.6 (6.7) 4.0 (10.1) 5.3 (13.5) 6.6 (16.8) 9.9 (25.2) 13.2 (33.6) 16.6 (42.1) 19.9 (50.5) Note • Position the projector in a smoky environment. other positions can cause heat build-up on critical parts and damage the...

PJD5350LS User Guide English
Page 28
...entering the new password. 5. Press Menu to decode the number. Seek help from the local ViewSonic service center to re-enter the password. 1. You may be required to provide proof of the projector. Open the OSD menu and go to the SYSTEM SETTING: ADVANCED > Advanced > Security Settings... menu. You have successfully assigned a new password to verify that you are an authorized user of purchase documentation to the projector. Go back to cancel the change or try another message 'INPUT NEW PASSWORD' displays. • If the password is activated, you turn ...
...entering the new password. 5. Press Menu to decode the number. Seek help from the local ViewSonic service center to re-enter the password. 1. You may be required to provide proof of the projector. Open the OSD menu and go to the SYSTEM SETTING: ADVANCED > Advanced > Security Settings... menu. You have successfully assigned a new password to verify that you are an authorized user of purchase documentation to the projector. Go back to cancel the change or try another message 'INPUT NEW PASSWORD' displays. • If the password is activated, you turn ...


