

User Guide
Page 2
... Menu ...13 E N G L I S H Other Information Specifications ...14 Timing Chart ...15 Troubleshooting ...16 Power Indicator Lights ...18 Screen Messages ...19 Maintenance ...20 Projector Lamp ...20 Remote Control Batteries ...21 Cleaning Instructions ...21 Attaching the Optional Handle ...22 Customer Support...23 Limited Warranty...24 VIEWSONIC Projector ...24 Appendix Power Cord Safety Guidelines...25 FCC Information ...26 ViewSonic PJ750 i
... Menu ...13 E N G L I S H Other Information Specifications ...14 Timing Chart ...15 Troubleshooting ...16 Power Indicator Lights ...18 Screen Messages ...19 Maintenance ...20 Projector Lamp ...20 Remote Control Batteries ...21 Cleaning Instructions ...21 Attaching the Optional Handle ...22 Customer Support...23 Limited Warranty...24 VIEWSONIC Projector ...24 Appendix Power Cord Safety Guidelines...25 FCC Information ...26 ViewSonic PJ750 i
User Guide
Page 3
Figures E N G L I S H Figure: 1 Figure: 2 Figure: 3 Figure: 4 Figure: 5 Figure: 6 Figure: 7 Figure: 8 Figure: 9 Package Contents...2 ViewSonic PJ750 Projector...3 System Setup...5 Recommended Projector Distances...6 Angle Adjustment ...7 Projector and Remote Controls...8 Lamp Replacement ...20 Installing the Batteries...21 Attaching the Handle...22 ii ViewSonic PJ750
Figures E N G L I S H Figure: 1 Figure: 2 Figure: 3 Figure: 4 Figure: 5 Figure: 6 Figure: 7 Figure: 8 Figure: 9 Package Contents...2 ViewSonic PJ750 Projector...3 System Setup...5 Recommended Projector Distances...6 Angle Adjustment ...7 Projector and Remote Controls...8 Lamp Replacement ...20 Installing the Batteries...21 Attaching the Handle...22 ii ViewSonic PJ750
User Guide
Page 5
... connectors) PS/2 mouse cable Quick Start guide Attachable handle Remote control unit including two AA batteries Carrying Case PJ750 projector ViewSonic Wizard CD-ROM Quick Start guide 2 ViewSonic PJ750 N DBY/O STAN MUTE INPUT T RESE MENU LAMP TEMP LAMP PJ750 Power cord (US) Power cord (Europe) Power cord (China) RGB cable Audio/Video cable PS/2 mouse cable...
... connectors) PS/2 mouse cable Quick Start guide Attachable handle Remote control unit including two AA batteries Carrying Case PJ750 projector ViewSonic Wizard CD-ROM Quick Start guide 2 ViewSonic PJ750 N DBY/O STAN MUTE INPUT T RESE MENU LAMP TEMP LAMP PJ750 Power cord (US) Power cord (Europe) Power cord (China) RGB cable Audio/Video cable PS/2 mouse cable...

User Guide
Page 6
... injury. • Do not operate the projector near the projector; Do not place drinks on any other unstable surface. E N G L I S H Projector Components Projector control panel LAMP Zoom ring TE MU T RESE NU ME Power switch AC power inlet Figure 2: ViewSonic PJ750 Projector N Y/O DB STAN UT INP Focus ring... LAMP TEMP PJ75 0 Remote Control Sensor Lens Air Vent (intake) ViewSonic PJ750 3 Doing so can be severely burned by the hot lens. doing so...
... injury. • Do not operate the projector near the projector; Do not place drinks on any other unstable surface. E N G L I S H Projector Components Projector control panel LAMP Zoom ring TE MU T RESE NU ME Power switch AC power inlet Figure 2: ViewSonic PJ750 Projector N Y/O DB STAN UT INP Focus ring... LAMP TEMP PJ75 0 Remote Control Sensor Lens Air Vent (intake) ViewSonic PJ750 3 Doing so can be severely burned by the hot lens. doing so...

User Guide
Page 7
...8226; The power LED lights a steady green after the power is turned on the side of the projected image is a safety feature. 4 ViewSonic PJ750 See "Connecting Input and Output Devices" on for at least 1 minute after the power is turned off when the power LED lights a steady... is complete. The steady green light indicates that the ViewSonic PJ750 is ready to adjust the focus. 9 Adjust the Keystone Value. • If the top of the projector. Determine the distance the projector will be from the screen. (See "Positioning the Projector" on page 6.) • Adjust the angle of ...
...8226; The power LED lights a steady green after the power is turned on the side of the projected image is a safety feature. 4 ViewSonic PJ750 See "Connecting Input and Output Devices" on for at least 1 minute after the power is turned off when the power LED lights a steady... is complete. The steady green light indicates that the ViewSonic PJ750 is ready to adjust the focus. 9 Adjust the Keystone Value. • If the top of the projector. Determine the distance the projector will be from the screen. (See "Positioning the Projector" on page 6.) • Adjust the angle of ...

User Guide
Page 8
... below as guides when connecting your input device. For specific connection instructions, refer to the user guide for your input and output devices to the ViewSonic PJ750 projector. Connecting Input and Output Devices Use the diagrams below demonstrate how various input devices can be connected to the...
... below as guides when connecting your input device. For specific connection instructions, refer to the user guide for your input and output devices to the ViewSonic PJ750 projector. Connecting Input and Output Devices Use the diagrams below demonstrate how various input devices can be connected to the...
User Guide
Page 9
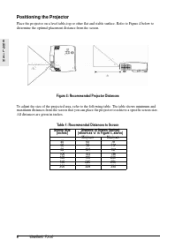
...6 ViewSonic PJ750 Table 1: Recommended Distances to Screen Screen Size (inches) 40 60 80 100 120 150 200 Distance to Screen (inches) (shown as 'a' in inches. Refer to Figure 4 below to determine the optimal placement distance from the screen that you can place the projector to... the following table. E N G L I S H Figure 4: Recommended Projector Distances To adjust the size of the projected area, refer to achieve a specific screen size. The table shows ...
...6 ViewSonic PJ750 Table 1: Recommended Distances to Screen Screen Size (inches) 40 60 80 100 120 150 200 Distance to Screen (inches) (shown as 'a' in inches. Refer to Figure 4 below to determine the optimal placement distance from the screen that you can place the projector to... the following table. E N G L I S H Figure 4: Recommended Projector Distances To adjust the size of the projected area, refer to achieve a specific screen size. The table shows ...

User Guide
Page 10
...the front foot adjuster Rotate the rear foot adjuster Figure 5: Angle Adjustment ViewSonic PJ750 7 See also Keystone under "Input Menu" on page 11. 1 Press the release button to lower the front foot, then tilt the projector up as shown in place. 3 Rotate the rear foot adjuster to ...adjusts the horizontal alignment of the projected image. 2 Release the button to lock the front foot in Figure 5 below . Adjusting the Projector Angle Adjust the projector angle using the foot adjusters shown in Figure 5 below . • The front foot adjusts the vertical height of the projected image.
...the front foot adjuster Rotate the rear foot adjuster Figure 5: Angle Adjustment ViewSonic PJ750 7 See also Keystone under "Input Menu" on page 11. 1 Press the release button to lower the front foot, then tilt the projector up as shown in place. 3 Rotate the rear foot adjuster to ...adjusts the horizontal alignment of the projected image. 2 Release the button to lock the front foot in Figure 5 below . Adjusting the Projector Angle Adjust the projector angle using the foot adjusters shown in Figure 5 below . • The front foot adjusts the vertical height of the projected image.
User Guide
Page 11
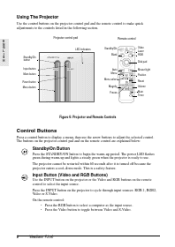
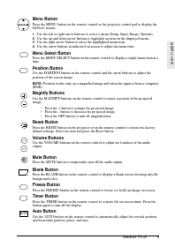
...Video and RGB buttons on the remote control to toggle between Video and S-Video. 8 ViewSonic PJ750 Press the Video button to select the input source. Using The Projector Use the control buttons on the projector control pad and the remote control to make quick adjustments to select a computer as the...below: Standby/On Button Press the STANDBY/ON button to use the arrow buttons to cycle through input sources: RGB 1, RGB2, Video or S-Video. Projector control pad E N G L I S H Remote control LED indicators Standby/On Blank Video Laser RGB Disk pad Standby/On button STANDBY/ON Input ...
...Video and RGB buttons on the remote control to toggle between Video and S-Video. 8 ViewSonic PJ750 Press the Video button to select the input source. Using The Projector Use the control buttons on the projector control pad and the remote control to make quick adjustments to select a computer as the...below: Standby/On Button Press the STANDBY/ON button to use the arrow buttons to cycle through input sources: RGB 1, RGB2, Video or S-Video. Projector control pad E N G L I S H Remote control LED indicators Standby/On Blank Video Laser RGB Disk pad Standby/On button STANDBY/ON Input ...
User Guide
Page 12
...freeze (or hold) an image on the remote control to select the highlighted menu item. Reset Button Press the RESET button on the projector or on screen. Volume Buttons Use the VOLUME buttons on screen to decrease the projected image. - Use the right arrow button to ...on the remote control to activate the on the remote control to automatically adjust the vertical position and horizontal position, phase, and size. ViewSonic PJ750 9 Timer Button Press the TIMER button on -screen timer. Blank Button Press the BLANK button on the remote control to adjust the loudness...
...freeze (or hold) an image on the remote control to select the highlighted menu item. Reset Button Press the RESET button on the projector or on screen. Volume Buttons Use the VOLUME buttons on screen to decrease the projected image. - Use the right arrow button to ...on the remote control to activate the on the remote control to automatically adjust the vertical position and horizontal position, phase, and size. ViewSonic PJ750 9 Timer Button Press the TIMER button on -screen timer. Blank Button Press the BLANK button on the remote control to adjust the loudness...
User Guide
Page 13
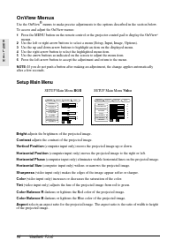
... BAL B ASPECT Bright adjusts the brightness of the projected image. Horizontal Phase (computer input only) eliminates visible horizontal lines on the remote control or the projector control pad to display the OnView® E N G L I S H 2 3 4 5 6 menus. To access and adjust the OnView menus: 1 ... input only) increases or decreases the saturation of the projected image. The aspect ratio is the ratio of the projected image. 10 ViewSonic PJ750 NOTE: If you do not push a button after making an adjustment, the change applies automatically after a few seconds. Horizontal Position ...
... BAL B ASPECT Bright adjusts the brightness of the projected image. Horizontal Phase (computer input only) eliminates visible horizontal lines on the remote control or the projector control pad to display the OnView® E N G L I S H 2 3 4 5 6 menus. To access and adjust the OnView menus: 1 ... input only) increases or decreases the saturation of the projected image. The aspect ratio is the ratio of the projected image. 10 ViewSonic PJ750 NOTE: If you do not push a button after making an adjustment, the change applies automatically after a few seconds. Horizontal Position ...
User Guide
Page 14
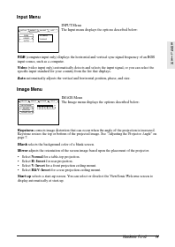
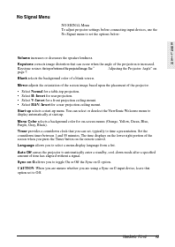
... projected image. Select V: Invert for a rear projection ceiling mount. See "Adjusting the Projector Angle" on page 7. You can select the specific input standard for your country from the list that can occur when the angle of the projection is increased. ViewSonic PJ750 11 E N G L I S H Image Menu SETUP INPUT IMAGE OPT. +1 IMAGE Menu The Image...
... projected image. Select V: Invert for a rear projection ceiling mount. See "Adjusting the Projector Angle" on page 7. You can select the specific input standard for your country from the list that can occur when the angle of the projection is increased. ViewSonic PJ750 11 E N G L I S H Image Menu SETUP INPUT IMAGE OPT. +1 IMAGE Menu The Image...
User Guide
Page 15
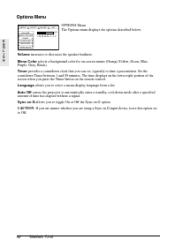
... If you are unsure whether you press the Timer button on the lower right portion of time has elapsed without a signal. Auto Off causes the projector to automatically enter a standby, cool-down mode after a specified amount of the screen when you are using a Sync on G allows you to... option. Sync on G input device, leave this option set , typically to select a menu-display language from a list. Language allows you to Off. 12 ViewSonic PJ750 Timer provides a countdown clock that you can set to toggle On or Off the Sync on -screen menus (Orange, Yellow, Green, Blue, Purple, Gray, ...
... If you are unsure whether you press the Timer button on the lower right portion of time has elapsed without a signal. Auto Off causes the projector to automatically enter a standby, cool-down mode after a specified amount of the screen when you are using a Sync on G allows you to... option. Sync on G input device, leave this option set , typically to select a menu-display language from a list. Language allows you to Off. 12 ViewSonic PJ750 Timer provides a countdown clock that you can set to toggle On or Off the Sync on -screen menus (Orange, Yellow, Green, Blue, Purple, Gray, ...
User Guide
Page 16
...-up . Start up selects a start -up menu. The time displays on the lower right portion of the projection is increased. See " Adjusting the Projector Angle" on -screen menus (Orange, Yellow, Green, Blue, Purple, Gray, Black). Select V: Invert for a rear projection ceiling mount. Select H&V: ...of time has elapsed without a signal. Select H: Invert for a table-top projection. Auto Off causes the projector to Off. Set the countdown timer between 1 and 99 minutes. ViewSonic PJ750 13 CAUTION: When you are using a Sync on G input device, leave this option set to automatically enter ...
...-up . Start up selects a start -up menu. The time displays on the lower right portion of the projection is increased. See " Adjusting the Projector Angle" on -screen menus (Orange, Yellow, Green, Blue, Purple, Gray, Black). Select V: Invert for a rear projection ceiling mount. Select H&V: ...of time has elapsed without a signal. Select H: Invert for a table-top projection. Auto Off causes the projector to Off. Set the countdown timer between 1 and 99 minutes. ViewSonic PJ750 13 CAUTION: When you are using a Sync on G input device, leave this option set to automatically enter ...

User Guide
Page 17
... Input signal Frequency Compatibility PC Macintosh1 Video Angle Distance Maximum Recommended RGB Video S-video Audio Serial control Voltage Consumption Temperature Humidity Altitude Temperature Humidity Altitude Projector Remote range Resolution Input ports Power Operating conditions Storage conditions Dimensions and weight Regulations 1 May require a Macintosh adapter 14 ViewSonic PJ750
... Input signal Frequency Compatibility PC Macintosh1 Video Angle Distance Maximum Recommended RGB Video S-video Audio Serial control Voltage Consumption Temperature Humidity Altitude Temperature Humidity Altitude Projector Remote range Resolution Input ports Power Operating conditions Storage conditions Dimensions and weight Regulations 1 May require a Macintosh adapter 14 ViewSonic PJ750

User Guide
Page 19
... to shut off the Power switch. Projector image is completely black (no light coming from the OnView® display menu to cool down, then restart. • Recheck the power cord connection. • Replace the lamp module. 16 ViewSonic PJ750 Cooling fan is not working when the... lamp is out of the computer signal. Let the projector cool down . Make sure ventilation openings are clean. Caution: Do not operate the...
... to shut off the Power switch. Projector image is completely black (no light coming from the OnView® display menu to cool down, then restart. • Recheck the power cord connection. • Replace the lamp module. 16 ViewSonic PJ750 Cooling fan is not working when the... lamp is out of the computer signal. Let the projector cool down . Make sure ventilation openings are clean. Caution: Do not operate the...
User Guide
Page 20
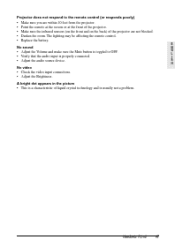
.... Darken the room. No video • Check the video input connections. • Adjust the Brightness. Projector does not respond to OFF. • Verify that the audio input is properly connected. • Adjust the audio source device. ViewSonic PJ750 17 E N G L I S H No sound • Adjust the Volume and make sure the Mute button is toggled...
.... Darken the room. No video • Check the video input connections. • Adjust the Brightness. Projector does not respond to OFF. • Verify that the audio input is properly connected. • Adjust the audio source device. ViewSonic PJ750 17 E N G L I S H No sound • Adjust the Volume and make sure the Mute button is toggled...
User Guide
Page 21
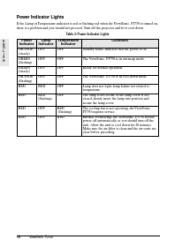
Turn off the projector and let it cool down mode. The ViewSonic PJ750 is in warm-up mode. Internal overheating-the ViewSonic PJ750 should power-off automatically or you should turn off the unit. Ready for 20 minutes. The cooling fan is not closed-... and secure the lamp cover. Allow the unit to temperature. Lamp does not light-lamp failure not related to cool down for normal operation. The ViewSonic PJ750 is in cool-down . Table 3: Power Indicator Lights E N G L I S H Power Indicator ORANGE (steady) GREEN (flashing) GREEN (steady) ORANGE (flashing) RED RED Lamp...
Turn off the projector and let it cool down mode. The ViewSonic PJ750 is in warm-up mode. Internal overheating-the ViewSonic PJ750 should power-off automatically or you should turn off the unit. Ready for 20 minutes. The cooling fan is not closed-... and secure the lamp cover. Allow the unit to temperature. Lamp does not light-lamp failure not related to cool down for normal operation. The ViewSonic PJ750 is in cool-down . Table 3: Power Indicator Lights E N G L I S H Power Indicator ORANGE (steady) GREEN (flashing) GREEN (steady) ORANGE (flashing) RED RED Lamp...
User Guide
Page 22
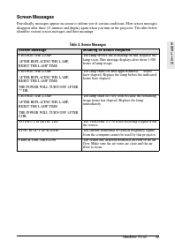
... CHANGE THE LAMP AFTER REPLACING THE LAMP, RESET THE LAMP TIME THE POWER WILL TURN OFF AFTER ** HR. Replace the lamp soon. ViewSonic PJ750 19 NO INPUT IS DETECTED SYNC IS OUT OF RANGE CHECK THE AIR FLOW Meaning or Action Required The lamp service life is clean....** hours have elapsed. The lamp shuts off very soon because the remaining usage hours has elapsed. The ViewSonic PJ750 is not receiving a signal from the computer cannot be used by this projector. Replace the lamp before the indicated hours have elapsed. Replace the lamp immediately. CHANGE THE LAMP AFTER REPLACING...
... CHANGE THE LAMP AFTER REPLACING THE LAMP, RESET THE LAMP TIME THE POWER WILL TURN OFF AFTER ** HR. Replace the lamp soon. ViewSonic PJ750 19 NO INPUT IS DETECTED SYNC IS OUT OF RANGE CHECK THE AIR FLOW Meaning or Action Required The lamp service life is clean....** hours have elapsed. The lamp shuts off very soon because the remaining usage hours has elapsed. The ViewSonic PJ750 is not receiving a signal from the computer cannot be used by this projector. Replace the lamp before the indicated hours have elapsed. Replace the lamp immediately. CHANGE THE LAMP AFTER REPLACING...
User Guide
Page 23
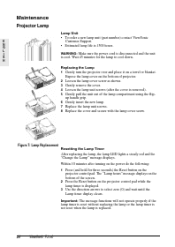
...(and hold for the lamp to select zero (0) and wait until the Lamp timer display clears. The "Lamp hours" message displays on the projector control pad. Wait 45 minutes for three seconds) the Reset button on the bottom of the lamp compartment using the flipup handle grip. 6... lamp timer is not reset when the lamp is 1500 hours. Maintenance Projector Lamp Lamp Unit • To order a new lamp unit (part number) contact ViewSonic Customer Support. • Estimated lamp life is replaced. 20 ViewSonic PJ750 WARNING: Make sure the power cord is disconnected and the unit is ...
...(and hold for the lamp to select zero (0) and wait until the Lamp timer display clears. The "Lamp hours" message displays on the projector control pad. Wait 45 minutes for three seconds) the Reset button on the bottom of the lamp compartment using the flipup handle grip. 6... lamp timer is not reset when the lamp is 1500 hours. Maintenance Projector Lamp Lamp Unit • To order a new lamp unit (part number) contact ViewSonic Customer Support. • Estimated lamp life is replaced. 20 ViewSonic PJ750 WARNING: Make sure the power cord is disconnected and the unit is ...


