
User Manual
Page 2
Contents Electronic Warranty Registration 2 For Your Records 2 Getting Started Package Contents 3 Precautions 3 Quick Installation 4 Using the Monitor Setting the Timing Mode 5 OSD Lock Setting 6 Adjusting the Screen Image 7 Other Information Specifications 12 Troubleshooting 13 Customer Support 14 Cleaning the Monitor 15 Limited Warranty 16 Appendix Power Cord Safety Guidelines 17 FCC Information 18 09/02/04 E ViewSonic P225f 1
Contents Electronic Warranty Registration 2 For Your Records 2 Getting Started Package Contents 3 Precautions 3 Quick Installation 4 Using the Monitor Setting the Timing Mode 5 OSD Lock Setting 6 Adjusting the Screen Image 7 Other Information Specifications 12 Troubleshooting 13 Customer Support 14 Cleaning the Monitor 15 Limited Warranty 16 Appendix Power Cord Safety Guidelines 17 FCC Information 18 09/02/04 E ViewSonic P225f 1

User Manual
Page 3
....viewsonic.com/pdf/recyclePlus.pdf 2. Environmental Protection Agency (EPA). nor for incidental or consequential damages resulting from ViewSonic Corporation. Electronic Warranty Registration To meet your future needs, and to receive any additional product information as it becomes available, please register your monitor's warranty on the Internet at: http://www.viewsonic.com For Your Records Product Name: Model Number: Document Number: Serial Number...
....viewsonic.com/pdf/recyclePlus.pdf 2. Environmental Protection Agency (EPA). nor for incidental or consequential damages resulting from ViewSonic Corporation. Electronic Warranty Registration To meet your future needs, and to receive any additional product information as it becomes available, please register your monitor's warranty on the Internet at: http://www.viewsonic.com For Your Records Product Name: Model Number: Document Number: Serial Number...

User Manual
Page 4
... video cable • Power cord • ViewSonic Wizard CD-ROM NOTE: The CD jacket contains the Quick Start Guide, and the CD includes the User Guide PDF files and INF/ICM display optimization files. The monitor should be facing away from direct sunlight to operate your monitor under these parts. • Avoid exposing the monitor to direct sunlight or another heat source. Oils from the monitor. • AVOID TOUCHING THE SCREEN...
... video cable • Power cord • ViewSonic Wizard CD-ROM NOTE: The CD jacket contains the Quick Start Guide, and the CD includes the User Guide PDF files and INF/ICM display optimization files. The monitor should be facing away from direct sunlight to operate your monitor under these parts. • Avoid exposing the monitor to direct sunlight or another heat source. Oils from the monitor. • AVOID TOUCHING THE SCREEN...

User Manual
Page 5
... asking them to AC outlet LINE INPUT VHBGR ViewSonic Ports for any future customer service needs: Write the serial number (see the user guide for your computer's graphics card. NOTE: if the CD-ROM does not auto-start . Quick Installation 1 Connect video cable(s) Make sure both the monitor and computer are powered OFF. This sequence (monitor before computer) is complete. For instructions on -screen instructions. 5 Windows users: Set the Timing Mode (resolution and refresh rate) Example: 1600 X 1200 @ 85 Hz. Attach...
... asking them to AC outlet LINE INPUT VHBGR ViewSonic Ports for any future customer service needs: Write the serial number (see the user guide for your computer's graphics card. NOTE: if the CD-ROM does not auto-start . Quick Installation 1 Connect video cable(s) Make sure both the monitor and computer are powered OFF. This sequence (monitor before computer) is complete. For instructions on -screen instructions. 5 Windows users: Set the Timing Mode (resolution and refresh rate) Example: 1600 X 1200 @ 85 Hz. Attach...

User Manual
Page 6
... card's user guide for maximizing the quality of the resolution (example 1280 x 1024) and refresh rate (or vertical frequency; example 75 Hz). The recommended timing mode for this monitor is important for instructions. To set the Timing Mode: 1 Set the resolution: Right-click on the Windows® desktop > Properties > Settings > Desktop Area (Screen Area for an optimal screen image, select a timing mode from the Preset Timing Modes table below. NOTE: To minimize the adjustments...
... card's user guide for maximizing the quality of the resolution (example 1280 x 1024) and refresh rate (or vertical frequency; example 75 Hz). The recommended timing mode for this monitor is important for instructions. To set the Timing Mode: 1 Set the resolution: Right-click on the Windows® desktop > Properties > Settings > Desktop Area (Screen Area for an optimal screen image, select a timing mode from the Preset Timing Modes table below. NOTE: To minimize the adjustments...

User Manual
Page 7
The message "OSD LOCK" will then display briefly, indicating that the OSD image settings are now unlocked. ViewSonic P225f 6 The message "OSD UNLOCK" will then display briefly, indicating that the OSD image settings are now locked. • OSD Unlock: Press and hold the [1] and [▼] buttons on the face of the monitor for 5 seconds. OSD Lock Settings You have the option of using the On Screen Display (OSD) locking feature, OSD LOCK, to prevent unwanted changes to the current image settings. • OSD Lock: Press and hold the [1] and [▼] buttons again for 5 seconds.
The message "OSD LOCK" will then display briefly, indicating that the OSD image settings are now unlocked. ViewSonic P225f 6 The message "OSD UNLOCK" will then display briefly, indicating that the OSD image settings are now locked. • OSD Unlock: Press and hold the [1] and [▼] buttons on the face of the monitor for 5 seconds. OSD Lock Settings You have the option of using the On Screen Display (OSD) locking feature, OSD LOCK, to prevent unwanted changes to the current image settings. • OSD Lock: Press and hold the [1] and [▼] buttons again for 5 seconds.
User Manual
Page 8
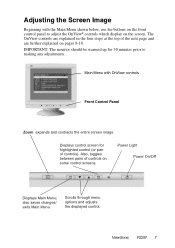
..., use the buttons on the front control panel to making any adjustments. Scrolls through menu options and adjusts the displayed control. also saves changes/ exits Main Menu. IMPORTANT: The monitor should be warmed up for highlighted control (or pair of controls). Adjusting the Screen Image Beginning with OnView controls 1 2 Front Control Panel Zoom expands and contracts the entire screen image Displays control screen for 30 minutes prior to adjust the OnView® controls which display on the screen. Power Light Power On/Off 1 2 Displays Main Menu; ViewSonic...
..., use the buttons on the front control panel to making any adjustments. Scrolls through menu options and adjusts the displayed control. also saves changes/ exits Main Menu. IMPORTANT: The monitor should be warmed up for highlighted control (or pair of controls). Adjusting the Screen Image Beginning with OnView controls 1 2 Front Control Panel Zoom expands and contracts the entire screen image Displays control screen for 30 minutes prior to adjust the OnView® controls which display on the screen. Power Light Power On/Off 1 2 Displays Main Menu; ViewSonic...

User Manual
Page 9
... displaying a control screen. 3 To adjust the selected control, press the arrow buttons (▼▲). 4 To save the control setting and Exit the menu, press button [1] twice. To adjust the screen image: 1 To display the Main Menu (parts 1-3 shown below), press button [1]. NOTE: Some controls on the Main Menu are listed in pairs, such as shown on the left, press button [2] to toggle to adjust, press the arrow buttons on the front control panel of your monitor...
... displaying a control screen. 3 To adjust the selected control, press the arrow buttons (▼▲). 4 To save the control setting and Exit the menu, press button [1] twice. To adjust the screen image: 1 To display the Main Menu (parts 1-3 shown below), press button [1]. NOTE: Some controls on the Main Menu are listed in pairs, such as shown on the left, press button [2] to toggle to adjust, press the arrow buttons on the front control panel of your monitor...

User Manual
Page 10
Main Menu Controls The menu items shown below can cause irregular colors to display the Contrast/Brightness control screen. Zoom expands and contracts the entire screen image. Shortcut: Before displaying the Main Menu, press ▼ or ▲ to appear around the edges of screen images. Brightness adjusts the background black level of your monitor. Vertical Size adjusts the height of the screen image until they are parallel. Tilt rotates the entire screen image. Vertical Position moves the screen image up of magnetic fields...
Main Menu Controls The menu items shown below can cause irregular colors to display the Contrast/Brightness control screen. Zoom expands and contracts the entire screen image. Shortcut: Before displaying the Main Menu, press ▼ or ▲ to appear around the edges of screen images. Brightness adjusts the background black level of your monitor. Vertical Size adjusts the height of the screen image until they are parallel. Tilt rotates the entire screen image. Vertical Position moves the screen image up of magnetic fields...

User Manual
Page 11
... (Horizontal Convergence) adjusts vertical color alignment. V. Adds red to adjust red (R), green (G), and blue (B). User Color - Interference patterns of black letters on -screen menu and press button [2]. This includes the refresh rate (or Vertical Frequency) and the scan rate (or Horizontal Frequency). Use this product is 9300K (9300 Kelvin). 9300K - ViewSonic P225f 10 Important: Do not degauss repeatedly. Doing so can be harmful to the screen image. OSD Position allows you to the screen image for cooler white (often used in office settings...
... (Horizontal Convergence) adjusts vertical color alignment. V. Adds red to adjust red (R), green (G), and blue (B). User Color - Interference patterns of black letters on -screen menu and press button [2]. This includes the refresh rate (or Vertical Frequency) and the scan rate (or Horizontal Frequency). Use this product is 9300K (9300 Kelvin). 9300K - ViewSonic P225f 10 Important: Do not degauss repeatedly. Doing so can be harmful to the screen image. OSD Position allows you to the screen image for cooler white (often used in office settings...

User Manual
Page 12
... use the purity control. Exception: This control does not affect changes made with the User Color control. If color is an advanced control and should be used for setup and calibration only. Purity adjusts the uneven color of the screen image. Bottom Left (Purity) adjusts uneven color at bottom right corner of screen. Linear (Vertical Linearity Center) adjusts the vertical distortion at the bottom of the screen image. NOTE: Vertical Linearity Center is still uneven, use...
... use the purity control. Exception: This control does not affect changes made with the User Color control. If color is an advanced control and should be used for setup and calibration only. Purity adjusts the uneven color of the screen image. Bottom Left (Purity) adjusts uneven color at bottom right corner of screen. Linear (Vertical Linearity Center) adjusts the vertical distortion at the bottom of the screen image. NOTE: Vertical Linearity Center is still uneven, use...

User Manual
Page 13
... require a Macintosh adapter. To order a Macintosh adapter, contact ViewSonic Customer Support. ViewSonic P225f 12 Other Information Specifications CRT Input Signal Compatibility Timing Modes with Maximum Refresh Rates2 Power Display Area Operating Conditions Storage Conditions Dimensions Weight Regulations Power Saving Modes Type Phosphor Glass surface 22" (20.0" viewable diagonal area), 0.24 mm aperture grill pitch, 90o deflection RGB, medium-short persistence Anti-reflection, anti-static coating Standard light transmission rate = 38.4% Video Sync RGB Analog (0.7 Vp...
... require a Macintosh adapter. To order a Macintosh adapter, contact ViewSonic Customer Support. ViewSonic P225f 12 Other Information Specifications CRT Input Signal Compatibility Timing Modes with Maximum Refresh Rates2 Power Display Area Operating Conditions Storage Conditions Dimensions Weight Regulations Power Saving Modes Type Phosphor Glass surface 22" (20.0" viewable diagonal area), 0.24 mm aperture grill pitch, 90o deflection RGB, medium-short persistence Anti-reflection, anti-static coating Standard light transmission rate = 38.4% Video Sync RGB Analog (0.7 Vp...

User Manual
Page 14
... screen image (rolls) vertically • Make sure video input signals are missing, check the video cable to make sure it to the monitor. • Adjust brightness and contrast. • Verify whether an adapter is required for proper signal continuity between graphics card and monitor. Connect the monitor to the video output port on the back of the computer. ViewSonic P225f 13 Power on page 12. • Remove any colors (red, green, or blue) are within the monitor's specified frequency range. • Try the monitor...
... screen image (rolls) vertically • Make sure video input signals are missing, check the video cable to make sure it to the monitor. • Adjust brightness and contrast. • Verify whether an adapter is required for proper signal continuity between graphics card and monitor. Connect the monitor to the video output port on the back of the computer. ViewSonic P225f 13 Power on page 12. • Remove any colors (red, green, or blue) are within the monitor's specified frequency range. • Try the monitor...

User Manual
Page 15
F: 886 2 8242 3668 viewsonic.com T: 886 2 2246 3456 service@hk. F: 886 2 8242 3668 viewsonic.com ViewSonic P225f 14 Customer Support For technical support or product service, see the table below or contact your reseller service.eu@ viewsoniceurope.com Australia and New www.viewsonic.com.au Zealand T: +61 2 9906 6277 service@au. NOTE: You will need the product serial number. viewsonic.com South Africa/ Other countries...
F: 886 2 8242 3668 viewsonic.com T: 886 2 2246 3456 service@hk. F: 886 2 8242 3668 viewsonic.com ViewSonic P225f 14 Customer Support For technical support or product service, see the table below or contact your reseller service.eu@ viewsoniceurope.com Australia and New www.viewsonic.com.au Zealand T: +61 2 9906 6277 service@au. NOTE: You will need the product serial number. viewsonic.com South Africa/ Other countries...

User Manual
Page 16
... damage resulting from use of non-ammonia, non-alcohol based glass cleaner onto a clean, soft, lint-free cloth, and wipe the screen. This removes dust and other particles. 2 If still not clean, apply a small amount of any ammonia or alcohol-based cleaners. To clean the screen: 1 Wipe the screen with a clean, soft, lint-free cloth. Cleaning the Monitor • MAKE SURE THE MONITOR IS TURNED OFF. • NEVER...
... damage resulting from use of non-ammonia, non-alcohol based glass cleaner onto a clean, soft, lint-free cloth, and wipe the screen. This removes dust and other particles. 2 If still not clean, apply a small amount of any ammonia or alcohol-based cleaners. To clean the screen: 1 Wipe the screen with a clean, soft, lint-free cloth. Cleaning the Monitor • MAKE SURE THE MONITOR IS TURNED OFF. • NEVER...

User Manual
Page 17
... warranty is effective: ViewSonic® color CRT monitors, including the display tubes, are warranted for three (3) years for all parts and three (3) years for the first consumer purchaser. Removal or installation of damages: VIEWSONIC'S LIABILITY IS LIMITED TO THE COST OF REPAIR OR REPLACEMENT OF THE PRODUCT. g. To obtain service under warranty, contact ViewSonic Customer Support. and Canada, contact ViewSonic or your product's serial number. 2. Any product...
... warranty is effective: ViewSonic® color CRT monitors, including the display tubes, are warranted for three (3) years for all parts and three (3) years for the first consumer purchaser. Removal or installation of damages: VIEWSONIC'S LIABILITY IS LIMITED TO THE COST OF REPAIR OR REPLACEMENT OF THE PRODUCT. g. To obtain service under warranty, contact ViewSonic Customer Support. and Canada, contact ViewSonic or your product's serial number. 2. Any product...

User Manual
Page 18
... is necessary to replace the original cord set, or if the cord set is HAR-Certified, and a special mark that is to be fitted, please observe the wiring code as follows: The wire which proper power cord to use the AC cords listed for this appliance do not correspond with the letter N or coloured BLACK. If in the plug which sit on...
... is necessary to replace the original cord set, or if the cord set is HAR-Certified, and a special mark that is to be fitted, please observe the wiring code as follows: The wire which proper power cord to use the AC cords listed for this appliance do not correspond with the letter N or coloured BLACK. If in the plug which sit on...

User Manual
Page 19
... the party responsible for Interference from that to which can radiate radio frequency energy, and if not installed and used , use only a shielded BNC(5) cable. These limits are shielded sufficiently. Install and use grounded power supply cord and the provided shielded video interface cable with the requirements of the Voluntary Control Council for compliance could lead to operate this unit are designed to...
... the party responsible for Interference from that to which can radiate radio frequency energy, and if not installed and used , use only a shielded BNC(5) cable. These limits are shielded sufficiently. Install and use grounded power supply cord and the provided shielded video interface cable with the requirements of the Voluntary Control Council for compliance could lead to operate this unit are designed to...


