User Manual
Page 2
Contents Electronic Warranty Registration 2 For Your Records 2 Getting Started Package Contents 3 Precautions 3 Quick Installation 4 Using the Monitor Setting the Timing Mode 5 OSD Lock Setting 6 Adjusting the Screen Image 7 Other Information Specifications 12 Troubleshooting 13 Customer Support 14 Cleaning the Monitor 15 Limited Warranty 16 Appendix Power Cord Safety Guidelines 17 FCC Information 18 06/07/04 D ViewSonic P220f 1
Contents Electronic Warranty Registration 2 For Your Records 2 Getting Started Package Contents 3 Precautions 3 Quick Installation 4 Using the Monitor Setting the Timing Mode 5 OSD Lock Setting 6 Adjusting the Screen Image 7 Other Information Specifications 12 Troubleshooting 13 Customer Support 14 Cleaning the Monitor 15 Limited Warranty 16 Appendix Power Cord Safety Guidelines 17 FCC Information 18 06/07/04 D ViewSonic P220f 1
User Manual
Page 3
..., for technical or editorial errors or omissions contained herein; For TCO'03 recycling information, please refer to change without prior written permission from furnishing this material, or the performance or use this document may change product specifications without notice. Europe: www.viewsoniceurope.com 3. Taiwan: recycle.epa.gov.tw ViewSonic P220f 2 Macintosh and Power Macintosh are registered trademarks of...
..., for technical or editorial errors or omissions contained herein; For TCO'03 recycling information, please refer to change without prior written permission from furnishing this material, or the performance or use this document may change product specifications without notice. Europe: www.viewsoniceurope.com 3. Taiwan: recycle.epa.gov.tw ViewSonic P220f 2 Macintosh and Power Macintosh are registered trademarks of...

User Manual
Page 4
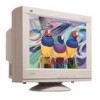
...; Color monitor • DB-15 video cable • Power cord • ViewSonic Wizard CD-ROM NOTE: The CD jacket contains the Quick Start Guide, and the CD includes the User Guide PDF files and INF/ICM display optimization files. Important! Do not place anything on the monitor that you touch these conditions. • Keep the monitor away from the monitor. • AVOID TOUCHING THE SCREEN WITH YOUR FINGERS. Getting Started Congratulations on your monitor...
...; Color monitor • DB-15 video cable • Power cord • ViewSonic Wizard CD-ROM NOTE: The CD jacket contains the Quick Start Guide, and the CD includes the User Guide PDF files and INF/ICM display optimization files. Important! Do not place anything on the monitor that you touch these conditions. • Keep the monitor away from the monitor. • AVOID TOUCHING THE SCREEN WITH YOUR FINGERS. Getting Started Congratulations on your monitor...
User Manual
Page 5
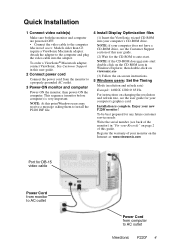
... AC outlet ViewSonic P220f 4 See Customer Support in this user guide. (2) Wait for DB-15 video cable Power Cord from monitor to AC outlet Power Cord from the monitor to install the P220f INF file. 4 Install Display Optimization files (1) Insert the ViewSonic wizard CD-ROM into the adapter. Quick Installation 1 Connect video cable(s) Make sure both the monitor and computer are powered OFF. • Connect the video cable to the computer and plug the video cable into your monitor on -screen instructions. 5 Windows users: Set the Timing Mode (resolution and refresh rate) Example...
... AC outlet ViewSonic P220f 4 See Customer Support in this user guide. (2) Wait for DB-15 video cable Power Cord from monitor to AC outlet Power Cord from the monitor to install the P220f INF file. 4 Install Display Optimization files (1) Insert the ViewSonic wizard CD-ROM into the adapter. Quick Installation 1 Connect video cable(s) Make sure both the monitor and computer are powered OFF. • Connect the video cable to the computer and plug the video cable into your monitor on -screen instructions. 5 Windows users: Set the Timing Mode (resolution and refresh rate) Example...
User Manual
Page 6
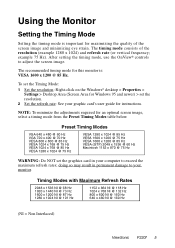
... (NI = Non Interlaced) ViewSonic P220f 5 To set the Timing Mode: 1 Set the resolution: Right-click on the Windows® desktop > Properties > Settings > Desktop Area (Screen Area for maximizing the quality of the resolution (example 1280 x 1024) and refresh rate (or vertical frequency; NOTE: To minimize the adjustments required for instructions. example 75 Hz). Preset Timing Modes VGA 640 x 480 @ 60 Hz VGA 720 x 400 @ 70 Hz VESA 800 x 600 @ 85...
... (NI = Non Interlaced) ViewSonic P220f 5 To set the Timing Mode: 1 Set the resolution: Right-click on the Windows® desktop > Properties > Settings > Desktop Area (Screen Area for maximizing the quality of the resolution (example 1280 x 1024) and refresh rate (or vertical frequency; NOTE: To minimize the adjustments required for instructions. example 75 Hz). Preset Timing Modes VGA 640 x 480 @ 60 Hz VGA 720 x 400 @ 70 Hz VESA 800 x 600 @ 85...
User Manual
Page 7
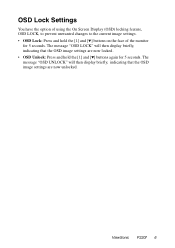
OSD Lock Settings You have the option of using the On Screen Display (OSD) locking feature, OSD LOCK, to prevent unwanted changes to the current image settings. • OSD Lock: Press and hold the [1] and [▼] buttons again for 5 seconds. ViewSonic P220f 6 The message "OSD LOCK" will then display briefly, indicating that the OSD image settings are now unlocked. The message "OSD UNLOCK" will then display briefly, indicating that the OSD image settings are now locked. • OSD Unlock: Press and hold the [1] and [▼] buttons on the face of the monitor for 5 seconds.
OSD Lock Settings You have the option of using the On Screen Display (OSD) locking feature, OSD LOCK, to prevent unwanted changes to the current image settings. • OSD Lock: Press and hold the [1] and [▼] buttons again for 5 seconds. ViewSonic P220f 6 The message "OSD LOCK" will then display briefly, indicating that the OSD image settings are now unlocked. The message "OSD UNLOCK" will then display briefly, indicating that the OSD image settings are now locked. • OSD Unlock: Press and hold the [1] and [▼] buttons on the face of the monitor for 5 seconds.

User Manual
Page 8
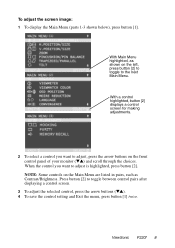
... front control panel to making any adjustments. ViewSonic P220f 7 IMPORTANT: The monitor should be warmed up for highlighted control (or pair of controls). Scrolls through menu options and adjusts the displayed control. Also, toggles between pairs of the next page and are further explained on some control screens. also saves changes/ exits Main Menu. Adjusting the Screen Image Beginning with OnView controls 1 2 Front Control Panel Zoom expands and contracts the entire screen image Power Light Power On/Off 1 2 Displays Main Menu...
... front control panel to making any adjustments. ViewSonic P220f 7 IMPORTANT: The monitor should be warmed up for highlighted control (or pair of controls). Scrolls through menu options and adjusts the displayed control. Also, toggles between pairs of the next page and are further explained on some control screens. also saves changes/ exits Main Menu. Adjusting the Screen Image Beginning with OnView controls 1 2 Front Control Panel Zoom expands and contracts the entire screen image Power Light Power On/Off 1 2 Displays Main Menu...
User Manual
Page 9
... Contrast/Brightness. With a control highlighted, button [2] displays a control screen for making adjustments. 2 To select a control you want to the next Main Menu. NOTE: Some controls on the Main Menu are listed in pairs, such as shown on the left, press button [2] to toggle to adjust, press the arrow buttons on the front control panel of your monitor (▼▲) and scroll through the choices. ViewSonic P220f 8 To adjust the screen image: 1 To display the Main Menu (parts...
... Contrast/Brightness. With a control highlighted, button [2] displays a control screen for making adjustments. 2 To select a control you want to the next Main Menu. NOTE: Some controls on the Main Menu are listed in pairs, such as shown on the left, press button [2] to toggle to adjust, press the arrow buttons on the front control panel of your monitor (▼▲) and scroll through the choices. ViewSonic P220f 8 To adjust the screen image: 1 To display the Main Menu (parts...
User Manual
Page 10
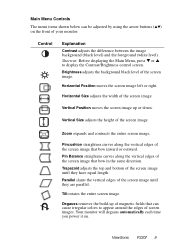
... direction. Horizontal Position moves the screen image left or right. Vertical Size adjusts the height of the screen image. Brightness adjusts the background black level of the screen image. ViewSonic P220f 9 Main Menu Controls The menu items shown below can cause irregular colors to display the Contrast/Brightness control screen. Shortcut: Before displaying the Main Menu, press ▼ or ▲ to appear around the edges of screen images. Horizontal Size adjusts the width of magnetic fields that bow inward or outward. Your monitor will...
... direction. Horizontal Position moves the screen image left or right. Vertical Size adjusts the height of the screen image. Brightness adjusts the background black level of the screen image. ViewSonic P220f 9 Main Menu Controls The menu items shown below can cause irregular colors to display the Contrast/Brightness control screen. Shortcut: Before displaying the Main Menu, press ▼ or ▲ to appear around the edges of screen images. Horizontal Size adjusts the width of magnetic fields that bow inward or outward. Your monitor will...
User Manual
Page 11
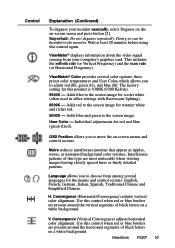
... and control screens. This includes the refresh rate (or Vertical Frequency) and the scan rate (or Horizontal Frequency). Interference patterns of black letters on -screen menu and press button [2]. ViewSonic P220f 10 User Color - Language allows you to choose from your monitor manually, select Degauss on the on a white background. Wait at least 20 minutes before using this type are present around the horizontal segments of this control again. ViewMeter® displays information about the video signal...
... and control screens. This includes the refresh rate (or Vertical Frequency) and the scan rate (or Horizontal Frequency). Interference patterns of black letters on -screen menu and press button [2]. ViewSonic P220f 10 User Color - Language allows you to choose from your monitor manually, select Degauss on the on a white background. Wait at least 20 minutes before using this type are present around the horizontal segments of this control again. ViewMeter® displays information about the video signal...

User Manual
Page 12
... should be used for setup and calibration only. Control Explanation (Continued) V. Bottom Right (Purity) adjusts uneven color at the center of screen. Linear (Vertical Linearity Center) adjusts the vertical distortion at bottom right corner of the screen image. V. Purity adjusts the uneven color of the screen image. ViewSonic P220f 11 Top Hooking straightens the top corners of the screen image. Exception: This control does not affect changes made with the User Color control. NOTE: Vertical Linearity Center...
... should be used for setup and calibration only. Control Explanation (Continued) V. Bottom Right (Purity) adjusts uneven color at the center of screen. Linear (Vertical Linearity Center) adjusts the vertical distortion at bottom right corner of the screen image. V. Purity adjusts the uneven color of the screen image. ViewSonic P220f 11 Top Hooking straightens the top corners of the screen image. Exception: This control does not affect changes made with the User Color control. NOTE: Vertical Linearity Center...
User Manual
Page 13
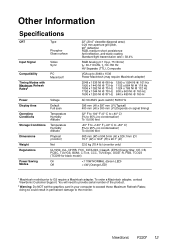
To order a Macintosh adapter, contact ViewSonic Customer Support. doing so could result in your computer to exceed these Maximum Refresh Rates; ViewSonic P220f 12 Other Information Specifications CRT Input Signal Compatibility Timing Modes with Maximum Refresh Rates2 Power Display Area Operating Conditions Storage Conditions Dimensions Weight Regulations Power Saving Modes Type Phosphor Glass surface 22" (20.0" viewable diagonal area), 0.24 mm aperture grill pitch, 90o deflection RGB, medium-short persistence Anti-reflection...
To order a Macintosh adapter, contact ViewSonic Customer Support. doing so could result in your computer to exceed these Maximum Refresh Rates; ViewSonic P220f 12 Other Information Specifications CRT Input Signal Compatibility Timing Modes with Maximum Refresh Rates2 Power Display Area Operating Conditions Storage Conditions Dimensions Weight Regulations Power Saving Modes Type Phosphor Glass surface 22" (20.0" viewable diagonal area), 0.24 mm aperture grill pitch, 90o deflection RGB, medium-short persistence Anti-reflection...
User Manual
Page 14
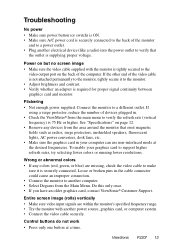
Flickering • Not enough power supplied. Control buttons do not work • Press only one button at the desired frequencies. Power on but no screen image • Make sure the video cable supplied with the monitor is tightly secured to the video output port on page 12. • Remove any colors (red, green, or blue) are within the monitor's specified frequency range. • Try the monitor with another power source, graphics card, or computer system. • Connect the video cable securely. Loose or broken...
Flickering • Not enough power supplied. Control buttons do not work • Press only one button at the desired frequencies. Power on but no screen image • Make sure the video cable supplied with the monitor is tightly secured to the video output port on page 12. • Remove any colors (red, green, or blue) are within the monitor's specified frequency range. • Try the monitor with another power source, graphics card, or computer system. • Connect the video cable securely. Loose or broken...
User Manual
Page 15
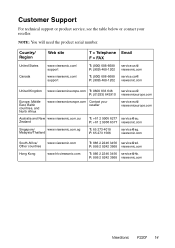
... 273 4018 F: 65 273 1566 service@sg. viewsonic.com South Africa/ Other countries Hong Kong www.viewsonic.com www.hk.viewsonic.com T: 886 2 2246 3456 service@sd. NOTE: You will need the product serial number. F: 886 2 8242 3668 viewsonic.com ViewSonic P220f 14 Customer Support For technical support or product service, see the table below or contact your reseller service.eu@ viewsoniceurope.com Australia and...
... 273 4018 F: 65 273 1566 service@sg. viewsonic.com South Africa/ Other countries Hong Kong www.viewsonic.com www.hk.viewsonic.com T: 886 2 2246 3456 service@sd. NOTE: You will need the product serial number. F: 886 2 8242 3668 viewsonic.com ViewSonic P220f 14 Customer Support For technical support or product service, see the table below or contact your reseller service.eu@ viewsoniceurope.com Australia and...
User Manual
Page 16
..., non-alcohol based, mild non-abrasive detergent onto a clean, soft, lint-free cloth, then wipe the surface. ViewSonic P220f 15 This removes dust and other particles. 2 If still not clean, apply a small amount of the monitor. To clean the case: 1 Use a soft, dry cloth. 2 If still not clean, apply a small amount of any ammonia or alcohol-based cleaners on the monitor screen or case.
..., non-alcohol based, mild non-abrasive detergent onto a clean, soft, lint-free cloth, then wipe the surface. ViewSonic P220f 15 This removes dust and other particles. 2 If still not clean, apply a small amount of the monitor. To clean the case: 1 Use a soft, dry cloth. 2 If still not clean, apply a small amount of any ammonia or alcohol-based cleaners on the monitor screen or case.
User Manual
Page 17
... ViewSonic service center or ViewSonic. 4. ViewSonic CRT Monitor Warranty (V3.0) Release Date: 03-26-2002 ViewSonic P220f 16 What the warranty does not cover: 1. Accident, misuse, neglect, fire, water, lightning, or other cause which the serial number has been defaced, modified or removed. 2. d. How to the product, such as electrical power fluctuations or failure. Who the warranty protects: This warranty is effective: ViewSonic® color CRT monitors...
... ViewSonic service center or ViewSonic. 4. ViewSonic CRT Monitor Warranty (V3.0) Release Date: 03-26-2002 ViewSonic P220f 16 What the warranty does not cover: 1. Accident, misuse, neglect, fire, water, lightning, or other cause which the serial number has been defaced, modified or removed. 2. d. How to the product, such as electrical power fluctuations or failure. Who the warranty protects: This warranty is effective: ViewSonic® color CRT monitors...

User Manual
Page 18
... letter L or coloured RED. For units which is coloured BLUE must be selected according to the current rating for your unit. Appendix Power Cord Safety Guidelines CAUTION: Use a power cable that will look like (Figure A1 below for the selection criteria for power cords used . Always use , please consult with the coloured markings identifying the terminals in the plug which is coloured BROWN...
... letter L or coloured RED. For units which is coloured BLUE must be selected according to the current rating for your unit. Appendix Power Cord Safety Guidelines CAUTION: Use a power cable that will look like (Figure A1 below for the selection criteria for power cords used . Always use , please consult with the coloured markings identifying the terminals in the plug which is coloured BROWN...
User Manual
Page 19
... installed and used , use grounded power supply cord and the provided shielded video interface cable with the instructions, may cause radio interference. Notice for Interference from that you do not display blue characters on , the user is connected. • Consult the dealer or an experienced radio/TV technician for compliance could lead to the instruction manual. Also, any unauthorized changes or modifications not expressly approved by turning...
... installed and used , use grounded power supply cord and the provided shielded video interface cable with the instructions, may cause radio interference. Notice for Interference from that you do not display blue characters on , the user is connected. • Consult the dealer or an experienced radio/TV technician for compliance could lead to the instruction manual. Also, any unauthorized changes or modifications not expressly approved by turning...


