User Manual
Page 6
Getting Started Congratulations on N4050w) ViewSonic N4000wP/N4050w 5 Important! Save the original box and all packaging material for future shipping needs. Package Contents Please confirm that the following accessories are present when you unpack the box: •LCD DISPLAY •Remote Control (batteries included) •Power Cord •AV RCA Cable •Quick Start Guide •User Guide •Speakers x 2 (available on N4050w) •VGA cable •Stand x 1 (available on your purchase of a ViewSonic N4000wP or N4050w.
Getting Started Congratulations on N4050w) ViewSonic N4000wP/N4050w 5 Important! Save the original box and all packaging material for future shipping needs. Package Contents Please confirm that the following accessories are present when you unpack the box: •LCD DISPLAY •Remote Control (batteries included) •Power Cord •AV RCA Cable •Quick Start Guide •User Guide •Speakers x 2 (available on N4050w) •VGA cable •Stand x 1 (available on your purchase of a ViewSonic N4000wP or N4050w.
User Manual
Page 12
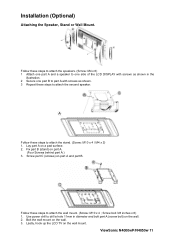
Follow these steps to one part A and a speaker to attach the wall mount. (Screw: M10 x 4 ; Fix part B (stand) on the wall. 2. Use power drill to drill a hole 11mm in the illustration. 2 Secure one part B to part A with screws as shown. 3 Repeat these steps ... part A on the wall mount. Screw bolt 3/8 inches x 6) 1. Lastly, hook up the LCD TV on a pad surface. 2. Follow these steps to attach the second speaker. ViewSonic N4000wP/N4050w 11 Screw part C (screws) on the wall. 3. Bolt the wall mount on part A and part B. Installation (Optional) Attaching the Speaker...
Follow these steps to one part A and a speaker to attach the wall mount. (Screw: M10 x 4 ; Fix part B (stand) on the wall. 2. Use power drill to drill a hole 11mm in the illustration. 2 Secure one part B to part A with screws as shown. 3 Repeat these steps ... part A on the wall mount. Screw bolt 3/8 inches x 6) 1. Lastly, hook up the LCD TV on a pad surface. 2. Follow these steps to attach the second speaker. ViewSonic N4000wP/N4050w 11 Screw part C (screws) on the wall. 3. Bolt the wall mount on part A and part B. Installation (Optional) Attaching the Speaker...


