User Guide
Page 2
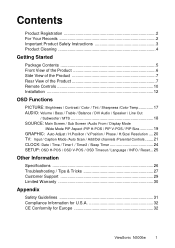
... 5 Front View of the Product 6 Side View of the Product 7 Rear View of the Product 7 Remote Controls 10 Installation 12 OSD Functions PICTURE: Brightness / Contrast / Color / Tint / Sharpness /Color Temp 17...PIP V-POS / PIP Size 19 GRAPHIC: Auto Adjust / H.Position / V.Position / Phase / H.Size/ Resolution .... 20 TV: Input / Caption Mode /Auto Scan / Add/Del channels /Parental Controls ....... 21 CLOCK: Date / Time / Timer1 / ... Customer Support 29 Limited Warranty 30 Appendix Safety Guidelines 31 Compliance Information for U.S.A 32 CE Conformity for Europe 32 ViewSonic N3000w 1
... 5 Front View of the Product 6 Side View of the Product 7 Rear View of the Product 7 Remote Controls 10 Installation 12 OSD Functions PICTURE: Brightness / Contrast / Color / Tint / Sharpness /Color Temp 17...PIP V-POS / PIP Size 19 GRAPHIC: Auto Adjust / H.Position / V.Position / Phase / H.Size/ Resolution .... 20 TV: Input / Caption Mode /Auto Scan / Add/Del channels /Parental Controls ....... 21 CLOCK: Date / Time / Timer1 / ... Customer Support 29 Limited Warranty 30 Appendix Safety Guidelines 31 Compliance Information for U.S.A 32 CE Conformity for Europe 32 ViewSonic N3000w 1
User Guide
Page 4
...proper ventilation is provided or the manufacturer's instruction have been adhered to continue using the product ViewSonic N3000w 3 Never remove the rear cover. It is a safety feature. This plug will not ...from overheating, these openings must not be equipped with care when moving it from the remote control 6. Pay particular attention to cords near plugs, convenience receptacles, and the point... ventilation purposes. Precautions Sit at least 30" from the product. 4. You may be blocked or covered. • Do not block the openings by ViewSonic • If your safety, please ...
...proper ventilation is provided or the manufacturer's instruction have been adhered to continue using the product ViewSonic N3000w 3 Never remove the rear cover. It is a safety feature. This plug will not ...from overheating, these openings must not be equipped with care when moving it from the remote control 6. Pay particular attention to cords near plugs, convenience receptacles, and the point... ventilation purposes. Precautions Sit at least 30" from the product. 4. You may be blocked or covered. • Do not block the openings by ViewSonic • If your safety, please ...

User Guide
Page 6
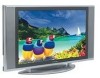
Save the original box and all packing material for future shipping needs. ViewSonic N3000w 5 Important ! Package Contents Your product package includes: • N3000w Display • Remote Control (with Windows operating systems, and the ICM file (Image Color Matching) insures accurate on-screen colors. The ViewSonic Wizard CD includes the User Guide PDF files and INF/ICM...
Save the original box and all packing material for future shipping needs. ViewSonic N3000w 5 Important ! Package Contents Your product package includes: • N3000w Display • Remote Control (with Windows operating systems, and the ICM file (Image Color Matching) insures accurate on-screen colors. The ViewSonic Wizard CD includes the User Guide PDF files and INF/ICM...

User Guide
Page 7
... Increase/Decrease sound volume or adjust a highlighted control while in OSD Menu. Channel up/down when source is at TV or select a control while in OSD Menu. Select Active Video Input Power ON/OFF Remote Control Infrared Sensor (Do not block) ViewSonic N3000w 6 Front View of the Product Use the buttons on page 16.
... Increase/Decrease sound volume or adjust a highlighted control while in OSD Menu. Channel up/down when source is at TV or select a control while in OSD Menu. Select Active Video Input Power ON/OFF Remote Control Infrared Sensor (Do not block) ViewSonic N3000w 6 Front View of the Product Use the buttons on page 16.
User Guide
Page 11
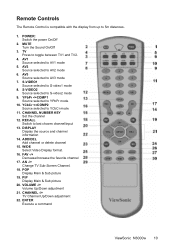
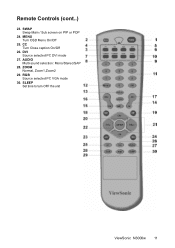
TV Press to AV2 mode 6. AV2 Source selected to toggle between TV1 and TV2. 4. Remote Controls The Remote Control is compatible with the display from up to AV3 mode 7. YPbPr POWER: Switch the power On/Off 2. MUTE Turn the Sound On/Off 3. AV3 Source selected to 5m distances. 1. S-VIDEO1 Source selected to S-video2 mode 9. S-VIDEO2 Source selected to S-video1 mode 8. AV1 Source selected to AV1 mode 5.
TV Press to AV2 mode 6. AV2 Source selected to toggle between TV1 and TV2. 4. Remote Controls The Remote Control is compatible with the display from up to AV3 mode 7. YPbPr POWER: Switch the power On/Off 2. MUTE Turn the Sound On/Off 3. AV3 Source selected to 5m distances. 1. S-VIDEO1 Source selected to S-video2 mode 9. S-VIDEO2 Source selected to S-video1 mode 8. AV1 Source selected to AV1 mode 5.
User Guide
Page 12
SWAP Swap Main / Sub screen on PIP or POP 24. SLEEP Set time to turn OFF the unit ViewSonic N3000w 11 DVI Source selected PC DVI mode 27. MENU Turn OSD Menu On/Off 25. AUDIO Multi-sound selection: Mono/Stereo/SAP 28. ZOOM Normal, Zoom1,Zoom2 29. CC Turn Close caption On/Off 26. Remote Controls (cont..) 23. RGB Source selected PC VGA mode 30.
SWAP Swap Main / Sub screen on PIP or POP 24. SLEEP Set time to turn OFF the unit ViewSonic N3000w 11 DVI Source selected PC DVI mode 27. MENU Turn OSD Menu On/Off 25. AUDIO Multi-sound selection: Mono/Stereo/SAP 28. ZOOM Normal, Zoom1,Zoom2 29. CC Turn Close caption On/Off 26. Remote Controls (cont..) 23. RGB Source selected PC VGA mode 30.
User Guide
Page 13
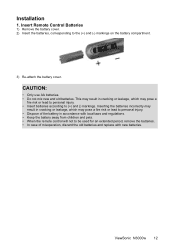
Insert Remote Control Batteries 1) Remove the battery cover. 2) Insert the batteries, corresponding to be used for an extended period, remove the batteries. • In case of misoperation, discard the old batteries and replace with new batteries. ViewSonic N3000w 12 This may pose a fire risk or lead to personal injury. •... may result in accordance with local laws and regulations. • Keep the battery away from children and pets. • When the remote control will not to the (+) and (-) markings on the battery compartment. 3) Re-attach the battery cover. Installation 1.
Insert Remote Control Batteries 1) Remove the battery cover. 2) Insert the batteries, corresponding to be used for an extended period, remove the batteries. • In case of misoperation, discard the old batteries and replace with new batteries. ViewSonic N3000w 12 This may pose a fire risk or lead to personal injury. •... may result in accordance with local laws and regulations. • Keep the battery away from children and pets. • When the remote control will not to the (+) and (-) markings on the battery compartment. 3) Re-attach the battery cover. Installation 1.

User Guide
Page 16
... button to "I", then press the Power ON button on how to set your product, via either OSD menu or remote control 7. Select input source for questions on the front of the product. ViewSonic N3000w 15 Power Button 6. NOTE: The latest up-to a properly grounded AC outlet. 5. NOTE: If connecting a PC (RGB/DVI... driver files are always available at 60Hz, refer to the graphic card's user guide, for your product timing mode to VESA 1280x768 at www.viewsonic.com. If connecting to receive all available channels. Or press the Power ON (Blue) button on TV1/TV2 Inputs: See p21, to configure...
... button to "I", then press the Power ON button on how to set your product, via either OSD menu or remote control 7. Select input source for questions on the front of the product. ViewSonic N3000w 15 Power Button 6. NOTE: The latest up-to a properly grounded AC outlet. 5. NOTE: If connecting a PC (RGB/DVI... driver files are always available at 60Hz, refer to the graphic card's user guide, for your product timing mode to VESA 1280x768 at www.viewsonic.com. If connecting to receive all available channels. Or press the Power ON (Blue) button on TV1/TV2 Inputs: See p21, to configure...

User Guide
Page 17
ViewSonic N3000w 16 To display the OSD main menu, press Menu button on the front control keys or the MENU key on the front panel. OSD Functions All the function settings for your product are controlled either via the remote control or using the bottom control keys on the remote control. Use W/X arrow keys to highlight the desired OSD sub-menu. Main Menu To select a sub-menu, press SOURCE on the front control keys or the ENTER key on the remote control.
ViewSonic N3000w 16 To display the OSD main menu, press Menu button on the front control keys or the MENU key on the front panel. OSD Functions All the function settings for your product are controlled either via the remote control or using the bottom control keys on the remote control. Use W/X arrow keys to highlight the desired OSD sub-menu. Main Menu To select a sub-menu, press SOURCE on the front control keys or the ENTER key on the remote control.
User Guide
Page 24
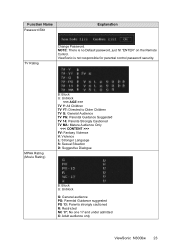
... PG: Parental Guidance suggested PG 13: Parents strongly cautioned R: Restricted NC 17: No one 17 and under admitted X: Adult audience only ViewSonic N3000w 23 NOTE: There is not responsible for parental control password security. ViewSonic is no Default password, just hit "ENTER" on the Remote Control. Function Name Password Edit Explanation TV Rating Change Password.
... PG: Parental Guidance suggested PG 13: Parents strongly cautioned R: Restricted NC 17: No one 17 and under admitted X: Adult audience only ViewSonic N3000w 23 NOTE: There is not responsible for parental control password security. ViewSonic is no Default password, just hit "ENTER" on the Remote Control. Function Name Password Edit Explanation TV Rating Change Password.
User Guide
Page 28
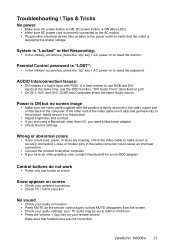
...time Snow appears on screen • Check your antenna connection • Check TV / CATV selection No sound • Check your audio connection • Press MUTE on the remote control again, so that MUTE disappears from the screen • Check your audio... settings, your TV audio may be set to SAP or minimum • Press the Volume + (Up) key on your remote control Make sure that the outlet is supplying the proper voltage System ...Wrong or abnormal colors • If any colors (red, green, or blue) are not connected ViewSonic N3000w 27
...time Snow appears on screen • Check your antenna connection • Check TV / CATV selection No sound • Check your audio connection • Press MUTE on the remote control again, so that MUTE disappears from the screen • Check your audio... settings, your TV audio may be set to SAP or minimum • Press the Volume + (Up) key on your remote control Make sure that the outlet is supplying the proper voltage System ...Wrong or abnormal colors • If any colors (red, green, or blue) are not connected ViewSonic N3000w 27
User Guide
Page 29
For High-Definition Users: • The N3000w is an ideal platform for standard 4:3 Televisions. To use this content so the entire screen is filled at the expense of image accuracy. However, due ...; Batteries could be weak Image Quality Issues: • TV: For Best Image Quality, "Standard Definition" TV should be viewed as broadcast. ViewSonic N3000w 28 For Letterbox Content Users: • Letterboxed (or "Widescreen") versions of expanding this function, press the "ZOOM" key on the remote control and select "1:1". Remote Control does not work • Make sure batteries...
For High-Definition Users: • The N3000w is an ideal platform for standard 4:3 Televisions. To use this content so the entire screen is filled at the expense of image accuracy. However, due ...; Batteries could be weak Image Quality Issues: • TV: For Best Image Quality, "Standard Definition" TV should be viewed as broadcast. ViewSonic N3000w 28 For Letterbox Content Users: • Letterboxed (or "Widescreen") versions of expanding this function, press the "ZOOM" key on the remote control and select "1:1". Remote Control does not work • Make sure batteries...

