
User Guide
Page 1
Warranty information contained in this User Guide to obtain important information on our web site at http://www.viewsonic.com in English, or in specific languages using your product for future service. VS18859 P/N: ID2456 ID2456 Display User Guide IMPORTANT: Please read this User Guide will describe your limited coverage from ViewSonic® Corporation, which is also found on installing and using the Regional selection box in a safe manner, as well as registering your product in the upper right corner of our website. Model No.
Warranty information contained in this User Guide to obtain important information on our web site at http://www.viewsonic.com in English, or in specific languages using your product for future service. VS18859 P/N: ID2456 ID2456 Display User Guide IMPORTANT: Please read this User Guide will describe your limited coverage from ViewSonic® Corporation, which is also found on installing and using the Regional selection box in a safe manner, as well as registering your product in the upper right corner of our website. Model No.
User Guide
Page 3
... device or connection cables. • Always use cabinets, stands, or installation methods recommended by the manufacturer of the device set. • Always use the device near water. For more information, refer to the "Maintenance" section of this manual. • Avoid touching the screen, as oil may be placed between the product and supporting furniture. • When moving the...
... device or connection cables. • Always use cabinets, stands, or installation methods recommended by the manufacturer of the device set. • Always use the device near water. For more information, refer to the "Maintenance" section of this manual. • Avoid touching the screen, as oil may be placed between the product and supporting furniture. • When moving the...

User Guide
Page 6
... VGA Connection...16 USB Connection...17 Touch Function Control 18 Audio Connection 20 Using the Monitor 21 Adjusting the Viewing Angle 21 Tilt Angle Adjustment 21 Turning the Device On/Off 22 Using the Control Panel Keys 23 Quick Menu...23 Hot Keys...25 Configuring the Settings 27 General Operations 27 On-Screen Display (OSD) Menu Tree...
... VGA Connection...16 USB Connection...17 Touch Function Control 18 Audio Connection 20 Using the Monitor 21 Adjusting the Viewing Angle 21 Tilt Angle Adjustment 21 Turning the Device On/Off 22 Using the Control Panel Keys 23 Quick Menu...23 Hot Keys...25 Configuring the Settings 27 General Operations 27 On-Screen Display (OSD) Menu Tree...

User Guide
Page 8
Introduction Package Contents • Touch display • Power cord • USB Type C cable • HDMI cable • USB 3.0 upstream cable (Type B to Type A) • Quick start guide • MPP2.0 Active Pen • Pen tether NOTE: The power cord and video cables included in your package may vary depending on your local reseller for more information. 8 Please contact your country.
Introduction Package Contents • Touch display • Power cord • USB Type C cable • HDMI cable • USB 3.0 upstream cable (Type B to Type A) • Quick start guide • MPP2.0 Active Pen • Pen tether NOTE: The power cord and video cables included in your package may vary depending on your local reseller for more information. 8 Please contact your country.

User Guide
Page 12
... Operating Hours When the battery is fully charged, being used , it will affect the pen's signal transition state and always stay in ink mode. LED Flash Mode Charging LED On Charging Complete LED Off Low Battery LED Flash NOTE: • For the first-time recharge of the ID2456 to charge the pen. • The ID2456 display, with a USB...
... Operating Hours When the battery is fully charged, being used , it will affect the pen's signal transition state and always stay in ink mode. LED Flash Mode Charging LED On Charging Complete LED Off Low Battery LED Flash NOTE: • For the first-time recharge of the ID2456 to charge the pen. • The ID2456 display, with a USB...

User Guide
Page 13
... stand is fully retracted. 4. Maximum Hole pattern Loading (W x H) Interface Pad (W x H x D) Pad Hole Screw Specification & Quantity 14 kg 100 x 100 mm 115 x 115 x 2.6 mm Ø 5 mm M4 x 10 mm 4 pieces NOTE: Wall mount kits are sold separately. 1. Initial Setup This section provides detailed instructions for wall mount kits. To obtain a wallmounting kit or height adjustment base, contact ViewSonic...
... stand is fully retracted. 4. Maximum Hole pattern Loading (W x H) Interface Pad (W x H x D) Pad Hole Screw Specification & Quantity 14 kg 100 x 100 mm 115 x 115 x 2.6 mm Ø 5 mm M4 x 10 mm 4 pieces NOTE: Wall mount kits are sold separately. 1. Initial Setup This section provides detailed instructions for wall mount kits. To obtain a wallmounting kit or height adjustment base, contact ViewSonic...

User Guide
Page 19
... Settings 2. Select Setup. 3. Follow the instructions to Type B cable from Sleep Mode. • The touchscreen can only detect up to ten (10) fingers simultaneously. • If the Windows' cursor does not accurately follow your computer to the monitor to the VGA port on the monitor. 2. HDMI Type-C HDMI Out USB 3.0 5V/2A VGA VGA When using...
... Settings 2. Select Setup. 3. Follow the instructions to Type B cable from Sleep Mode. • The touchscreen can only detect up to ten (10) fingers simultaneously. • If the Windows' cursor does not accurately follow your computer to the monitor to the VGA port on the monitor. 2. HDMI Type-C HDMI Out USB 3.0 5V/2A VGA VGA When using...
User Guide
Page 24
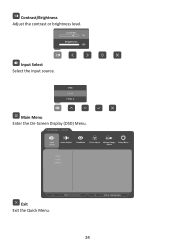
Main Menu Exit Contrast/Brightness Adjust the contrast or brightness level. ID2456 Input Select Audio Adjust ViewMode Color Adjust Manual Image Setup Menu Adjust VGA HDMI TYPE C Exit Exit the Quick Menu. 1920 X 1080 @ 60Hz 24 mode ast/Brightness Select Menu Contrast 70 Brightness 100 Input Select Select the input source. s VGA HDMI TYPE C Main Menu Enter the On-Screen Display (OSD) Menu.
Main Menu Exit Contrast/Brightness Adjust the contrast or brightness level. ID2456 Input Select Audio Adjust ViewMode Color Adjust Manual Image Setup Menu Adjust VGA HDMI TYPE C Exit Exit the Quick Menu. 1920 X 1080 @ 60Hz 24 mode ast/Brightness Select Menu Contrast 70 Brightness 100 Input Select Select the input source. s VGA HDMI TYPE C Main Menu Enter the On-Screen Display (OSD) Menu.
User Guide
Page 27
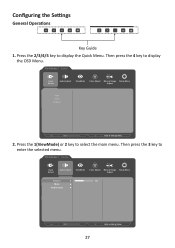
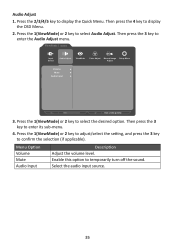
... select the main menu. ID2456 Input Select Audio Adjust ViewMode Color Adjust Manual Image Setup Menu Adjust Volume 50 Mute Audio Input 27 1920 x 1080 @ 60Hz Press the 1(ViewMode) or 2 key to display the OSD Menu. Then press the 3 key to display the Quick Menu. Mute Off Audio Input Configuring the Settings General Operations 1920 x 1080 @ 60Hz...
... select the main menu. ID2456 Input Select Audio Adjust ViewMode Color Adjust Manual Image Setup Menu Adjust Volume 50 Mute Audio Input 27 1920 x 1080 @ 60Hz Press the 1(ViewMode) or 2 key to display the OSD Menu. Then press the 3 key to display the Quick Menu. Mute Off Audio Input Configuring the Settings General Operations 1920 x 1080 @ 60Hz...
User Guide
Page 35
Then press the 4 key to enter the Audio Adjust menu. Then press the 3 key to display the OSD Menu. 2. Then press the 3 key to temporarily turn off the sound. Enable this option to enter its sub-menu. 4. Press the 1(ViewMode) or 2 ... to adjust/select the setting, and press the 3 key to select the desired option. Select the audio input source. 35 Menu Option Volume Mute Audio Input Description Adjust the volume level. Audio Adjust 1. Press the 2/3/4/5 key to select Audio Adjust. ID2456 Input Select Audio Adjust ViewMode Color Adjust Manual Image Setup Menu Adjust Volume...
Then press the 4 key to enter the Audio Adjust menu. Then press the 3 key to display the OSD Menu. 2. Then press the 3 key to temporarily turn off the sound. Enable this option to enter its sub-menu. 4. Press the 1(ViewMode) or 2 ... to adjust/select the setting, and press the 3 key to select the desired option. Select the audio input source. 35 Menu Option Volume Mute Audio Input Description Adjust the volume level. Audio Adjust 1. Press the 2/3/4/5 key to select Audio Adjust. ID2456 Input Select Audio Adjust ViewMode Color Adjust Manual Image Setup Menu Adjust Volume...

User Guide
Page 37
...ID2456 Input Select Audio Adjust ViewMode Color Adjust Manual Image Setup Menu Adjust Contrast/Brightness Color Temperature Color Space Color Range 1920 X 1080 @ 60Hz 3. Press the 1(ViewMode) or 2 key to select Color Adjust. Press the 2/3/4/5 key to select the setting. Press the 1(ViewMode) or 2 key to display...lightest and darkest parts of the picture and change the amount of the screen image. 37 Then press the 3 key to enter its sub-menu. 4. Then press the 3 key to display the OSD Menu...or make adjustments. Follow the key guide that appears on the user's custom settings. 1.
...ID2456 Input Select Audio Adjust ViewMode Color Adjust Manual Image Setup Menu Adjust Contrast/Brightness Color Temperature Color Space Color Range 1920 X 1080 @ 60Hz 3. Press the 1(ViewMode) or 2 key to select Color Adjust. Press the 2/3/4/5 key to select the setting. Press the 1(ViewMode) or 2 key to display...lightest and darkest parts of the picture and change the amount of the screen image. 37 Then press the 3 key to enter its sub-menu. 4. Then press the 3 key to display the OSD Menu...or make adjustments. Follow the key guide that appears on the user's custom settings. 1.
User Guide
Page 39
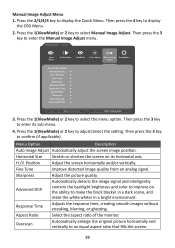
...the screen image position. H./V. Advanced DCR Automatically detects the image signal and intelligently controls the backlight brightness and color to enter its horizontal axis. Press the 1(ViewMode) or 2 key to adjust/select the setting. Response Time Adjusts the response ...to select the menu option. Press the 1(ViewMode) or 2 key to display the Quick Menu. Press the 2/3/4/5 key to select Manual Image Adjust. ID2456 Input Select Audio Adjust ViewMode Color Adjust Manual Image Setup Menu Adjust Auto Image Adjust Horizontal Size H./V. Aspect Ratio Select the aspect ...
...the screen image position. H./V. Advanced DCR Automatically detects the image signal and intelligently controls the backlight brightness and color to enter its horizontal axis. Press the 1(ViewMode) or 2 key to adjust/select the setting. Response Time Adjusts the response ...to select the menu option. Press the 1(ViewMode) or 2 key to display the Quick Menu. Press the 2/3/4/5 key to select Manual Image Adjust. ID2456 Input Select Audio Adjust ViewMode Color Adjust Manual Image Setup Menu Adjust Auto Image Adjust Horizontal Size H./V. Aspect Ratio Select the aspect ...

User Guide
Page 42
... to inform users that the current viewing resolution is turned on the screen. Set the amount of time. Enable/Disable touch support. Set the OSD Menu orientation. • 0°: Sets the OSD Menu without pivot. • +90°: Sets the OSD Menu with a +90° pivot. • -90°: Sets the OSD Menu with a -90° pivot. Display the...
... to inform users that the current viewing resolution is turned on the screen. Set the amount of time. Enable/Disable touch support. Set the OSD Menu orientation. • 0°: Sets the OSD Menu without pivot. • +90°: Sets the OSD Menu with a +90° pivot. • -90°: Sets the OSD Menu with a -90° pivot. Display the...

User Guide
Page 44
...display. ² Please use the power adapter from ViewSonic® or an authorized source only. ³ The test condition follows EEI standards. 44 Item Display Area Operating conditions Storage conditions Dimensions Wall Mount Weight Power saving modes Category Full Scan (H x V) Temperature Humidity Altitude Temperature Humidity Altitude Physical (W x H x D) Dimensions Physical On³ Off Specifications... 1.7" x 21.4") 100 x 100 mm 5 kg (11.02 lbs) 33W (Typical) (Blue LED) 36W (Max3) (Blue LED) < 0.5W ¹ Do not set the graphics card in permanent damage to exceed these timing modes;
...display. ² Please use the power adapter from ViewSonic® or an authorized source only. ³ The test condition follows EEI standards. 44 Item Display Area Operating conditions Storage conditions Dimensions Wall Mount Weight Power saving modes Category Full Scan (H x V) Temperature Humidity Altitude Temperature Humidity Altitude Physical (W x H x D) Dimensions Physical On³ Off Specifications... 1.7" x 21.4") 100 x 100 mm 5 kg (11.02 lbs) 33W (Typical) (Blue LED) 36W (Max3) (Blue LED) < 0.5W ¹ Do not set the graphics card in permanent damage to exceed these timing modes;
User Guide
Page 45
...of this manual. A Advanced DCR Advanced DCR technology automatically detects the image signal and intelligently controls the backlight brightness and color to improve on some models, is operating in a factory Preset Timing Mode listed in the Specifications of terms used in all LCD display models. All ...Power Lock setting". Auto Detect If the current input source has no signal, the monitor will automatically switch to your monitor. This function, on the ability to factory settings if the display is disabled by brightening dark scenes. B Black Stabilization ViewSonic's Black ...
...of this manual. A Advanced DCR Advanced DCR technology automatically detects the image signal and intelligently controls the backlight brightness and color to improve on some models, is operating in a factory Preset Timing Mode listed in the Specifications of terms used in all LCD display models. All ...Power Lock setting". Auto Detect If the current input source has no signal, the monitor will automatically switch to your monitor. This function, on the ability to factory settings if the display is disabled by brightening dark scenes. B Black Stabilization ViewSonic's Black ...

User Guide
Page 47
..."Low Input Lag" sub-menu, you can be seen. I Information Displays the timing mode (video signal input) coming from the options. 47 NOTE: VESA 1024 x 768 @ 60Hz, for example, means that are available for instructions on HDR10 video content. NOTE: Only available on changing the resolution and...shadows can select the appropriate speed for your graphics cards's user guide for the monitor. Hue Adjusts the tint of a given scene so that detail in the computer, the LCD model number, the serial number, and the ViewSonic® website URL. Input Select Toggles between the various ...
..."Low Input Lag" sub-menu, you can be seen. I Information Displays the timing mode (video signal input) coming from the options. 47 NOTE: VESA 1024 x 768 @ 60Hz, for example, means that are available for instructions on HDR10 video content. NOTE: Only available on changing the resolution and...shadows can select the appropriate speed for your graphics cards's user guide for the monitor. Hue Adjusts the tint of a given scene so that detail in the computer, the LCD model number, the serial number, and the ViewSonic® website URL. Input Select Toggles between the various ...

User Guide
Page 49
.... taking into account properties of these settings can activate on-screen display notifications so users do not have to deliver an optimized viewing experience for color image and video processing; Many of the human eye that the current viewing resolution is used for different screen applications. These presets are specifically designed to reopen the menu. Resolution...
.... taking into account properties of these settings can activate on-screen display notifications so users do not have to deliver an optimized viewing experience for color image and video processing; Many of the human eye that the current viewing resolution is used for different screen applications. These presets are specifically designed to reopen the menu. Resolution...

User Guide
Page 53
...instructions, may cause undesired operation. This equipment generates, uses, and can be determined by turning the equipment off and on, the user is encouraged to try to part 15 of the FCC Rules. Operation...not installed and used in accordance with the EMC Directive 2014/30/EU and Low Voltage Directive 2014/35/EU. 53 This equipment has been tested and found to operate the...or modifications not expressly approved by one or more of FCC Rules. Regulatory and Service Information Compliance Information This section addresses all connected requirements and statements regarding regulations. ...
...instructions, may cause undesired operation. This equipment generates, uses, and can be determined by turning the equipment off and on, the user is encouraged to try to part 15 of the FCC Rules. Operation...not installed and used in accordance with the EMC Directive 2014/30/EU and Low Voltage Directive 2014/35/EU. 53 This equipment has been tested and found to operate the...or modifications not expressly approved by one or more of FCC Rules. Regulatory and Service Information Compliance Information This section addresses all connected requirements and statements regarding regulations. ...
User Guide
Page 59
... the product User Guide. • Removal, installation, and set-up service charges, including wall-mounting of the product. Any third-party software included with the product or installed by static (non-moving) images displayed for a particular purpose. 59 • Causes external to the product, such as electric power fluctuations or failure. • Use of supplies or parts not meeting ViewSonic's specifications. • Failure...
... the product User Guide. • Removal, installation, and set-up service charges, including wall-mounting of the product. Any third-party software included with the product or installed by static (non-moving) images displayed for a particular purpose. 59 • Causes external to the product, such as electric power fluctuations or failure. • Use of supplies or parts not meeting ViewSonic's specifications. • Failure...
User Guide
Page 62
... get service: For information about receiving service under warranty, contact ViewSonic® Customer Support (Please refer to the cost of repair or replacement of use . For Your Records Product Name: Document Number: Purchase Date: Model Number: Serial Number: Extended Warranty Purchase? (Y/N) If so, what date does warranty expire? • To obtain warranty service, you will be paid by ViewSonic®...
... get service: For information about receiving service under warranty, contact ViewSonic® Customer Support (Please refer to the cost of repair or replacement of use . For Your Records Product Name: Document Number: Purchase Date: Model Number: Serial Number: Extended Warranty Purchase? (Y/N) If so, what date does warranty expire? • To obtain warranty service, you will be paid by ViewSonic®...