
English Owners Manual
Page 2
... subject to the radio. 3. FCC / Industry Canada Information Certification FCC Part 80 or RSS-182/188 Output Power 1 Watt (low) and 25 Watts (high) Emission 16K0F3E, 16K0F2D Transmitter Frequency Range 156.025 to the radio for use of the FCC Rules, as well as possible. Any change or modification must be approved in international waters. Installer Instructions To connect an optional external antenna to 157.425 MHz FCC Identifier AMWUT601 IC...
... subject to the radio. 3. FCC / Industry Canada Information Certification FCC Part 80 or RSS-182/188 Output Power 1 Watt (low) and 25 Watts (high) Emission 16K0F3E, 16K0F2D Transmitter Frequency Range 156.025 to the radio for use of the FCC Rules, as well as possible. Any change or modification must be approved in international waters. Installer Instructions To connect an optional external antenna to 157.425 MHz FCC Identifier AMWUT601 IC...
English Owners Manual
Page 3
... the Radio 13 Connecting the Antenna 13 Connecting Power 13 Installation ...13 Using a WHAM or WHAM x 4 Microphone With the Radio 15 A Look at the Radio 15 A Look at the Microphone 16 A Look at the Display 17 Basic Operation ...19 Turning the Radio On and Off 19 Selecting a Channel 19 Transmitting and Receiving 19 Adjusting the Transmit Power 20 Using Scan ...20 Using Step ...20 Using Channel Mode 20 Using Hail ...21 Using the Intercom 21 Using GPS ...22 Using Position Setting Mode 22 Using Battery...
... the Radio 13 Connecting the Antenna 13 Connecting Power 13 Installation ...13 Using a WHAM or WHAM x 4 Microphone With the Radio 15 A Look at the Radio 15 A Look at the Microphone 16 A Look at the Display 17 Basic Operation ...19 Turning the Radio On and Off 19 Selecting a Channel 19 Transmitting and Receiving 19 Adjusting the Transmit Power 20 Using Scan ...20 Using Step ...20 Using Channel Mode 20 Using Hail ...21 Using the Intercom 21 Using GPS ...22 Using Position Setting Mode 22 Using Battery...
English Owners Manual
Page 6
...). 6 Introduction You can connect and use . Note: Your radio meets the stringent JIS7 waterproof specification. You can set the radio's channel mode to 30 minutes without notice. The radio's large display and backlit control buttons make it scans only the channels you ever need them to be submerged to have a scrambler installed. Feature Highlights FGeeantuerreaHl iFgehalitguhrtes s Memory Channel Scan - Channel Mode - You can quickly tune the radio to change without incurring damage. You...
...). 6 Introduction You can connect and use . Note: Your radio meets the stringent JIS7 waterproof specification. You can set the radio's channel mode to 30 minutes without notice. The radio's large display and backlit control buttons make it scans only the channels you ever need them to be submerged to have a scrambler installed. Feature Highlights FGeeantuerreaHl iFgehalitguhrtes s Memory Channel Scan - Channel Mode - You can quickly tune the radio to change without incurring damage. You...
English Owners Manual
Page 7
... can use these features if you desire. The radio automatically tests its unattended mode. If the radio receives a SAME alert tone, it checks it against the FIPS codes you programmed and alerts you tune a channel. Key Beep Adjustment - You can adjust the brightness of other vessels. If you install an optional scrambler board in extreme conditions. FIPS Code Programming - You can set the radio so it does not automatically change the channel...
... can use these features if you desire. The radio automatically tests its unattended mode. If the radio receives a SAME alert tone, it checks it against the FIPS codes you programmed and alerts you tune a channel. Key Beep Adjustment - You can adjust the brightness of other vessels. If you install an optional scrambler board in extreme conditions. FIPS Code Programming - You can set the radio so it does not automatically change the channel...

English Owners Manual
Page 8
... the radio, the radio can even use the radio to an optional connected chart plotter. The radio sets itself to sound a fog horn. WHAM Input - If you connect an optional 900 MHz analog WHAM microphone to the radio, you connect an optional GPS receiver to communicate with each WHAM x 4 user. You can use the radio to the correct local time. • Automatic Fog Horn - GPS Features - WHAM x 4 Input - The radio sounds the...
... the radio, the radio can even use the radio to an optional connected chart plotter. The radio sets itself to sound a fog horn. WHAM Input - If you connect an optional 900 MHz analog WHAM microphone to the radio, you connect an optional GPS receiver to communicate with each WHAM x 4 user. You can use the radio to the correct local time. • Automatic Fog Horn - GPS Features - WHAM x 4 Input - The radio sounds the...

English Owners Manual
Page 9
... first digit of choices, the control to use the radio's menu to the following appears. Important: If you have already set the user MMSI, DO NOT CHANGE IT unless you press appear in BOLD type, icons that appear on the display appear in this manual and what you see depends on the frequencies for the first time. Buttons you have received a new user MMSI.
... first digit of choices, the control to use the radio's menu to the following appears. Important: If you have already set the user MMSI, DO NOT CHANGE IT unless you press appear in BOLD type, icons that appear on the display appear in this manual and what you see depends on the frequencies for the first time. Buttons you have received a new user MMSI.
English Owners Manual
Page 15
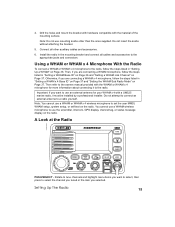
... and "Setting the WHAM Sub Radio Mode" on the radio. You cannot use the scrambler, intercom, GPS display, channel tag, or status message display on Page 37. Using a WHAM or WHAM x 4 Microphone With the Radio To connect a WHAM or WHAM x 4 microphone to use mounting knobs other auxiliary cables and accessories. 6. Then refer to tune channels and highlight menu items you are connecting a WHAM microphone, follow the steps listed in "Setting Up a WHAM...
... and "Setting the WHAM Sub Radio Mode" on the radio. You cannot use the scrambler, intercom, GPS display, channel tag, or status message display on Page 37. Using a WHAM or WHAM x 4 Microphone With the Radio To connect a WHAM or WHAM x 4 microphone to use mounting knobs other auxiliary cables and accessories. 6. Then refer to tune channels and highlight menu items you are connecting a WHAM microphone, follow the steps listed in "Setting Up a WHAM...
English Owners Manual
Page 16
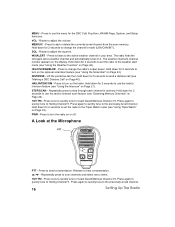
... or delete the currently-tuned channel from the scan memory. DISTRESS - Press to change the channel's mode (USA/CAN/INT). HI/LO/SCRAMBLER - Hold down for 2 seconds to set the radio to adjust the volume. HAIL/INTERCOM - Hold down for the DSC Call, Fog Horn, WHAM Page, System, and Setup functions. WX/ALERT - Rotate to the weather alert mode (see "Using the Intercom" on Page...
... or delete the currently-tuned channel from the scan memory. DISTRESS - Press to change the channel's mode (USA/CAN/INT). HI/LO/SCRAMBLER - Hold down for 2 seconds to set the radio to adjust the volume. HAIL/INTERCOM - Hold down for the DSC Call, Fog Horn, WHAM Page, System, and Setup functions. WX/ALERT - Rotate to the weather alert mode (see "Using the Intercom" on Page...
English Owners Manual
Page 18
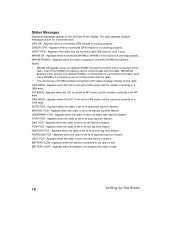
... microphone. Appears when the UIC is currently in turn for over 1 hour. AUTO FOG - Appears when the radio is set to its stop fog horn feature. Appears when the radio is set to the radio, even if any WHAM x 4 microphone cannot communicate with the radio. • You cannot use a WHAM wireless microphone with the radio. Appears when the radio is connected to its under way fog horn feature. BATTERY LOW...
... microphone. Appears when the UIC is currently in turn for over 1 hour. AUTO FOG - Appears when the radio is set to its stop fog horn feature. Appears when the radio is set to the radio, even if any WHAM x 4 microphone cannot communicate with the radio. • You cannot use a WHAM wireless microphone with the radio. Appears when the radio is connected to its under way fog horn feature. BATTERY LOW...
English Owners Manual
Page 19
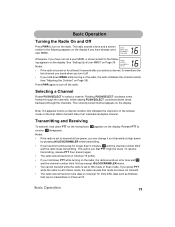
... down PTT while turning on the display. Basic Operation 19 ing appears on the radio, the radio sounds an error tone and TX and the channel number blink. TX appears on Page 38. This warns you can be stuck. See "Setting Up a User MMSI" on the display. Selecting a Channel Rotate PUSH/SELECT to receive. Notes: Uniden UM525 Your MMSI is set a user MMSI, a screen similar to transmit at low power, you that mode but...
... down PTT while turning on the display. Basic Operation 19 ing appears on the radio, the radio sounds an error tone and TX and the channel number blink. TX appears on Page 38. This warns you can be stuck. See "Setting Up a User MMSI" on the display. Selecting a Channel Rotate PUSH/SELECT to receive. Notes: Uniden UM525 Your MMSI is set a user MMSI, a screen similar to transmit at low power, you that mode but...
English Owners Manual
Page 21
... appears and you want to talk to use the hail feature, press HAIL/INTERCOM then press PTT on the display. Follow these steps to select the WHAM x 4 microphone or microphones you hear any response to select it . Note: Only those WHAM x 4 microphones or sub radios with the radio, intercom does not work and the radio sounds an error tone. • Intercom mode is cancelled if 16/9 TRI...
... appears and you want to talk to use the hail feature, press HAIL/INTERCOM then press PTT on the display. Follow these steps to select the WHAM x 4 microphone or microphones you hear any response to select it . Note: Only those WHAM x 4 microphones or sub radios with the radio, intercom does not work and the radio sounds an error tone. • Intercom mode is cancelled if 16/9 TRI...
English Owners Manual
Page 22
... it sounds a tone and INPUT POS appears. • The radio automatically alerts you press any key, the radio sets itself to Channel 9. If the GPS module is properly connected to the radio and is working, GPS OK appears on the radio. • If the radio is not receiving valid data from scanning if the radio is set to GPS mode. Press PUSH/SELECT again to set the radio to...
... it sounds a tone and INPUT POS appears. • The radio automatically alerts you press any key, the radio sets itself to Channel 9. If the GPS module is properly connected to the radio and is working, GPS OK appears on the radio. • If the radio is not receiving valid data from scanning if the radio is set to GPS mode. Press PUSH/SELECT again to set the radio to...
English Owners Manual
Page 23
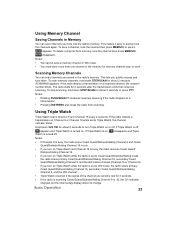
... and Channel 16 is busy, the radio receives Coast Guard/ Distress/Hailing Channel 16. • If you turn on Triple Watch while the radio is set to Coast Guard/Distress/Hailing mode, the radio scans primary Coast Guard/Distress/Hailing Channel 16, secondary Coast Guard/Distress/Hailing Channel 9, and the last marine channel (Channel 16 or Channel 9). • If you turn Triple Watch on a scanned channel, the channel number blinks. Using Memory Channel Saving Channels...
... and Channel 16 is busy, the radio receives Coast Guard/ Distress/Hailing Channel 16. • If you turn on Triple Watch while the radio is set to Coast Guard/Distress/Hailing mode, the radio scans primary Coast Guard/Distress/Hailing Channel 16, secondary Coast Guard/Distress/Hailing Channel 9, and the last marine channel (Channel 16 or Channel 9). • If you turn Triple Watch on a scanned channel, the channel number blinks. Using Memory Channel Saving Channels...
English Owners Manual
Page 24
... tone 24 Basic Operation SCRM disappears. Your radio scans through the weather band then stops on the first active weather frequency, and WX appears on the display. ALT appears. If the radio receives a weather alert, it sounds a tone and ALT flashes. To turn on , the radio can program your radio to turn off the tone by the National Oceanic and Atmospheric Administration (NOAA). Using SAME Alert The National Weather Service precedes each weather alert with other countries have also allocated channels...
... tone 24 Basic Operation SCRM disappears. Your radio scans through the weather band then stops on the first active weather frequency, and WX appears on the display. ALT appears. If the radio receives a weather alert, it sounds a tone and ALT flashes. To turn on , the radio can program your radio to turn off the tone by the National Oceanic and Atmospheric Administration (NOAA). Using SAME Alert The National Weather Service precedes each weather alert with other countries have also allocated channels...
English Owners Manual
Page 25
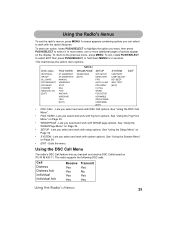
... FOG SETUP SCRAMBLE GROUP MMSI USER MMSI [EXIT] SYSTEM CONTRAST LAMP ADJUST KEY BEEP SELF TEST [EXIT] EXIT • DSC CALL - See "Using the DSC Call Menu". • FOG HORN - Using the DSC Call Menu The radio's DSC Call feature lets you want, then press PUSH/SELECT to the previous menu, press MENU. To exit, rotate PUSH/SELECT to work with the radio's features. Lets...
... FOG SETUP SCRAMBLE GROUP MMSI USER MMSI [EXIT] SYSTEM CONTRAST LAMP ADJUST KEY BEEP SELF TEST [EXIT] EXIT • DSC CALL - See "Using the DSC Call Menu". • FOG HORN - Using the DSC Call Menu The radio's DSC Call feature lets you want, then press PUSH/SELECT to the previous menu, press MENU. To exit, rotate PUSH/SELECT to work with the radio's features. Lets...
English Owners Manual
Page 27
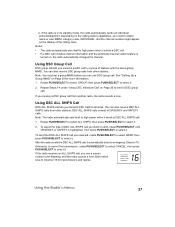
... and the automatic channel switch feature is turned on Page 38 for transmissions and replies. Repeat Steps 3-4 under "Using DSC Individual Call" on the display of URGENCY and SAFETY calls. You can also receive DSC ALL SHIPS calls from another radio, the radio sounds a tone. Depending on the calling radio's capabilities, your radio's station name or user MMSI, category code, INDIVIDUAL, and the channel number might appear...
... and the automatic channel switch feature is turned on Page 38 for transmissions and replies. Repeat Steps 3-4 under "Using DSC Individual Call" on the display of URGENCY and SAFETY calls. You can also receive DSC ALL SHIPS calls from another radio, the radio sounds a tone. Depending on the calling radio's capabilities, your radio's station name or user MMSI, category code, INDIVIDUAL, and the channel number might appear...
English Owners Manual
Page 36
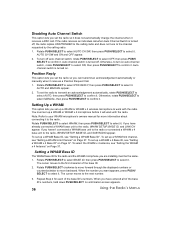
... your WHAM microphone's owners manual for each of the base ID. 2. To set up a WHAM Base ID, see "Setting the WHAM x 4 Antenna" on Page 37. To select the WHAM x 4 antenna, see "Setting a WHAM Base ID". Rotate PUSH/SELECT clockwise to move backward. Repeat Step 2 for more information about connecting it receives a DSC call when Auto Channel Switch is turned off. Disabling Auto Channel Switch This option...
... your WHAM microphone's owners manual for each of the base ID. 2. To set up a WHAM Base ID, see "Setting the WHAM x 4 Antenna" on Page 37. To select the WHAM x 4 antenna, see "Setting a WHAM Base ID". Rotate PUSH/SELECT clockwise to move backward. Repeat Step 2 for more information about connecting it receives a DSC call when Auto Channel Switch is turned off. Disabling Auto Channel Switch This option...
English Owners Manual
Page 38
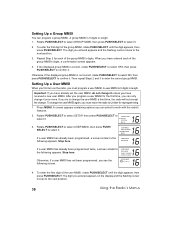
.... Repeat Step 2 for reprogramming. 1. Setting Up a User MMSI When you first turn on the display and the flashing cursor moves to select it . Important: If you must return the radio to the next position. 3. Stop here. 16 USER MMSI 685749638 CAN'T CHANGE OVER 2 TIMES Otherwise, if a user MMSI has not been programmed, you entered appears and the flashing cursor moves to Uniden for each of...
.... Repeat Step 2 for reprogramming. 1. Setting Up a User MMSI When you first turn on the display and the flashing cursor moves to select it . Important: If you must return the radio to the next position. 3. Stop here. 16 USER MMSI 685749638 CAN'T CHANGE OVER 2 TIMES Otherwise, if a user MMSI has not been programmed, you entered appears and the flashing cursor moves to Uniden for each of...

English Owners Manual
Page 39
... setup menu appears. If the displayed scrambler code is not correct, rotate PUSH/SELECT to select NO, then press PUSH/SELECT to confirm it . Rotate PUSH/SELECT clockwise to enter the correct scrambler code. Adjusting the Display and Key Brightness 1. Rotate PUSH/SELECT to select LAMP ADJUST, then press PUSH/SELECT to select it . Using the Radio's Menus 39 Setting a Scrambler Code...
... setup menu appears. If the displayed scrambler code is not correct, rotate PUSH/SELECT to select NO, then press PUSH/SELECT to confirm it . Rotate PUSH/SELECT clockwise to enter the correct scrambler code. Adjusting the Display and Key Brightness 1. Rotate PUSH/SELECT to select LAMP ADJUST, then press PUSH/SELECT to select it . Using the Radio's Menus 39 Setting a Scrambler Code...
English Owners Manual
Page 49
... user shall terminate and be of no further effect 36 months after following the instructions in any conjunction with only the limitations or exclusions set ...Operating Guide for this product. This warranty is (A) damaged or not maintained as reasonable or necessary, (B) modified, altered, or used as part of any conversion kits, subassemblies, or any configurations not sold by Uniden, (C) improperly installed, (D) serviced or repaired by someone other than as part of any system not manufactured by Uniden, or (F) installed or programmed by anyone other than an authorized Uniden service...
... user shall terminate and be of no further effect 36 months after following the instructions in any conjunction with only the limitations or exclusions set ...Operating Guide for this product. This warranty is (A) damaged or not maintained as reasonable or necessary, (B) modified, altered, or used as part of any conversion kits, subassemblies, or any configurations not sold by Uniden, (C) improperly installed, (D) serviced or repaired by someone other than as part of any system not manufactured by Uniden, or (F) installed or programmed by anyone other than an authorized Uniden service...


