English Owner's Manual
Page 1
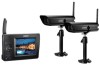
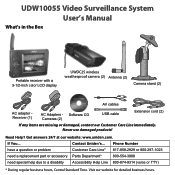
... 800-297-1023 need a replacement part or accessory Parts Department* 800-554-3988 need special help due to a disability Accessibility Help Line 800-874-9314 (voice or TTY) * During regular business hours, Central Standard Time. UDW10055 Video Surveillance System User's Manual What's in the Box Portable receiver with a 3-1/2-inch color LCD display UWDC25 wireless weatherproof camera (2) Antenna (2) Camera stand (2) AV cables AC adapter Receiver (1) AC Adapters - If You... Software CD Cameras (2) USB cable Extension cord (2) If...
... 800-297-1023 need a replacement part or accessory Parts Department* 800-554-3988 need special help due to a disability Accessibility Help Line 800-874-9314 (voice or TTY) * During regular business hours, Central Standard Time. UDW10055 Video Surveillance System User's Manual What's in the Box Portable receiver with a 3-1/2-inch color LCD display UWDC25 wireless weatherproof camera (2) Antenna (2) Camera stand (2) AV cables AC adapter Receiver (1) AC Adapters - If You... Software CD Cameras (2) USB cable Extension cord (2) If...
English Owner's Manual
Page 2
... user. Check with any power cord; when running power cords, avoid letting them rub against any sharp edges or lie across any high traffic areas where people might trip over them. ►► Do not use . Do not cover the camera or receiver with local codes for possible special disposal instructions for...►► STRANGULATION HAZARD. be sure to liquids, or the unit has been dropped or is NOT waterproof. Keep the adapter cords out of the reach of electric shock from the wall outlet. ►► Never leave power cords where they can become crushed, cut, or frayed; it...
... user. Check with any power cord; when running power cords, avoid letting them rub against any sharp edges or lie across any high traffic areas where people might trip over them. ►► Do not use . Do not cover the camera or receiver with local codes for possible special disposal instructions for...►► STRANGULATION HAZARD. be sure to liquids, or the unit has been dropped or is NOT waterproof. Keep the adapter cords out of the reach of electric shock from the wall outlet. ►► Never leave power cords where they can become crushed, cut, or frayed; it...
English Owner's Manual
Page 3
... Started 4 Connect the Power 4 Check the Video Signal 5 Learning Your System 6 Get to Know the Camera 6 What the lights mean 6 Using the Camera Stand 6 Switch the bracket 7 Mount the stand 7 Attach the camera 8 Adjusting the Sun Shield 8 Get to Know the Receiver 9 What the buttons do 9 What the lights mean 10 What the connections do 10 Using the Menu 11 Using Zoom Mode 12 Pan and tilt in zoom mode 12 Understanding Night Vision 12 Connecting to...
... Started 4 Connect the Power 4 Check the Video Signal 5 Learning Your System 6 Get to Know the Camera 6 What the lights mean 6 Using the Camera Stand 6 Switch the bracket 7 Mount the stand 7 Attach the camera 8 Adjusting the Sun Shield 8 Get to Know the Receiver 9 What the buttons do 9 What the lights mean 10 What the connections do 10 Using the Menu 11 Using Zoom Mode 12 Pan and tilt in zoom mode 12 Understanding Night Vision 12 Connecting to...
English Owner's Manual
Page 4
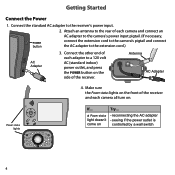
... Connect the Power 1. Connect the standard AC adapter to the extension cord.) AC Adapter 3. OK Power status lights If... Connect the other end of each camera all turn on the side of the receiver and each adapter to a 120 volt AC (standard indoor) power outlet, and press the Power button on . a Power status light doesn't come on Try... --reconnecting the AC adapter --seeing if the power outlet is controlled by a wall switch...
... Connect the Power 1. Connect the standard AC adapter to the extension cord.) AC Adapter 3. OK Power status lights If... Connect the other end of each camera all turn on the side of the receiver and each adapter to a 120 volt AC (standard indoor) power outlet, and press the Power button on . a Power status light doesn't come on Try... --reconnecting the AC adapter --seeing if the power outlet is controlled by a wall switch...
English Owner's Manual
Page 5
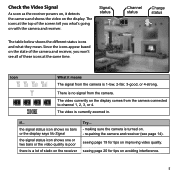
... The video is turned on. --re-pairing the camera and receiver (see all of the screen tell you won't see page 14). Signal status The table below shows the different status icons and what 's going on the display comes from the camera connected to ...camera is currently zoomed in. Since the icons appear based on the state of the camera and receiver, you what they mean. Channel status 1 Charge status Icon What it detects the camera and shows the video on the display. The icons at the top of these icons at the same time. Check the Video Signal As soon as the receiver powers...
... The video is turned on. --re-pairing the camera and receiver (see all of the screen tell you won't see page 14). Signal status The table below shows the different status icons and what 's going on the display comes from the camera connected to ...camera is currently zoomed in. Since the icons appear based on the state of the camera and receiver, you what they mean. Channel status 1 Charge status Icon What it detects the camera and shows the video on the display. The icons at the top of these icons at the same time. Check the Video Signal As soon as the receiver powers...
English Owner's Manual
Page 6
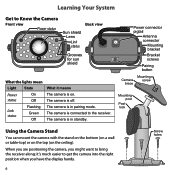
... the Camera Front view Power status Sun shield Lens Link status Back view Grooves for sun shield What the lights mean Light State Power On status Off Link status Flashing Green Off What it 's much easier to the receiver. Learning Your System Get to bring the receiver along; The camera is in standby. Power connector pigtail Antenna connector Mounting bracket Bracket screws Pairing button Mounting Camera screw brace Mounting post Post lock Using the Camera...
... the Camera Front view Power status Sun shield Lens Link status Back view Grooves for sun shield What the lights mean Light State Power On status Off Link status Flashing Green Off What it 's much easier to the receiver. Learning Your System Get to bring the receiver along; The camera is in standby. Power connector pigtail Antenna connector Mounting bracket Bracket screws Pairing button Mounting Camera screw brace Mounting post Post lock Using the Camera...
English Owner's Manual
Page 7
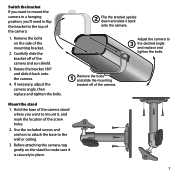
... base of the camera stand where you 'll need to flip the bracket to the top of the camera: 1. Remove the bolts on the stand to make sure it , and mark the location of the screw holes. 2. Carefully slide the bracket off of the camera and sun shield. 3. Switch the bracket If you want to mount it is securely in a hanging position...
... base of the camera stand where you 'll need to flip the bracket to the top of the camera: 1. Remove the bolts on the stand to make sure it , and mark the location of the screw holes. 2. Carefully slide the bracket off of the camera and sun shield. 3. Switch the bracket If you want to mount it is securely in a hanging position...
English Owner's Manual
Page 8
... the mounting bracket (see page 7). Tighten it in the receiver display. Tighten the camera brace up against the camera to secure it a few turns. 4. Unlock the mounting post by turning the wingnut to the correct angle, then tighten the wingnut until the post is cut off, try moving the sun shield back. Set the mounting post to the left a few turns, then turn the camera...
... the mounting bracket (see page 7). Tighten it in the receiver display. Tighten the camera brace up against the camera to secure it a few turns. 4. Unlock the mounting post by turning the wingnut to the correct angle, then tighten the wingnut until the post is cut off, try moving the sun shield back. Set the mounting post to the left a few turns, then turn the camera...
English Owner's Manual
Page 9
Get to Know the Receiver Front Status lights: Battery Power BUTTONS: MENU/OK LEFT DOWN SELECT CAMERA Antenna Side (right) Stand Speaker POWER OK VOL− VOL+ UP RIGHT ZOOM USB output Audio/video output Power input What the buttons do Button What it does MENU/ok --Open and close the menu LEFT --Decrease volume. --In zoom mode: pan to the left side of the zoom area. --In the menu: cycle through the...
Get to Know the Receiver Front Status lights: Battery Power BUTTONS: MENU/OK LEFT DOWN SELECT CAMERA Antenna Side (right) Stand Speaker POWER OK VOL− VOL+ UP RIGHT ZOOM USB output Audio/video output Power input What the buttons do Button What it does MENU/ok --Open and close the menu LEFT --Decrease volume. --In zoom mode: pan to the left side of the zoom area. --In the menu: cycle through the...

English Owner's Manual
Page 10
... to channel 2. --Cycle through the active cameras. --From the pairing menu: link to the selected camera. --Enter and exit zoom mode. --Turn the receiver on . The battery is low; The battery is fully charged. What the connections do Connector USB output Audio/video output Use it to Connect the receiver to your computer for use with the Uniden Surveillance System Software. (See the software manual for more information.) Send the signal from the...
... to channel 2. --Cycle through the active cameras. --From the pairing menu: link to the selected camera. --Enter and exit zoom mode. --Turn the receiver on . The battery is low; The battery is fully charged. What the connections do Connector USB output Audio/video output Use it to Connect the receiver to your computer for use with the Uniden Surveillance System Software. (See the software manual for more information.) Send the signal from the...
English Owner's Manual
Page 11
...). Choose a value from the camera. Any changes or settings will remain active.) To turn the display back on, press OK. Change the video output format from 0 (off if it to Adjust the volume of time the receiver spends on power save mode. If you set this field to Auto, the display turns off ) through 15 (max). Using the Menu To open the Reset System Setup sub-menu, press OK To close the...
...). Choose a value from the camera. Any changes or settings will remain active.) To turn the display back on, press OK. Change the video output format from 0 (off if it to Adjust the volume of time the receiver spends on power save mode. If you set this field to Auto, the display turns off ) through 15 (max). Using the Menu To open the Reset System Setup sub-menu, press OK To close the...
English Owner's Manual
Page 12
Pan and tilt in zoom mode Once in zoom mode, you can see the video better. 1 In zoom mode, the receiver increases the pixel size and focuses on when the ambient light gets too dim (around twilight); Tilt down . the LED provides enough light for the camera to capture clear images in deep twilight or under a very bright full moon. (See page 23 for lowlight conditions. Using Zoom Mode Normal view The...
Pan and tilt in zoom mode Once in zoom mode, you can see the video better. 1 In zoom mode, the receiver increases the pixel size and focuses on when the ambient light gets too dim (around twilight); Tilt down . the LED provides enough light for the camera to capture clear images in deep twilight or under a very bright full moon. (See page 23 for lowlight conditions. Using Zoom Mode Normal view The...
English Owner's Manual
Page 13
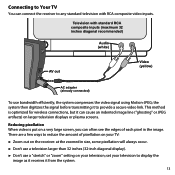
... system compresses the video signal using Motion-JPEG; set your television to display the image as it receives it can cause an indented image line ("ghosting" or JPEG artifacts) on larger television displays or plasma screens. Television with RCA composite video inputs. the system then digitizes the signal before transmitting it to provide a secure video link. Reducing pixellation When video is optimized for wireless connections, but it from...
... system compresses the video signal using Motion-JPEG; set your television to display the image as it receives it can cause an indented image line ("ghosting" or JPEG artifacts) on larger television displays or plasma screens. Television with RCA composite video inputs. the system then digitizes the signal before transmitting it to provide a secure video link. Reducing pixellation When video is optimized for wireless connections, but it from...
English Owner's Manual
Page 14
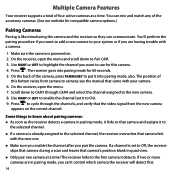
... receiver overwrites that came with a camera. 1. Scroll down to Pair CAM. 3. Use Right or Left to enable the channel (set to Off, the receiver skips that camera during a scan and leaves that camera's position blank in pairing mode, it links to that the video signal from camera to your camera. 6. Make sure the camera is set it detects. If a channel is powered on the correct channel. Multiple Camera Features Your receiver supports...
... receiver overwrites that came with a camera. 1. Scroll down to Pair CAM. 3. Use Right or Left to enable the channel (set to Off, the receiver skips that camera during a scan and leaves that camera's position blank in pairing mode, it links to that the video signal from camera to your camera. 6. Make sure the camera is set it detects. If a channel is powered on the correct channel. Multiple Camera Features Your receiver supports...
English Owner's Manual
Page 16
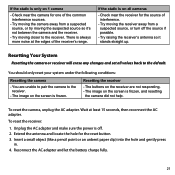
... Time is enabled (set to On in the menu. ►► The receiver does not go into quad display, select Quad (see Using Quad Display on the current channel, select Off. If... To set to Off or Quad. --Making sure more than one channel is enabled. --Making sure more than one channel is enabled. --Making sure you press to manually switch channels, the receiver turns...
... Time is enabled (set to On in the menu. ►► The receiver does not go into quad display, select Quad (see Using Quad Display on the current channel, select Off. If... To set to Off or Quad. --Making sure more than one channel is enabled. --Making sure more than one channel is enabled. --Making sure you press to manually switch channels, the receiver turns...
English Owner's Manual
Page 18
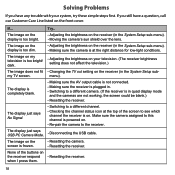
... TV screen. The display just says USB PC Camera Mode. --Disconnecting the USB cable. The image on the display is too bright. --Adjusting the brightness on the receiver respond --Resetting the receiver. Solving Problems If you still have any trouble with your television. (The receiver brightness setting does not affect the television.) The image does not fit --Changing the TV out setting on the receiver (in the System Setup sub...
... TV screen. The display just says USB PC Camera Mode. --Disconnecting the USB cable. The image on the display is too bright. --Adjusting the brightness on the receiver respond --Resetting the receiver. Solving Problems If you still have any trouble with your television. (The receiver brightness setting does not affect the television.) The image does not fit --Changing the TV out setting on the receiver (in the System Setup sub...
English Owner's Manual
Page 21
... following conditions: Resetting the camera --You are not responding. --The image on the screen is off the source if possible. --Try raising the receiver's antenna so it 's not between the camera and the receiver. --Try moving the camera away from a suspected source, or turn off . 2. Unplug the AC adapter and make sure the power is frozen, and resetting the camera did not help. If...
... following conditions: Resetting the camera --You are not responding. --The image on the screen is off the source if possible. --Try raising the receiver's antenna so it 's not between the camera and the receiver. --Try moving the camera away from a suspected source, or turn off . 2. Unplug the AC adapter and make sure the power is frozen, and resetting the camera did not help. If...

English Owner's Manual
Page 23
... battery with limits for recycling. System Specifications Camera Receiver Power consumption 650 mA max 650 mA max Low light solution 24 IR LEDs, 1 Low light sensor Low light sensitivity 1-8 lux Picture sensor OV7725 1/4' Color CMOS Lens F3.6mm H:53 V:40 Output Jacks AV OUT : 3.5 mm headset... residential installations. Operation is subjected to the following two conditions: (1) this device may not cause harmful interference, and (2) this product to Uniden for a Class B digital device, pursuant to Part 15 of their components (especially batteries and LCD displays) in...
... battery with limits for recycling. System Specifications Camera Receiver Power consumption 650 mA max 650 mA max Low light solution 24 IR LEDs, 1 Low light sensor Low light sensitivity 1-8 lux Picture sensor OV7725 1/4' Color CMOS Lens F3.6mm H:53 V:40 Output Jacks AV OUT : 3.5 mm headset... residential installations. Operation is subjected to the following two conditions: (1) this device may not cause harmful interference, and (2) this product to Uniden for a Class B digital device, pursuant to Part 15 of their components (especially batteries and LCD displays) in...
English Owner's Manual
Page 24
... (73/23/EEC); If this equipment does cause interference to operate the equipment. RF Exposure Information The antenna used in conjunction with the instructions, may cause harmful interference to radio communications. frequency energy, and if not installed and used for additional suggestions. However, there is connected. ►► Consult the dealer or an experienced radio/television...
... (73/23/EEC); If this equipment does cause interference to operate the equipment. RF Exposure Information The antenna used in conjunction with the instructions, may cause harmful interference to radio communications. frequency energy, and if not installed and used for additional suggestions. However, there is connected. ►► Consult the dealer or an experienced radio/television...
English Owner's Manual
Page 25
... the owner's manual you to return it to you. The Product should be of no further effect 12 months after following the instructions in effect, warrantor will either, at any configurations not sold by Uniden, (C) improperly installed, (D) serviced or repaired by someone other rights which vary from the Product & separately secure the battery in any conjunction with equipment or parts...
... the owner's manual you to return it to you. The Product should be of no further effect 12 months after following the instructions in effect, warrantor will either, at any configurations not sold by Uniden, (C) improperly installed, (D) serviced or repaired by someone other rights which vary from the Product & separately secure the battery in any conjunction with equipment or parts...


