English Owner's Manual
Page 3
......5 GETTING STARTED 6 WHAT'S INCLUDED...6 INSTALLATION...6 General Placement Considerations...6 Installing Your Monitor...7 Installing the Camera...7 BASIC OPERATION 10 WIRELESS Monitor...10 WIRELESS CAMERA...12 Front & Back Controls...12 LCD DISPLAY...13 USING THE UDR444...14 Viewing Modes...14 Common Operations...14 UDR444 SYSTEM MENUS 17 ALERT...17 POWER SAVE...18 SYSTEM...18 Date & Time...19...
......5 GETTING STARTED 6 WHAT'S INCLUDED...6 INSTALLATION...6 General Placement Considerations...6 Installing Your Monitor...7 Installing the Camera...7 BASIC OPERATION 10 WIRELESS Monitor...10 WIRELESS CAMERA...12 Front & Back Controls...12 LCD DISPLAY...13 USING THE UDR444...14 Viewing Modes...14 Common Operations...14 UDR444 SYSTEM MENUS 17 ALERT...17 POWER SAVE...18 SYSTEM...18 Date & Time...19...
English Owner's Manual
Page 4
USING THE INTERCOM...28 VIEWING LIVE VIDEO...28 Viewing On Your TV...28 Viewing On Your Computer...28 Viewing on Your Wireless Device or Remote Computer 29 PAIRING ACCESSORY CAMERAS 30 MAINTAINING YOUR SYSTEM 31 MONITOR...31 CAMERAS...31 Troubleshooting 32 Specifications 33 MONITOR...33 General...33 Monitor...33 CAMERA...34 General...34 Camera...34 One-Year Limited Warranty 36
USING THE INTERCOM...28 VIEWING LIVE VIDEO...28 Viewing On Your TV...28 Viewing On Your Computer...28 Viewing on Your Wireless Device or Remote Computer 29 PAIRING ACCESSORY CAMERAS 30 MAINTAINING YOUR SYSTEM 31 MONITOR...31 CAMERAS...31 Troubleshooting 32 Specifications 33 MONITOR...33 General...33 Monitor...33 CAMERA...34 General...34 Camera...34 One-Year Limited Warranty 36
English Owner's Manual
Page 5
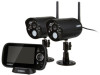
...Overview. It also provides a list of each screen and how it is set it from your box and how to set up to 4 cameras total (additional cameras sold separately) •• Simultaneous Quad view •• Digital zoom, pan, and tilt •• Schedule recording setting •&#...8482; and access it up to 4.5 hours) •• Up to keep your equipment's function keys in the next section. •• Uniden UDR444 Screen Descriptions. It also lists the system's features. •• Getting Started. Here you will support up to microSD card (4GB microSD card...
...Overview. It also provides a list of each screen and how it is set it from your box and how to set up to 4 cameras total (additional cameras sold separately) •• Simultaneous Quad view •• Digital zoom, pan, and tilt •• Schedule recording setting •&#...8482; and access it up to 4.5 hours) •• Up to keep your equipment's function keys in the next section. •• Uniden UDR444 Screen Descriptions. It also lists the system's features. •• Getting Started. Here you will support up to microSD card (4GB microSD card...
English Owner's Manual
Page 6
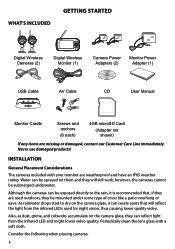
...with your monitor are missing or damaged, contact our Customer Care Line immediately. INSTALLATION General Placement Considerations The cameras included with a soft cloth. Although the cameras can reflect light from the infrared LEDs used outdoors, they can be submerged underwater. WHAT'S INCLUDED GETTING ... 4GB microSD Card (Adapter not shown) If any items are weatherproof and have an IP65 weather rating. Consider the following when placing cameras: 6 As rainwater drops start to the rain, it can create spots that , if they are used for night vision, thus causing...
...with your monitor are missing or damaged, contact our Customer Care Line immediately. INSTALLATION General Placement Considerations The cameras included with a soft cloth. Although the cameras can reflect light from the infrared LEDs used outdoors, they can be submerged underwater. WHAT'S INCLUDED GETTING ... 4GB microSD Card (Adapter not shown) If any items are weatherproof and have an IP65 weather rating. Consider the following when placing cameras: 6 As rainwater drops start to the rain, it can create spots that , if they are used for night vision, thus causing...
English Owner's Manual
Page 7
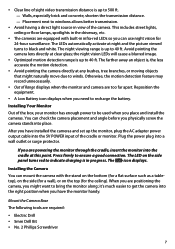
...lamps, spotlights in progress. The farther away an object is, the less accurate the motion detection. •• Avoid pointing the camera directly at clear glass; Walls, especially brick and concrete, shorten the transmission distance. -- Otherwise, the motion detection feature may record ...unnecessarily. •• Out of Range displays when the monitor and camera are required: •• Electric Drill •• 5mm Drill Bit •• No. 2 Phillips Screwdriver 7 Plug the power...
...lamps, spotlights in progress. The farther away an object is, the less accurate the motion detection. •• Avoid pointing the camera directly at clear glass; Walls, especially brick and concrete, shorten the transmission distance. -- Otherwise, the motion detection feature may record ...unnecessarily. •• Out of Range displays when the monitor and camera are required: •• Electric Drill •• 5mm Drill Bit •• No. 2 Phillips Screwdriver 7 Plug the power...
English Owner's Manual
Page 8
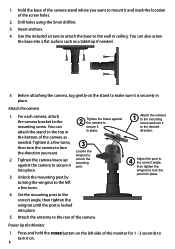
..., then tighten the wingnut until the post is securely in place. Unlock the mounting post by turning the wingnut to the left side of the camera as a tabletop if needed . 1. Drill holes using the 5mm drill bit. 3. into place. 5. You can attach the stand to the top or 2... Tighten the brace against the camera to turn it in place. the bottom of the monitor for 1 - 2 seconds to secure it mounting post. Tighten it to the desired direction. 4 Adjust...
..., then tighten the wingnut until the post is securely in place. Unlock the mounting post by turning the wingnut to the left side of the camera as a tabletop if needed . 1. Drill holes using the 5mm drill bit. 3. into place. 5. You can attach the stand to the top or 2... Tighten the brace against the camera to turn it in place. the bottom of the monitor for 1 - 2 seconds to secure it mounting post. Tighten it to the desired direction. 4 Adjust...
English Owner's Manual
Page 9
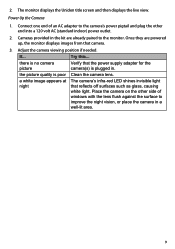
... adapter for the camera(s) is poor Clean the camera lens. Place the camera on the other end into a 120 volt AC (standard indoor) power outlet. 2. Cameras provided in a well-lit area. 9 Adjust the camera viewing position if needed. 2. The monitor displays the Uniden title screen and... then displays the live view. Power Up the Camera 1. Once they are already paired to improve the night...
... adapter for the camera(s) is poor Clean the camera lens. Place the camera on the other end into a 120 volt AC (standard indoor) power outlet. 2. Cameras provided in a well-lit area. 9 Adjust the camera viewing position if needed. 2. The monitor displays the Uniden title screen and... then displays the live view. Power Up the Camera 1. Once they are already paired to improve the night...
English Owner's Manual
Page 10
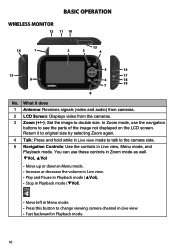
You can use the navigation buttons to double size. Return it does 1 Antenna: Receives signals (video and audio) from cameras. 2 LCD Screen: Displays video from the cameras. 3 Zoom (+/−): Set the image to see the parts of the image not displayed on the LCD screen. In Zoom mode,... Pause in Playback mode (▲Vol). • Stop in Playback mode (▼Vol). • Move left in Menu mode. • Press this button to the camera side. 5 Navigation Controls: Use the controls in Playback mode. 10 BASIC OPERATION WIRELESS Monitor 12 11 10 14 1 13 2 3 4 15 9 5 16 17 6 ...
You can use the navigation buttons to double size. Return it does 1 Antenna: Receives signals (video and audio) from cameras. 2 LCD Screen: Displays video from the cameras. 3 Zoom (+/−): Set the image to see the parts of the image not displayed on the LCD screen. In Zoom mode,... Pause in Playback mode (▲Vol). • Stop in Playback mode (▼Vol). • Move left in Menu mode. • Press this button to the camera side. 5 Navigation Controls: Use the controls in Playback mode. 10 BASIC OPERATION WIRELESS Monitor 12 11 10 14 1 13 2 3 4 15 9 5 16 17 6 ...
English Owner's Manual
Page 11
... good • Flashing = Low battery 10 Monitor Stand: Built-in stand for when monitor is not in cradle. 11 Speaker: Output sound received from camera. 12 Reset Button: Insert a blunt thin object (such as an unbent paper clip) into the reset button hole on the back of the monitor. ... Battery is fully charged. • Orange = Battery is almost charged. • Red = Battery is not in Playback mode. Menu/OK • Press to access the UDR444 menu. • Confirm selections in Menu mode. 6 Back: Press this button to power the monitor and/or charge the monitor battery (when the monitor is...
... good • Flashing = Low battery 10 Monitor Stand: Built-in stand for when monitor is not in cradle. 11 Speaker: Output sound received from camera. 12 Reset Button: Insert a blunt thin object (such as an unbent paper clip) into the reset button hole on the back of the monitor. ... Battery is fully charged. • Orange = Battery is almost charged. • Red = Battery is not in Playback mode. Menu/OK • Press to access the UDR444 menu. • Confirm selections in Menu mode. 6 Back: Press this button to power the monitor and/or charge the monitor battery (when the monitor is...
English Owner's Manual
Page 12
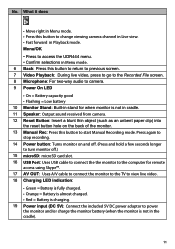
...activate IR LEDs for night vision. 3 Microphone: Receives sounds from the area near the camera. 4 PIR sensor: Detects motion within camera's line of sight. 5 Camera Lens: Mechanism through which the cameras view surroundings and record images. 6 Infrared LED: Infrared LEDs provide viewing in no/...low light conditions. PIR sensor: Detects motion within camera's line of sight. 7 Pair: Press this button to pair the camera to the monitor. 8 Camera stand: Connects to the camera to allow multiple mounting positions. 9 Speaker: Transmits sound from the monitor (intercom...
...activate IR LEDs for night vision. 3 Microphone: Receives sounds from the area near the camera. 4 PIR sensor: Detects motion within camera's line of sight. 5 Camera Lens: Mechanism through which the cameras view surroundings and record images. 6 Infrared LED: Infrared LEDs provide viewing in no/...low light conditions. PIR sensor: Detects motion within camera's line of sight. 7 Pair: Press this button to pair the camera to the monitor. 8 Camera stand: Connects to the camera to allow multiple mounting positions. 9 Speaker: Transmits sound from the monitor (intercom...
English Owner's Manual
Page 13
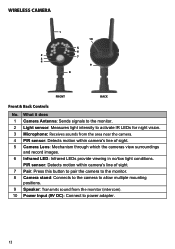
...full. 4 New Record indicator: Displays and flashes when a new recorded file is available. 5 Overwrite indicator: Choose Yes to switch between available cameras. 3 MicroSD Card indicator: Displays if there is turned off. 8 Battery: Indicates the amount of Range 2 Channel indicator: Displays the current ...channel number. The icon flickers when charging is charging. What it does 1 Signal Indicator: Shows the camera's signal strength. The icon displays when the battery is nearly complete. 13 This means the video monitor will overwrite old video files...
...full. 4 New Record indicator: Displays and flashes when a new recorded file is available. 5 Overwrite indicator: Choose Yes to switch between available cameras. 3 MicroSD Card indicator: Displays if there is turned off. 8 Battery: Indicates the amount of Range 2 Channel indicator: Displays the current ...channel number. The icon flickers when charging is charging. What it does 1 Signal Indicator: Shows the camera's signal strength. The icon displays when the battery is nearly complete. 13 This means the video monitor will overwrite old video files...
English Owner's Manual
Page 14
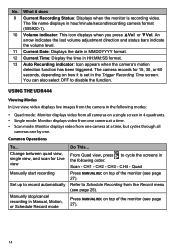
...when the monitor is set in hour/minute/second/recording camera format (055920-1). 10 Volume indicator: This icon displays when you press ▲Vol or ▼Vol. USING THE UDR444 Viewing Modes In Live view, video displays live images from the camera in the following order: Scan - No. The file ...name displays in the Trigger Recording Time screen. CH2 - The camera records for Live view Manually start recording Set up ...
...when the monitor is set in hour/minute/second/recording camera format (055920-1). 10 Volume indicator: This icon displays when you press ▲Vol or ▼Vol. USING THE UDR444 Viewing Modes In Live view, video displays live images from the camera in the following order: Scan - No. The file ...name displays in the Trigger Recording Time screen. CH2 - The camera records for Live view Manually start recording Set up ...

English Owner's Manual
Page 15
...TV: Use the AV cable to connect the monitor to Off (see live video. (See page 29 for details. To view on PC: Place the UDR444's microSD card in an adapter. 2. Be sure both your PC. 3. See page 27 for details.) 1. Select Record/Schedule Record. 2. When that... to turn that destination. Press ▲Vol (increase volume) or ▼Vol (decrease volume) when viewing a camera. 2. Manually cancel a Scheduled Record Playing back a recording on the UDR444 monitor Cancel watching a recorded video Watching recorded video on your computer and play the files from the card itself or...
...TV: Use the AV cable to connect the monitor to Off (see live video. (See page 29 for details. To view on PC: Place the UDR444's microSD card in an adapter. 2. Be sure both your PC. 3. See page 27 for details.) 1. Select Record/Schedule Record. 2. When that... to turn that destination. Press ▲Vol (increase volume) or ▼Vol (decrease volume) when viewing a camera. 2. Manually cancel a Scheduled Record Playing back a recording on the UDR444 monitor Cancel watching a recorded video Watching recorded video on your computer and play the files from the card itself or...
English Owner's Manual
Page 17
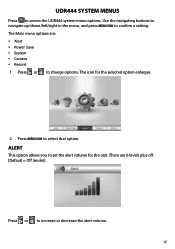
... MENU/OK to change options. The icon for the unit. There are : •• Alert •• Power Save •• System •• Camera •• Record 1. The Main menu options are 6 levels plus off. [Default = Off (mute)]. ALERT This option allows you to increase or decrease the ...alert volume. 17 Press or to set the alert volume for the selected option enlarges. 2. UDR444 SYSTEM MENUS Press to confirm a setting. Use the navigating buttons to navigate up/down/left/right in the menu, and press MENU/OK to ...
... MENU/OK to change options. The icon for the unit. There are : •• Alert •• Power Save •• System •• Camera •• Record 1. The Main menu options are 6 levels plus off. [Default = Off (mute)]. ALERT This option allows you to increase or decrease the ...alert volume. 17 Press or to set the alert volume for the selected option enlarges. 2. UDR444 SYSTEM MENUS Press to confirm a setting. Use the navigating buttons to navigate up/down/left/right in the menu, and press MENU/OK to ...
English Owner's Manual
Page 21
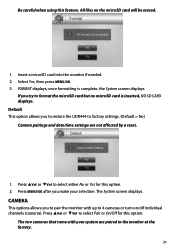
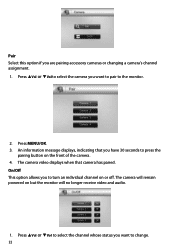
... this option. 2. The System screen displays. Press ▲Vol or ▼Vol to pair the monitor with your selection. CAMERA This options allows you to restore the UDR444 to factory settings. (Default = No) Camera pairings and date/time settings are paired to select Pair or On/Off for this option. Press ▲Vol...
... this option. 2. The System screen displays. Press ▲Vol or ▼Vol to pair the monitor with your selection. CAMERA This options allows you to restore the UDR444 to factory settings. (Default = No) Camera pairings and date/time settings are paired to select Pair or On/Off for this option. Press ▲Vol...
English Owner's Manual
Page 22
... or ▼Vol to select the channel whose status you want to pair to the monitor. 2. Press ▲Vol or ▼Vol to select the camera you are pairing accessory cameras or changing a camera's channel assignment. 1. The camera video displays when that you to turn an individual channel on or off. The... camera will remain powered on the front of the camera. 4. Press MENU/OK. 3. On/Off This option allows you have 30 seconds to press the pairing button on but the monitor will no longer receive ...
... or ▼Vol to select the channel whose status you want to pair to the monitor. 2. Press ▲Vol or ▼Vol to select the camera you are pairing accessory cameras or changing a camera's channel assignment. 1. The camera video displays when that you to turn an individual channel on or off. The... camera will remain powered on the front of the camera. 4. Press MENU/OK. 3. On/Off This option allows you have 30 seconds to press the pairing button on but the monitor will no longer receive ...
English Owner's Manual
Page 23
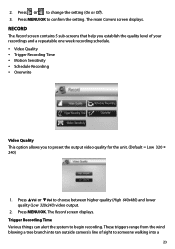
The Record screen displays. Press MENU/OK to someone walking into tan outside camera's line of your recordings and a repeatable one week recording schedule. •• Video Quality •• Trigger Recording Time •• Motion Sensitivity •• ...) and lower quality (Low 320x240) video output. 2. Press ▲Vol or ▼Vol to change the setting (On or Off). 3. Press MENU/OK. The main Camera screen displays. Trigger Recording Time Various things can alert the system to preset the output video quality for the unit. (Default = Low 320 × 240...
The Record screen displays. Press MENU/OK to someone walking into tan outside camera's line of your recordings and a repeatable one week recording schedule. •• Video Quality •• Trigger Recording Time •• Motion Sensitivity •• ...) and lower quality (Low 320x240) video output. 2. Press ▲Vol or ▼Vol to change the setting (On or Off). 3. Press MENU/OK. The main Camera screen displays. Trigger Recording Time Various things can alert the system to preset the output video quality for the unit. (Default = Low 320 × 240...
English Owner's Manual
Page 24
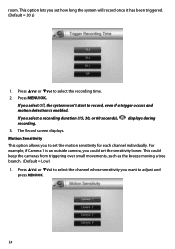
... enabled. If you want to record, even if a trigger occurs and motion detection is an outside camera, you select a recording duration (15, 30, or 60 seconds), recording. displays during 3. This could set the sensitivity lower. Press ▲Vol or ▼Vol... the motion sensitivity for each channel individually. room. Press MENU/OK. This option lets you to select the recording time. 2. If you could keep the cameras from triggering over small movements, such as the breeze moving a tree branch. (Default = Low) 1. The Record screen displays. Press ▲Vol or ▼...
... enabled. If you want to record, even if a trigger occurs and motion detection is an outside camera, you select a recording duration (15, 30, or 60 seconds), recording. displays during 3. This could set the sensitivity lower. Press ▲Vol or ▼Vol... the motion sensitivity for each channel individually. room. Press MENU/OK. This option lets you to select the recording time. 2. If you could keep the cameras from triggering over small movements, such as the breeze moving a tree branch. (Default = Low) 1. The Record screen displays. Press ▲Vol or ▼...

English Owner's Manual
Page 25
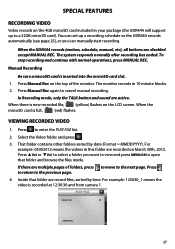
...3. Using ▲Vol or ▼Vol , scroll to record your selection. After you change it. The Schedule Recording screen displays. 25 The camera's sensitivity levels display on or off that day displays. 2. Schedule Recording This option allows you can also set to set the recording schedule for ...PM) until you set each selection to move to set Start Recording Time - The Motion Sensitivity screen displays again. For example, if you have camera 1 set that evening, you to select On or Off. 4. Press after each day separately, and you can turn on the next screen. ...
...3. Using ▲Vol or ▼Vol , scroll to record your selection. After you change it. The Schedule Recording screen displays. 25 The camera's sensitivity levels display on or off that day displays. 2. Schedule Recording This option allows you can also set to set the recording schedule for ...PM) until you set each selection to move to set Start Recording Time - The Motion Sensitivity screen displays again. For example, if you have camera 1 set that evening, you to select On or Off. 4. Press after each day separately, and you can turn on the next screen. ...
English Owner's Manual
Page 27
...:30:30 and from camera 1. 27 Select the Video folder and press . 3. You can manually start recording. The monitor records in this folder are multiple pages of the monitor. For example: 03302012 means the videos in 10 minute blocks. 2. Press to return to a 32GB microSD card). When the UDR444 records (motion, schedule...
...:30:30 and from camera 1. 27 Select the Video folder and press . 3. You can manually start recording. The monitor records in this folder are multiple pages of the monitor. For example: 03302012 means the videos in 10 minute blocks. 2. Press to return to a 32GB microSD card). When the UDR444 records (motion, schedule...


