
English Owners Manual
Page 1
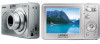
INSTRUCTION MANUAL Digital Camera UDC-7M Congratulations on your purchase of the Uniden UDC-7M Digital Camera. • Please be sure to read this Instruction Manual before you begin using your camera. • Save this manual for future reference. • Review the separate booklet "SAFETY MANUAL" before operating your camera.
INSTRUCTION MANUAL Digital Camera UDC-7M Congratulations on your purchase of the Uniden UDC-7M Digital Camera. • Please be sure to read this Instruction Manual before you begin using your camera. • Save this manual for future reference. • Review the separate booklet "SAFETY MANUAL" before operating your camera.
English Owners Manual
Page 4
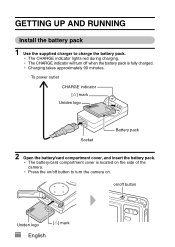
... when the battery pack is located on /off button Uniden logo iii English [o] mark h The battery/card compartment cover is fully charged. h Charging takes approximately 90 minutes. h The CHARGE indicator will turn the camera on /off button to charge the battery pack. To... power outlet CHARGE indicator [o] mark Uniden logo Socket Battery pack 2 Open the battery/card compartment cover, and insert the battery pack....
... when the battery pack is located on /off button Uniden logo iii English [o] mark h The battery/card compartment cover is fully charged. h Charging takes approximately 90 minutes. h The CHARGE indicator will turn the camera on /off button to charge the battery pack. To... power outlet CHARGE indicator [o] mark Uniden logo Socket Battery pack 2 Open the battery/card compartment cover, and insert the battery pack....
English Owners Manual
Page 6
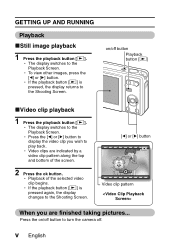
on /off button to the Shooting Screen. h If the playback button [=] is pressed, the display returns to turn the camera off button Playback button [=] kVideo clip playback 1 Press the playback button [=]. GETTING UP AND RUNNING Playback kStill image playback 1 Press the playback button [=]. h Playback of ...
on /off button to the Shooting Screen. h If the playback button [=] is pressed, the display returns to turn the camera off button Playback button [=] kVideo clip playback 1 Press the playback button [=]. GETTING UP AND RUNNING Playback kStill image playback 1 Press the playback button [=]. h Playback of ...

English Owners Manual
Page 7
... MAP 10 „ SETUP PARTS NAMES 11 CHARGING THE BATTERY PACK 13 INSTALL THE BATTERY PACK AND CARD 16 TURNING THE CAMERA ON AND OFF 18 DATE AND TIME SETTING 20 „ BASIC OPERATION BEFORE TAKING PICTURES 23 CAPTURING AND PLAYING BACK STILL IMAGES 30 SHOOTING SEQUENTIAL ...
... MAP 10 „ SETUP PARTS NAMES 11 CHARGING THE BATTERY PACK 13 INSTALL THE BATTERY PACK AND CARD 16 TURNING THE CAMERA ON AND OFF 18 DATE AND TIME SETTING 20 „ BASIC OPERATION BEFORE TAKING PICTURES 23 CAPTURING AND PLAYING BACK STILL IMAGES 30 SHOOTING SEQUENTIAL ...
English Owners Manual
Page 8
RESET FUNCTION 88 INITIALIZING THE CARD MEMORY AND INTERNAL MEMORY .......91 RESETTING THE CAMERA SETTINGS 93 CHECKING THE REMAINING INTERNAL MEMORY AND CARD MEMORY 94 CHECKING THE REMAINING BATTERY CHARGE 96 „ OTHER DEVICES AND CONNECTIONS CONNECTING TO A TV ...
RESET FUNCTION 88 INITIALIZING THE CARD MEMORY AND INTERNAL MEMORY .......91 RESETTING THE CAMERA SETTINGS 93 CHECKING THE REMAINING INTERNAL MEMORY AND CARD MEMORY 94 CHECKING THE REMAINING BATTERY CHARGE 96 „ OTHER DEVICES AND CONNECTIONS CONNECTING TO A TV ...

English Owners Manual
Page 9
..." on page 30 • "SHOOTING SEQUENTIAL SHOTS" on page 37 Log the date and time of convenient features and functions. QUICK SEARCH BY OPERATION Your camera has an abundance of your purposes in on the subject • "USING THE ZOOM" on page 46 Close-up photography • "FOCUS RANGE" (macro mode...
..." on page 30 • "SHOOTING SEQUENTIAL SHOTS" on page 37 Log the date and time of convenient features and functions. QUICK SEARCH BY OPERATION Your camera has an abundance of your purposes in on the subject • "USING THE ZOOM" on page 46 Close-up photography • "FOCUS RANGE" (macro mode...

English Owners Manual
Page 10
... "FLASH SETTING" on page 47 • "USING THE SCENE FUNCTION" (night view portrait mode/fireworks mode/lamp mode) on page 42 Increase the camera's sensitivity • "ISO SENSITIVITY" on page 60 Photographing people • "USING THE SCENE FUNCTION" (portrait mode/night view portrait mode/face chaser mode...42 Take a self-photo • "SELF-TIMER" on page 49 Make images lighter or darker • "EXPOSURE CORRECTION" on page 62 Adjust the camera's sensitivity • "ISO SENSITIVITY" on page 60 Change the color of the images • "USING THE SCENE FUNCTION" (monochrome/sepia) on page...
... "FLASH SETTING" on page 47 • "USING THE SCENE FUNCTION" (night view portrait mode/fireworks mode/lamp mode) on page 42 Increase the camera's sensitivity • "ISO SENSITIVITY" on page 60 Photographing people • "USING THE SCENE FUNCTION" (portrait mode/night view portrait mode/face chaser mode...42 Take a self-photo • "SELF-TIMER" on page 49 Make images lighter or darker • "EXPOSURE CORRECTION" on page 62 Adjust the camera's sensitivity • "ISO SENSITIVITY" on page 60 Change the color of the images • "USING THE SCENE FUNCTION" (monochrome/sepia) on page...
English Owners Manual
Page 13
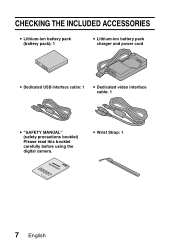
i Wrist Strap: 1 7 English CHECKING THE INCLUDED ACCESSORIES i Lithium-ion battery pack (battery pack): 1 i Lithium-ion battery pack charger and power cord i Dedicated USB interface cable: 1 i Dedicated video interface cable: 1 i "SAFETY MANUAL" (safety precautions booklet) Please read this booklet carefully before using the digital camera.
i Wrist Strap: 1 7 English CHECKING THE INCLUDED ACCESSORIES i Lithium-ion battery pack (battery pack): 1 i Lithium-ion battery pack charger and power cord i Dedicated USB interface cable: 1 i Dedicated video interface cable: 1 i "SAFETY MANUAL" (safety precautions booklet) Please read this booklet carefully before using the digital camera.

English Owners Manual
Page 14
i The cards in the illustrations in this manual are SD Memory Cards, but all installation and removal procedures are referred to as "card". English 8 Attaching the handstrap Media cards that can be used with this camera The types of card that can be inserted into and used with this camera are: i SD Memory Card i Multi Media Card What "card" means in this manual i In this manual, SD Memory Cards and Multi Media Cards that can be used in this digital camera are the same for both SD Memory Cards and Multi Media Cards.
i The cards in the illustrations in this manual are SD Memory Cards, but all installation and removal procedures are referred to as "card". English 8 Attaching the handstrap Media cards that can be used with this camera The types of card that can be inserted into and used with this camera are: i SD Memory Card i Multi Media Card What "card" means in this manual i In this manual, SD Memory Cards and Multi Media Cards that can be used in this digital camera are the same for both SD Memory Cards and Multi Media Cards.
English Owners Manual
Page 15
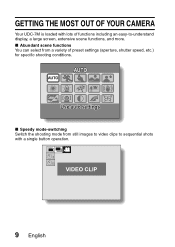
k Abundant scene functions You can select from a variety of preset settings (aperture, shutter speed, etc.) for specific shooting conditions. 12 AUTO 9 Use auto settings k Speedy mode-switching Switch the shooting mode from still images to video clips to sequential shots with lots of functions including an easy-to-understand display, a large screen, extensive scene functions, and more. GETTING THE MOST OUT OF YOUR CAMERA Your UDC-7M is loaded with a single button operation. VIDEO CLIP 9 English
k Abundant scene functions You can select from a variety of preset settings (aperture, shutter speed, etc.) for specific shooting conditions. 12 AUTO 9 Use auto settings k Speedy mode-switching Switch the shooting mode from still images to video clips to sequential shots with lots of functions including an easy-to-understand display, a large screen, extensive scene functions, and more. GETTING THE MOST OUT OF YOUR CAMERA Your UDC-7M is loaded with a single button operation. VIDEO CLIP 9 English

English Owners Manual
Page 16
... the computer's hard disk. You can connect it to a printer for example, copy your photos. Or take the card to a photo shop to have your camera to a computer, printer or TV. Internet Computer Dedicated USB interface cable Printer Dedicated video interface TV cable Battery charger (supplied) Commercially available SD Memory Card...
... the computer's hard disk. You can connect it to a printer for example, copy your photos. Or take the card to a photo shop to have your camera to a computer, printer or TV. Internet Computer Dedicated USB interface cable Printer Dedicated video interface TV cable Battery charger (supplied) Commercially available SD Memory Card...

English Owners Manual
Page 20
... further away from the TV or radio. i When the battery pack temperature is normal and does not indicate a malfunction. If there is interference to your camera. RECHARGING THE BATTERY PACK Be sure to fully charge the supplied battery pack before using it in the following cases i A battery pack which has not...
... further away from the TV or radio. i When the battery pack temperature is normal and does not indicate a malfunction. If there is interference to your camera. RECHARGING THE BATTERY PACK Be sure to fully charge the supplied battery pack before using it in the following cases i A battery pack which has not...
English Owners Manual
Page 21
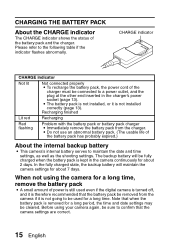
...Recharging finished Lit red Recharging Red flashing Problem with the battery pack or battery pack charger i Immediately remove the battery pack from the camera if it is therefore recommended that the battery pack be connected to a power outlet, and the plug at the other end inserted in the...must be removed from the charger. Please refer to maintain the date and time settings, as well as the shooting settings. Note that the camera settings are correct. 15 English CHARGE indicator CHARGE indicator Not lit Not connected properly i To recharge the battery pack, the power cord of ...
...Recharging finished Lit red Recharging Red flashing Problem with the battery pack or battery pack charger i Immediately remove the battery pack from the camera if it is therefore recommended that the battery pack be connected to a power outlet, and the plug at the other end inserted in the...must be removed from the charger. Please refer to maintain the date and time settings, as well as the shooting settings. Note that the camera settings are correct. 15 English CHARGE indicator CHARGE indicator Not lit Not connected properly i To recharge the battery pack, the power cord of ...

English Owners Manual
Page 22
... pack, be used after it clicks. INSTALL THE BATTERY PACK AND CARD 1 Insert the battery pack and card. h The card can be careful of the camera. 2 3 Uniden logo [o] mark Insert the battery pack. 4 Contact end Insert all the way until it has been formatted with the...
... pack, be used after it clicks. INSTALL THE BATTERY PACK AND CARD 1 Insert the battery pack and card. h The card can be careful of the camera. 2 3 Uniden logo [o] mark Insert the battery pack. 4 Contact end Insert all the way until it has been formatted with the...
English Owners Manual
Page 23
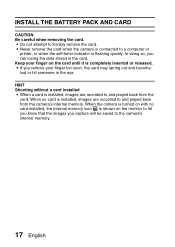
INSTALL THE BATTERY PACK AND CARD CAUTION Be careful when removing the card. i Never remove the card when the camera is completely inserted or released. When the camera is turned on with no card is flashing quickly. Keep your finger too soon, the card may spring out and become lost or hit someone... the card. When no card installed, the internal memory icon is shown on the card until it is connected to and played back from the camera's internal memory. In doing so, you remove your finger on the monitor to let you know that the images you capture will be saved to...
INSTALL THE BATTERY PACK AND CARD CAUTION Be careful when removing the card. i Never remove the card when the camera is completely inserted or released. When the camera is turned on with no card is flashing quickly. Keep your finger too soon, the card may spring out and become lost or hit someone... the card. When no card installed, the internal memory icon is shown on the card until it is connected to and played back from the camera's internal memory. In doing so, you remove your finger on the monitor to let you know that the images you capture will be saved to...

English Owners Manual
Page 24
h The camera turns on /off button is pressed, the camera turns off. h The camera turns off button In the playback mode 1 Press the playback button [=] for at least one second. h When the playback button [=] or on in the shooting mode that was active before it was last turned off. Monitor Playback button [=] Turning off the camera 1 Press the on /off button. TURNING THE CAMERA ON AND OFF Turning on the camera In the shooting mode 1 Press the on /off button. h The Playback Screen appears on . h The camera turns on the monitor (pages 32 and 39). on/off . English 18
h The camera turns on /off button is pressed, the camera turns off. h The camera turns off button In the playback mode 1 Press the playback button [=] for at least one second. h When the playback button [=] or on in the shooting mode that was active before it was last turned off. Monitor Playback button [=] Turning off the camera 1 Press the on /off button. TURNING THE CAMERA ON AND OFF Turning on the camera In the shooting mode 1 Press the on /off button. h The Playback Screen appears on . h The camera turns on the monitor (pages 32 and 39). on/off . English 18

English Owners Manual
Page 25
...about 3 minutes during shooting or about 12 hours. i When a picture is taken, the date and time it was captured is disabled, and the camera turns off (page 87). i If the auto power save function is recorded with the image because the date and time have the date and time... recorded with images, please make this setting before the camera automatically turns off after a certain period of inactivity (about 1 minute during playback [factory default settings]). When the date and time cannot be ...
...about 3 minutes during shooting or about 12 hours. i When a picture is taken, the date and time it was captured is disabled, and the camera turns off (page 87). i If the auto power save function is recorded with the image because the date and time have the date and time... recorded with images, please make this setting before the camera automatically turns off after a certain period of inactivity (about 1 minute during playback [factory default settings]). When the date and time cannot be ...
English Owners Manual
Page 26
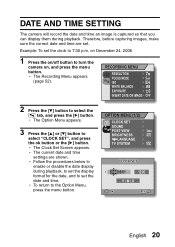
... , and press the menu button. RECORDING MENU RESOLUTION FOCUS MODE ISO WHITE BALANCE EXPOSURE INSERT DATE ON IMAGE OFF 2 Press the [o] button to turn the camera on /off button to select the 3 tab, and press the [m] button. h Follow the procedures below to enable or disable the date display during playback. .... 3 Press the [n] or [o] button to the Option Menu, press the menu button. h The Recording Menu appears (page 52). DATE AND TIME SETTING The camera will record the date and time an image is captured so that you can display them during playback, to set the display format for the...
... , and press the menu button. RECORDING MENU RESOLUTION FOCUS MODE ISO WHITE BALANCE EXPOSURE INSERT DATE ON IMAGE OFF 2 Press the [o] button to turn the camera on /off button to select the 3 tab, and press the [m] button. h Follow the procedures below to enable or disable the date display during playback. .... 3 Press the [n] or [o] button to the Option Menu, press the menu button. h The Recording Menu appears (page 52). DATE AND TIME SETTING The camera will record the date and time an image is captured so that you can display them during playback, to set the display format for the...

English Owners Manual
Page 29
HINT i Images captured in the still image shooting mode can be rotated when they are not blocked by your body and making sure the camera is stable. BASIC OPERATION BEFORE TAKING PICTURES How to hold A finger is blocking the lens or flash. Make sure that the lens and flash are played back (page 67). Correct hold Incorrect hold the camera Hold the camera securely, keeping your elbows close to waver, but this is operating, the image may appear to your fingers or the handstrap. i When the optical zoom is used or when the autofocus is not a malfunction. 23 English
HINT i Images captured in the still image shooting mode can be rotated when they are not blocked by your body and making sure the camera is stable. BASIC OPERATION BEFORE TAKING PICTURES How to hold A finger is blocking the lens or flash. Make sure that the lens and flash are played back (page 67). Correct hold Incorrect hold the camera Hold the camera securely, keeping your elbows close to waver, but this is operating, the image may appear to your fingers or the handstrap. i When the optical zoom is used or when the autofocus is not a malfunction. 23 English

English Owners Manual
Page 30
... the desired subject. i Subjects without vertical lines Use the focus-lock function to lock the focus while framing the subject vertically, then re-orient the camera to capture images (page 51). English 24 however, there are some of the image or dark subjects or locations Use the focus-lock function to...
... the desired subject. i Subjects without vertical lines Use the focus-lock function to lock the focus while framing the subject vertically, then re-orient the camera to capture images (page 51). English 24 however, there are some of the image or dark subjects or locations Use the focus-lock function to...


