
English Owners Manual
Page 7
... 13 INSTALL THE BATTERY PACK AND CARD 16 TURNING THE CAMERA ON AND OFF 18 DATE AND TIME SETTING 20 „ BASIC OPERATION BEFORE TAKING PICTURES 23 CAPTURING AND PLAYING BACK STILL IMAGES 30 SHOOTING SEQUENTIAL SHOTS 37 VIDEO CLIP RECORDING AND PLAYBACK 38 USING THE SCENE FUNCTION 42 USING THE ZOOM 46 FLASH SETTING 47 SELF-TIMER 49 FOCUS RANGE 51 „ SHOOTING ACCESSING THE RECORDING MENU 52 RESOLUTION/VIDEO SIZE SETTING 55 FOCUS AREA SETTING 58 ISO SENSITIVITY 60 WHITE BALANCE 61 EXPOSURE CORRECTION 62 DATE IMPRINT 63 1 English
... 13 INSTALL THE BATTERY PACK AND CARD 16 TURNING THE CAMERA ON AND OFF 18 DATE AND TIME SETTING 20 „ BASIC OPERATION BEFORE TAKING PICTURES 23 CAPTURING AND PLAYING BACK STILL IMAGES 30 SHOOTING SEQUENTIAL SHOTS 37 VIDEO CLIP RECORDING AND PLAYBACK 38 USING THE SCENE FUNCTION 42 USING THE ZOOM 46 FLASH SETTING 47 SELF-TIMER 49 FOCUS RANGE 51 „ SHOOTING ACCESSING THE RECORDING MENU 52 RESOLUTION/VIDEO SIZE SETTING 55 FOCUS AREA SETTING 58 ISO SENSITIVITY 60 WHITE BALANCE 61 EXPOSURE CORRECTION 62 DATE IMPRINT 63 1 English
English Owners Manual
Page 8
...; PLAYBACK DISPLAYING THE PLAYBACK MENU 64 IMAGE PROTECT 66 ROTATE IMAGE 67 CONTRAST CORRECTION 68 COPY DATA 70 PRINT SETTINGS 72 SLIDESHOW PLAYBACK 76 DISPLAYING STILL IMAGE PROPERTIES 77 „ OPTION DISPLAYING THE OPTION MENU 78 SOUNDS 81 POST-VIEW SETTING 83 ADJUST THE MONITOR BRIGHTNESS 84 SCREEN LANGUAGE 85 TV SYSTEM SETTING 86 AUTO POWER OFF FUNCTION 87 FILE No. RESET FUNCTION 88 INITIALIZING THE CARD MEMORY AND INTERNAL MEMORY .......91 RESETTING THE CAMERA SETTINGS 93 CHECKING THE REMAINING INTERNAL MEMORY AND CARD MEMORY 94 CHECKING THE REMAINING BATTERY CHARGE 96...
...; PLAYBACK DISPLAYING THE PLAYBACK MENU 64 IMAGE PROTECT 66 ROTATE IMAGE 67 CONTRAST CORRECTION 68 COPY DATA 70 PRINT SETTINGS 72 SLIDESHOW PLAYBACK 76 DISPLAYING STILL IMAGE PROPERTIES 77 „ OPTION DISPLAYING THE OPTION MENU 78 SOUNDS 81 POST-VIEW SETTING 83 ADJUST THE MONITOR BRIGHTNESS 84 SCREEN LANGUAGE 85 TV SYSTEM SETTING 86 AUTO POWER OFF FUNCTION 87 FILE No. RESET FUNCTION 88 INITIALIZING THE CARD MEMORY AND INTERNAL MEMORY .......91 RESETTING THE CAMERA SETTINGS 93 CHECKING THE REMAINING INTERNAL MEMORY AND CARD MEMORY 94 CHECKING THE REMAINING BATTERY CHARGE 96...

English Owners Manual
Page 9
... started shooting • "Recording a video clip" on page 38 • "Shooting single shots" on page 30 • "SHOOTING SEQUENTIAL SHOTS" on page 37 Log the date and time of convenient features and functions. From creating precisely the photo you want, to viewing images using various techniques, you can locate the exact operation for your photos • "DATE AND TIME SETTING" on page 20 Zoom in the following table. QUICK SEARCH BY OPERATION Your camera...
... started shooting • "Recording a video clip" on page 38 • "Shooting single shots" on page 30 • "SHOOTING SEQUENTIAL SHOTS" on page 37 Log the date and time of convenient features and functions. From creating precisely the photo you want, to viewing images using various techniques, you can locate the exact operation for your photos • "DATE AND TIME SETTING" on page 20 Zoom in the following table. QUICK SEARCH BY OPERATION Your camera...

English Owners Manual
Page 12
... 68 Copy files from the internal memory to the card, or vice versa • "COPY DATA" on page 70 Delete files • "Erasing files" on page 35 Protect images from accidental erasure • "IMAGE PROTECT" on page 66 Format a card • "INITIALIZING THE CARD MEMORY AND INTERNAL MEMORY" on page 91 Specify the number of prints and date imprint • "PRINT SETTINGS" on page 72 View the settings that were in effect when the image/audio data was recorded • "DISPLAYING STILL IMAGE...
... 68 Copy files from the internal memory to the card, or vice versa • "COPY DATA" on page 70 Delete files • "Erasing files" on page 35 Protect images from accidental erasure • "IMAGE PROTECT" on page 66 Format a card • "INITIALIZING THE CARD MEMORY AND INTERNAL MEMORY" on page 91 Specify the number of prints and date imprint • "PRINT SETTINGS" on page 72 View the settings that were in effect when the image/audio data was recorded • "DISPLAYING STILL IMAGE...
English Owners Manual
Page 21
... English Before using the camera for a long time, remove the battery pack i A small amount of the charger must be connected to a power outlet, and the plug at the other end inserted in the camera continuously for a long period, the time and date settings may be removed from the charger. CHARGE indicator CHARGE indicator Not lit Not connected properly i To recharge the battery pack, the power cord of power is still used even if the digital camera is turned off...
... English Before using the camera for a long time, remove the battery pack i A small amount of the charger must be connected to a power outlet, and the plug at the other end inserted in the camera continuously for a long period, the time and date settings may be removed from the charger. CHARGE indicator CHARGE indicator Not lit Not connected properly i To recharge the battery pack, the power cord of power is still used even if the digital camera is turned off...

English Owners Manual
Page 25
... furnished with the image because the date and time have the date and time recorded with it. i When a picture is taken, the date and time it back on. i If the auto power save function is disabled, and the camera turns off after about 3 minutes during shooting or about 12 hours. i When the camera is connected to a computer or printer using the dedicated USB interface cable, the auto power save function has operated to turn the camera off, press the on...
... furnished with the image because the date and time have the date and time recorded with it. i When a picture is taken, the date and time it back on. i If the auto power save function is disabled, and the camera turns off after about 3 minutes during shooting or about 12 hours. i When the camera is connected to a computer or printer using the dedicated USB interface cable, the auto power save function has operated to turn the camera off, press the on...
English Owners Manual
Page 26
... press the [m] button. RECORDING MENU RESOLUTION FOCUS MODE ISO WHITE BALANCE EXPOSURE INSERT DATE ON IMAGE OFF 2 Press the [o] button to select "CLOCK SET", and press the ok button or the [m] button. h To return to turn the camera on, and press the menu button. h The Recording Menu appears (page 52). OPTION MENU (1/2) CLOCK SET SOUND POST VIEW 3sec BRIGHTNESS LANGUAGE TV SYSTEM CLOCK SET 2006/09/01 12:00 Y / M / D OK OK English 20 h The Clock Set Screen appears. on December...
... press the [m] button. RECORDING MENU RESOLUTION FOCUS MODE ISO WHITE BALANCE EXPOSURE INSERT DATE ON IMAGE OFF 2 Press the [o] button to select "CLOCK SET", and press the ok button or the [m] button. h To return to turn the camera on, and press the menu button. h The Recording Menu appears (page 52). OPTION MENU (1/2) CLOCK SET SOUND POST VIEW 3sec BRIGHTNESS LANGUAGE TV SYSTEM CLOCK SET 2006/09/01 12:00 Y / M / D OK OK English 20 h The Clock Set Screen appears. on December...
English Owners Manual
Page 37
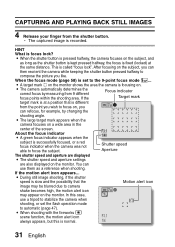
... aperture settings are also displayed on a wide area in the center of the screen. HINT What is slow and the possibility that is at the same distance. i During still image shooting, if the shutter speed is focus lock? i The camera automatically determines the correct focus by changing the shooting angle. i When shooting with the fireworks ^ scene function, the motion alert icon F3.1 always appears, but this case, use...
... aperture settings are also displayed on a wide area in the center of the screen. HINT What is slow and the possibility that is at the same distance. i During still image shooting, if the shutter speed is focus lock? i The camera automatically determines the correct focus by changing the shooting angle. i When shooting with the fireworks ^ scene function, the motion alert icon F3.1 always appears, but this case, use...

English Owners Manual
Page 41
... PLAYING BACK STILL IMAGES Erasing files You can erase the files one file at once. 1 To erase data from the camera's internal memory, remove the card before performing the delete procedure. 2 Set the camera to select "ALL FILES". 3 Press the ok button. To erase data from the card, perform the delete procedure with the card installed in the camera. DELETE ALL FILES 1 FILE OK DELETE Zoom I/O 3 Delete the files. 1 Use the [l] and [m] buttons to view the images and check if it is shown. 35 English h The Delete Screen appears. ALL FILES: Erases...
... PLAYING BACK STILL IMAGES Erasing files You can erase the files one file at once. 1 To erase data from the camera's internal memory, remove the card before performing the delete procedure. 2 Set the camera to select "ALL FILES". 3 Press the ok button. To erase data from the card, perform the delete procedure with the card installed in the camera. DELETE ALL FILES 1 FILE OK DELETE Zoom I/O 3 Delete the files. 1 Use the [l] and [m] buttons to view the images and check if it is shown. 35 English h The Delete Screen appears. ALL FILES: Erases...

English Owners Manual
Page 86
... factory-preset settings. i 7 through 0 are displayed. 6 [TV system setting] (page 86) h Select the type of TV signal that is output from the camera's A/V OUT terminal. 7 [Auto power off] (page 87) h Specify the time elapsed before the auto power off function operates to turn the camera off. 8 [File number reset] (page 88) h Set the file number reset function to ON or OFF. 9 [Format] (page 91) h Reformat the camera's internal memory or the card installed in the camera. 0 [Reset camera settings] (page 93) h Reset the camera...
... factory-preset settings. i 7 through 0 are displayed. 6 [TV system setting] (page 86) h Select the type of TV signal that is output from the camera's A/V OUT terminal. 7 [Auto power off] (page 87) h Specify the time elapsed before the auto power off function operates to turn the camera off. 8 [File number reset] (page 88) h Set the file number reset function to ON or OFF. 9 [Format] (page 91) h Reformat the camera's internal memory or the card installed in the camera. 0 [Reset camera settings] (page 93) h Reset the camera...

English Owners Manual
Page 94
RESET FUNCTION If a newly formatted (page 91) card is used , the file name (image number) of file names continues from 0001. This is because the file number reset function is replaced with the same numbers. File name (image number) Card A 0001, 0002 ......0012, 0013 Replace card Card B 0001, 0002 ......0012, 0013 Card A File name (image number) 0001, 0002 ......0012, 0013 Replace card Card B 0014, 0015 ....... 0025, 0026 English 88 FILE No. By setting the file number reset function to "OFF", even if the card is reformatted or the card is...
RESET FUNCTION If a newly formatted (page 91) card is used , the file name (image number) of file names continues from 0001. This is because the file number reset function is replaced with the same numbers. File name (image number) Card A 0001, 0002 ......0012, 0013 Replace card Card B 0001, 0002 ......0012, 0013 Card A File name (image number) 0001, 0002 ......0012, 0013 Replace card Card B 0014, 0015 ....... 0025, 0026 English 88 FILE No. By setting the file number reset function to "OFF", even if the card is reformatted or the card is...
English Owners Manual
Page 100
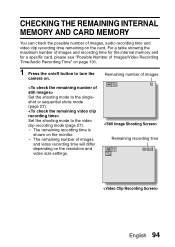
... shots mode (page 27). Remaining number of images and video recording time will differ depending on the resolution and video size settings. Set the shooting mode to the video clip recording mode (page 27). h The remaining number of images 12 Remaining recording time 00:00:25 English 94 For a table showing the maximum number of images and recording time for the internal memory and for a specific card, please see "Possible Number of images, audio recording time and video clip recording time remaining on the card. h The remaining recording time...
... shots mode (page 27). Remaining number of images and video recording time will differ depending on the resolution and video size settings. Set the shooting mode to the video clip recording mode (page 27). h The remaining number of images 12 Remaining recording time 00:00:25 English 94 For a table showing the maximum number of images and recording time for the internal memory and for a specific card, please see "Possible Number of images, audio recording time and video clip recording time remaining on the card. h The remaining recording time...

English Owners Manual
Page 103
... be saved on the Information Screen (page 77). The same is recommended for taking pictures at a wedding or while traveling, for example, the battery pack can also check the remaining battery pack charge on a fully charged battery pack will vary greatly. CHECKING THE REMAINING BATTERY CHARGE HINT i If any data is present, you don't miss capturing images of important moments due to use.) 97 English i Battery life...
... be saved on the Information Screen (page 77). The same is recommended for taking pictures at a wedding or while traveling, for example, the battery pack can also check the remaining battery pack charge on a fully charged battery pack will vary greatly. CHECKING THE REMAINING BATTERY CHARGE HINT i If any data is present, you don't miss capturing images of important moments due to use.) 97 English i Battery life...

English Owners Manual
Page 105
... files, first copy them to your camera not recognizing that data. Data file formats The format of data Data format File name structure Still image/ sequential shots data JPEG File name begins with UNI_. Extension is ".wav". Format all cards to a computer. Extension is ".wav". Operating environment Windows A computer with a standard-equipped USB port, and preinstalled with Mac OS 9.0, 9.1, 9.2, Mac OS X 10.1 or later is required. CONNECTING TO A COMPUTER The camera can be used by your camera...
... files, first copy them to your camera not recognizing that data. Data file formats The format of data Data format File name structure Still image/ sequential shots data JPEG File name begins with UNI_. Extension is ".wav". Format all cards to a computer. Extension is ".wav". Operating environment Windows A computer with a standard-equipped USB port, and preinstalled with Mac OS 9.0, 9.1, 9.2, Mac OS X 10.1 or later is required. CONNECTING TO A COMPUTER The camera can be used by your camera...

English Owners Manual
Page 106
....jpg UNI_0002.jpg UNI_0003.mov UNI_0004.wav UNI_0005.jpg Image number Image or audio data number UNI_9999.jpg * Up to 9,999 files can be downloaded free of folder numbers and file names continues from the Apple Computer website. i QuickTime can be stored in folder 100UNIDN. English 100 If more image or audio files are made, a folder named 101UNIDN is replaced, consecutive numbering of charge from the previously installed card (see page 92).
....jpg UNI_0002.jpg UNI_0003.mov UNI_0004.wav UNI_0005.jpg Image number Image or audio data number UNI_9999.jpg * Up to 9,999 files can be downloaded free of folder numbers and file names continues from the Apple Computer website. i QuickTime can be stored in folder 100UNIDN. English 100 If more image or audio files are made, a folder named 101UNIDN is replaced, consecutive numbering of charge from the previously installed card (see page 92).

English Owners Manual
Page 117
... support your camera's DPOF function. h Printing begins. CAUTION i Reserved images printing is not possible if a printer is used that is set to print (page 72) is pressed. i Multi-prints are not possible. 111 English Print the DPOF images? : : 1 PRINT HINT i In step 3, if you press the [l] or [m] button, you can confirm the images that are set to print. 1 Make the print settings (page 72), and complete the printing setup (page 106). 2 Press the menu button. DIRECT PRINTING To print...
... support your camera's DPOF function. h Printing begins. CAUTION i Reserved images printing is not possible if a printer is used that is set to print (page 72) is pressed. i Multi-prints are not possible. 111 English Print the DPOF images? : : 1 PRINT HINT i In step 3, if you press the [l] or [m] button, you can confirm the images that are set to print. 1 Make the print settings (page 72), and complete the printing setup (page 106). 2 Press the menu button. DIRECT PRINTING To print...

English Owners Manual
Page 118
... VALUES VALUES English 112 PAPER SIZE: Specify the size of paper used for printing. h The PictBridge Menu appears. 3 Select the printer settings tab v, and press the ok button. DATE STAMP: Print the date the photo was taken. h The Printer Settings Menu appears. QUALITY: Select the print quality for the images. LAYOUT: Specify how the images are printed according to be arranged on the paper. To change the printer settings and print images (change printer settings) Images are to settings specified by...
... VALUES VALUES English 112 PAPER SIZE: Specify the size of paper used for printing. h The PictBridge Menu appears. 3 Select the printer settings tab v, and press the ok button. DATE STAMP: Print the date the photo was taken. h The Printer Settings Menu appears. QUALITY: Select the print quality for the images. LAYOUT: Specify how the images are printed according to be arranged on the paper. To change the printer settings and print images (change printer settings) Images are to settings specified by...
English Owners Manual
Page 123
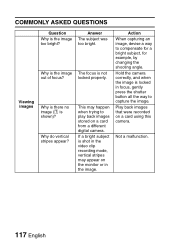
... to play back images stored on a card using this camera. Not a malfunction. 117 English The focus is shown)? Why is locked in focus, gently press the shutter button all the way to capture the image. Hold the camera correctly, and when the image is the image out of focus? If a bright subject is the image too bright? COMMONLY ASKED QUESTIONS Viewing images Question Why is shot in the video clip recording mode, vertical...
... to play back images stored on a card using this camera. Not a malfunction. 117 English The focus is shown)? Why is locked in focus, gently press the shutter button all the way to capture the image. Hold the camera correctly, and when the image is the image out of focus? If a bright subject is the image too bright? COMMONLY ASKED QUESTIONS Viewing images Question Why is shot in the video clip recording mode, vertical...

English Owners Manual
Page 127
.... Save the images to automatic flash mode or forced flash mode. TROUBLESHOOTING Shooting Problem An image is not captured when the shutter button is selected. Recharge the battery pack. The flash off mode is pressed. The battery pack is consumed. The battery pack is dead. Erase the images that can be captured or the maximum video clip recording time has been reached. Recharge the battery pack. Action Install a new card. The flash does not operate. Set the flash to...
.... Save the images to automatic flash mode or forced flash mode. TROUBLESHOOTING Shooting Problem An image is not captured when the shutter button is selected. Recharge the battery pack. The flash off mode is pressed. The battery pack is consumed. The battery pack is dead. Erase the images that can be captured or the maximum video clip recording time has been reached. Recharge the battery pack. Action Install a new card. The flash does not operate. Set the flash to...

English Owners Manual
Page 130
... 66 131 English 124 There is less than that indicated in the installed card or the internal memory. Action Capture the image using the forced flash mode. Play back after capturing images. Depending on the card, the capacity may be erased. The recording capacity is no image stored in the section "Possible Number of Images/Video Recording Time/Audio Recording Time". Hold the camera correctly, and make sure the lens is protected" message appears and the data cannot be...
... 66 131 English 124 There is less than that indicated in the installed card or the internal memory. Action Capture the image using the forced flash mode. Play back after capturing images. Depending on the card, the capacity may be erased. The recording capacity is no image stored in the section "Possible Number of Images/Video Recording Time/Audio Recording Time". Hold the camera correctly, and make sure the lens is protected" message appears and the data cannot be...


