
English Owners Manual
Page 13
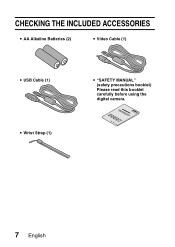
CHECKING THE INCLUDED ACCESSORIES i AA Alkaline Batteries (2) i Video Cable (1) i USB Cable (1) i Wrist Strap (1) i "SAFETY MANUAL" (safety precautions booklet) Please read this booklet carefully before using the digital camera. 7 English
CHECKING THE INCLUDED ACCESSORIES i AA Alkaline Batteries (2) i Video Cable (1) i USB Cable (1) i Wrist Strap (1) i "SAFETY MANUAL" (safety precautions booklet) Please read this booklet carefully before using the digital camera. 7 English
English Owners Manual
Page 17
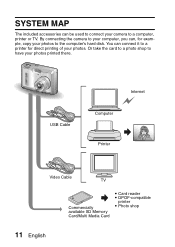
You can connect it to a printer for example, copy your photos. Or take the card to a photo shop to have your camera to a computer, printer or TV. By connecting the camera to your computer, you can, for direct printing of your photos to the computer's hard disk. USB Cable Internet Computer Printer Video Cable TV Commercially available SD Memory Card/Multi Media Card i Card reader i DPOF-compatible printer i Photo shop 11 English SYSTEM MAP The included accessories can be used to connect your photos printed there.
You can connect it to a printer for example, copy your photos. Or take the card to a photo shop to have your camera to a computer, printer or TV. By connecting the camera to your computer, you can, for direct printing of your photos to the computer's hard disk. USB Cable Internet Computer Printer Video Cable TV Commercially available SD Memory Card/Multi Media Card i Card reader i DPOF-compatible printer i Photo shop 11 English SYSTEM MAP The included accessories can be used to connect your photos printed there.
English Owners Manual
Page 24
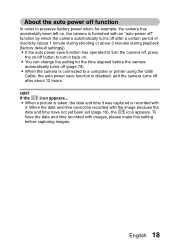
... turn the camera off, press the on/off (page 79). To have the date and time recorded with the image because the date and time have not yet been set (page 19), the K icon appears. About the auto power off function In order to a computer or printer using the USB Cable, the auto... power save function has operated to turn it . i You can change the setting for example, the camera has accidentally been left on . i If the auto power save function is furnished with it back...
... turn the camera off, press the on/off (page 79). To have the date and time recorded with the image because the date and time have not yet been set (page 19), the K icon appears. About the auto power off function In order to a computer or printer using the USB Cable, the auto... power save function has operated to turn it . i You can change the setting for example, the camera has accidentally been left on . i If the auto power save function is furnished with it back...
English Owners Manual
Page 96
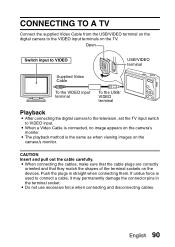
... Push the plugs in the terminal socket. CAUTION Insert and pull out the cable carefully. OTHER DEVICES AND CONNECTIONS CONNECTING TO A TV Connect the supplied Video Cable from the USB/VIDEO terminal on the digital camera to the VIDEO input terminals on the devices. i Do not use excessive ...match the shapes of the terminal sockets on the TV. Open USB/ VIDEO Switch input to VIDEO USB/VIDEO terminal Supplied Video Cable To the VIDEO input terminal To the USB/ VIDEO terminal Playback i After connecting the digital camera to the television, set the TV input switch to VIDEO input...
... Push the plugs in the terminal socket. CAUTION Insert and pull out the cable carefully. OTHER DEVICES AND CONNECTIONS CONNECTING TO A TV Connect the supplied Video Cable from the USB/VIDEO terminal on the digital camera to the VIDEO input terminals on the devices. i Do not use excessive ...match the shapes of the terminal sockets on the TV. Open USB/ VIDEO Switch input to VIDEO USB/VIDEO terminal Supplied Video Cable To the VIDEO input terminal To the USB/ VIDEO terminal Playback i After connecting the digital camera to the television, set the TV input switch to VIDEO input...
English Owners Manual
Page 99
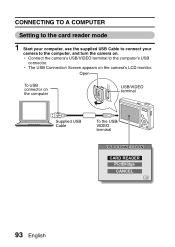
h The USB Connection Screen appears on the computer USB/VIDEO terminal Supplied USB Cable To the USB/ VIDEO terminal USB CONNECTION CARD READER PictBridge CANCEL 93 English h Connect the camera's USB/VIDEO terminal to the computer, and turn the camera on. Open To USB connector on the camera's LCD monitor. CONNECTING TO A COMPUTER Setting to the card reader mode 1 Start your computer, use the supplied USB Cable to connect your camera to the computer's USB connector.
h The USB Connection Screen appears on the computer USB/VIDEO terminal Supplied USB Cable To the USB/ VIDEO terminal USB CONNECTION CARD READER PictBridge CANCEL 93 English h Connect the camera's USB/VIDEO terminal to the computer, and turn the camera on. Open To USB connector on the camera's LCD monitor. CONNECTING TO A COMPUTER Setting to the card reader mode 1 Start your computer, use the supplied USB Cable to connect your camera to the computer's USB connector.

English Owners Manual
Page 104
... card containing the images you wish to print in the camera. 2 Turn the printer on, use the supplied USB Cable to connect the camera to the printer's USB connector. DIRECT PRINTING Your camera supports the PictBridge function. By connecting the camera directly to a PictBridge-enabled printer, the camera's monitor can be used to select images and initiate printing...
... card containing the images you wish to print in the camera. 2 Turn the printer on, use the supplied USB Cable to connect the camera to the printer's USB connector. DIRECT PRINTING Your camera supports the PictBridge function. By connecting the camera directly to a PictBridge-enabled printer, the camera's monitor can be used to select images and initiate printing...

English Owners Manual
Page 105
... are correctly oriented and that the remaining battery charge is connected, the camera may permanently damage the connector pins in straight when connecting them. If the camera does not operate correctly, disconnect the USB Cable, turn off while it may not operate correctly. i Make sure that they match the shapes of the terminal sockets...
... are correctly oriented and that the remaining battery charge is connected, the camera may permanently damage the connector pins in straight when connecting them. If the camera does not operate correctly, disconnect the USB Cable, turn off while it may not operate correctly. i Make sure that they match the shapes of the terminal sockets...


