

English Owners Manual
Page 7
Basic operation Convenient functions Additional functions Shooting/recording Getting started shooting • "Shooting still images" on page 29 • "Recording a video clip" on page 40 1 English From creating precisely the photo you want, to viewing images using various techniques, you can locate the exact operation for your photos • "DATE AND TIME SETTINGS" on page 19 • "DATE IMPRINTING ON STILL IMAGES" on page 57 Zoom in the following table. QUICK SEARCH BY OPERATION Your camera has an...
Basic operation Convenient functions Additional functions Shooting/recording Getting started shooting • "Shooting still images" on page 29 • "Recording a video clip" on page 40 1 English From creating precisely the photo you want, to viewing images using various techniques, you can locate the exact operation for your photos • "DATE AND TIME SETTINGS" on page 19 • "DATE IMPRINTING ON STILL IMAGES" on page 57 Zoom in the following table. QUICK SEARCH BY OPERATION Your camera has an...
English Owners Manual
Page 9
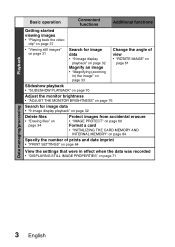
...; "ADJUST THE MONITOR BRIGHTNESS" on page 76 Search for image data • "9-image display playback" on page 32 Delete files • "Erasing files" on page 34 Protect images from accidental erasure • "IMAGE PROTECT" on page 60 Format a card • "INITIALIZING THE CARD MEMORY AND INTERNAL MEMORY" on page 84 Specify the number of prints and date imprint • "PRINT SETTINGS" on page 64 View the settings that were in effect when the data was recorded • "DISPLAYING STILL IMAGE PROPERTIES...
...; "ADJUST THE MONITOR BRIGHTNESS" on page 76 Search for image data • "9-image display playback" on page 32 Delete files • "Erasing files" on page 34 Protect images from accidental erasure • "IMAGE PROTECT" on page 60 Format a card • "INITIALIZING THE CARD MEMORY AND INTERNAL MEMORY" on page 84 Specify the number of prints and date imprint • "PRINT SETTINGS" on page 64 View the settings that were in effect when the data was recorded • "DISPLAYING STILL IMAGE PROPERTIES...

English Owners Manual
Page 10
... 12 INSTALLING THE BATTERIES AND CARD 14 TURNING THE CAMERA ON AND OFF 17 DATE AND TIME SETTINGS 19 „ BASIC OPERATION BEFORE TAKING PICTURES 22 CAPTURING AND PLAYING BACK STILL IMAGES 29 VIDEO CLIP RECORDING AND PLAYBACK 36 USING THE SCENE FUNCTION 40 USING THE ZOOM 42 FLASH SETTING 43 SELF-TIMER 45 FOCUS RANGE 47 „ SHOOTING ACCESSING THE RECORDING MENU 48 RESOLUTION/VIDEO CLIP SETTING 51 FOCUS AREA SETTING 52 ISO SENSITIVITY 53 WHITE BALANCE 54 EXPOSURE CORRECTION 56 DATE IMPRINTING ON STILL IMAGES 57 English 4
... 12 INSTALLING THE BATTERIES AND CARD 14 TURNING THE CAMERA ON AND OFF 17 DATE AND TIME SETTINGS 19 „ BASIC OPERATION BEFORE TAKING PICTURES 22 CAPTURING AND PLAYING BACK STILL IMAGES 29 VIDEO CLIP RECORDING AND PLAYBACK 36 USING THE SCENE FUNCTION 40 USING THE ZOOM 42 FLASH SETTING 43 SELF-TIMER 45 FOCUS RANGE 47 „ SHOOTING ACCESSING THE RECORDING MENU 48 RESOLUTION/VIDEO CLIP SETTING 51 FOCUS AREA SETTING 52 ISO SENSITIVITY 53 WHITE BALANCE 54 EXPOSURE CORRECTION 56 DATE IMPRINTING ON STILL IMAGES 57 English 4

English Owners Manual
Page 11
CONTENTS „ PLAYBACK DISPLAYING THE PLAYBACK MENU 58 IMAGE PROTECT 60 ROTATE IMAGE 61 COPY DATA 62 PRINT SETTINGS 64 SLIDESHOW PLAYBACK 70 DISPLAYING STILL IMAGE PROPERTIES 71 „ OPTIONS DISPLAYING THE OPTION MENU 72 POST-VIEW SETTING 75 ADJUST THE MONITOR BRIGHTNESS 76 SCREEN LANGUAGE 77 TV SYSTEM SETTING 78 AUTO POWER OFF FUNCTION 79 FILE No. RESET FUNCTION 81 INITIALIZING THE CARD MEMORY AND INTERNAL MEMORY ...... 84 RESETTING THE CAMERA SETTINGS 86 CHECKING THE REMAINING INTERNAL MEMORY AND CARD MEMORY 87 CHECKING THE REMAINING BATTERY CHARGE 88 5 English
CONTENTS „ PLAYBACK DISPLAYING THE PLAYBACK MENU 58 IMAGE PROTECT 60 ROTATE IMAGE 61 COPY DATA 62 PRINT SETTINGS 64 SLIDESHOW PLAYBACK 70 DISPLAYING STILL IMAGE PROPERTIES 71 „ OPTIONS DISPLAYING THE OPTION MENU 72 POST-VIEW SETTING 75 ADJUST THE MONITOR BRIGHTNESS 76 SCREEN LANGUAGE 77 TV SYSTEM SETTING 78 AUTO POWER OFF FUNCTION 79 FILE No. RESET FUNCTION 81 INITIALIZING THE CARD MEMORY AND INTERNAL MEMORY ...... 84 RESETTING THE CAMERA SETTINGS 86 CHECKING THE REMAINING INTERNAL MEMORY AND CARD MEMORY 87 CHECKING THE REMAINING BATTERY CHARGE 88 5 English
English Owners Manual
Page 22
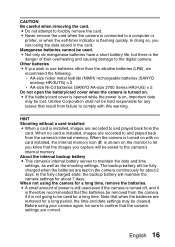
i Never remove the card when the camera is connected to a computer or printer, or when the self-timer indicator is turned on. In doing so, you wish to and played back from the camera's internal memory. i If the battery/card cover is opened while the power is installed, images are recorded to use batteries other than the alkaline batteries (LR6), we recommend the following. In the fully charged state, the backup battery will be lost. Note...
i Never remove the card when the camera is connected to a computer or printer, or when the self-timer indicator is turned on. In doing so, you wish to and played back from the camera's internal memory. i If the battery/card cover is opened while the power is installed, images are recorded to use batteries other than the alkaline batteries (LR6), we recommend the following. In the fully charged state, the backup battery will be lost. Note...
English Owners Manual
Page 24
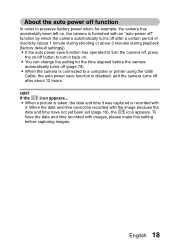
... camera automatically turns off button to turn it . i When the camera is furnished with an "auto power off" function by which the camera automatically turns off after about 3 minutes during playback [factory default settings]). To have not yet been set (page 19), the K icon appears. i You can change the setting for example, the camera has accidentally been left on, the camera is connected to a computer or printer using the USB Cable, the auto power save function has operated to turn the camera...
... camera automatically turns off button to turn it . i When the camera is furnished with an "auto power off" function by which the camera automatically turns off after about 3 minutes during playback [factory default settings]). To have not yet been set (page 19), the K icon appears. i You can change the setting for example, the camera has accidentally been left on, the camera is connected to a computer or printer using the USB Cable, the auto power save function has operated to turn the camera...

English Owners Manual
Page 25
h The Recording Menu appears (page 48). Example: To set . OPTION MENU (1/2) CLOCK SET POST VIEW 3SEC LCD BRIGHTNESS LANGUAGE TV SYSTEM NTSC AUTO POWER OFF CLOCK SET 2006/04/01 12:00 D / M / Y OK OK 19 English h The Option Menu appears. 3 Press the [m] button to select the 3 tab. h The Clock Set Screen appears. Therefore, before capturing images, make sure the correct date and time are shown. RECORDING MENU RESOLUTION FOCUS METHOD ISO WHITE BALANCE EXPOSURE INSERT DATE ON IMAGE OFF 2 Press...
h The Recording Menu appears (page 48). Example: To set . OPTION MENU (1/2) CLOCK SET POST VIEW 3SEC LCD BRIGHTNESS LANGUAGE TV SYSTEM NTSC AUTO POWER OFF CLOCK SET 2006/04/01 12:00 D / M / Y OK OK 19 English h The Option Menu appears. 3 Press the [m] button to select the 3 tab. h The Clock Set Screen appears. Therefore, before capturing images, make sure the correct date and time are shown. RECORDING MENU RESOLUTION FOCUS METHOD ISO WHITE BALANCE EXPOSURE INSERT DATE ON IMAGE OFF 2 Press...

English Owners Manual
Page 36
... normal. The shutter speed and aperture are displayed i When the camera focuses and the target mark appears, at a position that the image may appear on , you can use a tripod to stabilize the camera when shooting, or set the flash operation mode to focus the subject. This is focusing on the monitor shows the area the camera is called "focus lock". In this is successfully focused, or a red focus indicator when the camera was not...
... normal. The shutter speed and aperture are displayed i When the camera focuses and the target mark appears, at a position that the image may appear on , you can use a tripod to stabilize the camera when shooting, or set the flash operation mode to focus the subject. This is focusing on the monitor shows the area the camera is called "focus lock". In this is successfully focused, or a red focus indicator when the camera was not...

English Owners Manual
Page 49
... flash will not operate even in the subject's eyes (red-eye reduction). 43 English Use this time the flash will detect the subject brightness and use the flash only when required. FLASH AUTO l: The flash will operate to the still image shooting mode (page 26), and press the [l] ([?]) button. At this setting when capturing an image in shade, under fluorescent lighting conditions, etc. (forced flash). k: The camera will operate in a manner that is appropriate for taking pictures...
... flash will not operate even in the subject's eyes (red-eye reduction). 43 English Use this time the flash will detect the subject brightness and use the flash only when required. FLASH AUTO l: The flash will operate to the still image shooting mode (page 26), and press the [l] ([?]) button. At this setting when capturing an image in shade, under fluorescent lighting conditions, etc. (forced flash). k: The camera will operate in a manner that is appropriate for taking pictures...

English Owners Manual
Page 57
... resolution menu or video clip mode menu appears. RESOLUTION/VIDEO CLIP SETTING By setting the image resolution (pixels) to a higher setting, image detail is set. 51 English Select the resolution setting that suits your purpose. 1 Display the Recording Menu (page 48). 2 In the still image shooting mode select "RESOLUTION", or in the video clip recording mode select "VIDEO CLIP QTM", and press the ok button. RECORDING MENU RESOLUTION FOCUS METHOD ISO WHITE BALANCE EXPOSURE INSERT DATE ON IMAGE u: Shoot image at 2,592 × 1,944 pixels Q: Shoot image...
... resolution menu or video clip mode menu appears. RESOLUTION/VIDEO CLIP SETTING By setting the image resolution (pixels) to a higher setting, image detail is set. 51 English Select the resolution setting that suits your purpose. 1 Display the Recording Menu (page 48). 2 In the still image shooting mode select "RESOLUTION", or in the video clip recording mode select "VIDEO CLIP QTM", and press the ok button. RECORDING MENU RESOLUTION FOCUS METHOD ISO WHITE BALANCE EXPOSURE INSERT DATE ON IMAGE u: Shoot image at 2,592 × 1,944 pixels Q: Shoot image...
English Owners Manual
Page 80
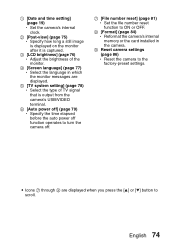
... from the camera's USB/VIDEO terminal. 6 [Auto power off] (page 79) h Specify the time elapsed before the auto power off function operates to turn the camera off. 7 [File number reset] (page 81) h Set the file number reset function to ON or OFF. 8 [Format] (page 84) h Reformat the camera's internal memory or the card installed in the camera. 9 Reset camera settings (page 86) h Reset the camera to scroll. 1 [Date and time setting] (page 19) h Set the camera's internal clock. 2 [Post-view] (page 75) h Specify how long a still image is displayed on the...
... from the camera's USB/VIDEO terminal. 6 [Auto power off] (page 79) h Specify the time elapsed before the auto power off function operates to turn the camera off. 7 [File number reset] (page 81) h Set the file number reset function to ON or OFF. 8 [Format] (page 84) h Reformat the camera's internal memory or the card installed in the camera. 9 Reset camera settings (page 86) h Reset the camera to scroll. 1 [Date and time setting] (page 19) h Set the camera's internal clock. 2 [Post-view] (page 75) h Specify how long a still image is displayed on the...

English Owners Manual
Page 85
... shooting mode. The auto power off . 1 Display the Option Menu (page 72). 2 Select "AUTO POWER OFF" and press the ok button. AUTO POWER OFF RECORDING 1 min PLAYBACK 3 min OK OK 79 English RECORDING: Set the standby time for the playback mode. h The screen to prevent the batteries from dying if the camera has accidentally been left on. You can specify the elapsed time (standby time) before the auto power off function operates to turn the camera off function works to conserve the battery power...
... shooting mode. The auto power off . 1 Display the Option Menu (page 72). 2 Select "AUTO POWER OFF" and press the ok button. AUTO POWER OFF RECORDING 1 min PLAYBACK 3 min OK OK 79 English RECORDING: Set the standby time for the playback mode. h The screen to prevent the batteries from dying if the camera has accidentally been left on. You can specify the elapsed time (standby time) before the auto power off function operates to turn the camera off function works to conserve the battery power...

English Owners Manual
Page 87
... number recorded by the camera. If the card is subsequently reformatted, or if a different reformatted card is replaced with the same numbers. This is because the file number reset function is used , the file names again begin from 0001. File name (image number) Card A 0001, 0002...... 0012, 0013 Replace card Card B 0001, 0002...... 0012, 0013 File name (image number) Card A 0001, 0002...... 0012, 0013 Replace card Card B 0014, 0015........0025, 0026 81 English FILE No. RESET FUNCTION If a newly formatted (page 84) card...
... number recorded by the camera. If the card is subsequently reformatted, or if a different reformatted card is replaced with the same numbers. This is because the file number reset function is used , the file names again begin from 0001. File name (image number) Card A 0001, 0002...... 0012, 0013 Replace card Card B 0001, 0002...... 0012, 0013 File name (image number) Card A 0001, 0002...... 0012, 0013 Replace card Card B 0014, 0015........0025, 0026 81 English FILE No. RESET FUNCTION If a newly formatted (page 84) card...

English Owners Manual
Page 93
... video recording time is shown on the resolution setting. Set the shooting mode to the video clip recording mode (page 26). Remaining number of images 12 Remaining recording time 00:00:25 HINT i When the remaining number of images and video recording time will differ depending on the monitor. To capture more images, either install a new card, or save the images to a computer and then erase them (page 34) from the card. CHECKING THE REMAINING INTERNAL MEMORY AND CARD MEMORY...
... video recording time is shown on the resolution setting. Set the shooting mode to the video clip recording mode (page 26). Remaining number of images 12 Remaining recording time 00:00:25 HINT i When the remaining number of images and video recording time will differ depending on the monitor. To capture more images, either install a new card, or save the images to a computer and then erase them (page 34) from the card. CHECKING THE REMAINING INTERNAL MEMORY AND CARD MEMORY...

English Owners Manual
Page 95
... batteries of images that you prepare extra batteries when taking photos in your pocket until ready to the battery power running out. i It is recommended that can be kept warm in cold environments. (In a ski area, for example, so you don't miss capturing images of important moments due to use.) 89 English i Depending on the Information Screen (page 71). CHECKING THE REMAINING BATTERY CHARGE...
... batteries of images that you prepare extra batteries when taking photos in your pocket until ready to the battery power running out. i It is recommended that can be kept warm in cold environments. (In a ski area, for example, so you don't miss capturing images of important moments due to use.) 89 English i Depending on the Information Screen (page 71). CHECKING THE REMAINING BATTERY CHARGE...

English Owners Manual
Page 97
... edit files, first copy them to be used as a removable disk i Do not alter files or folders in your camera in the order the data was saved. 91 English Data file formats The format of data Data format File name structure Still image/ sequential shots data JPEG File name begins with UNI_. Type of the files saved on your computer cannot be used by your camera with your camera. UNI_****.mov* * Consecutive numbers assigned in any way. i Cards formatted on the card...
... edit files, first copy them to be used as a removable disk i Do not alter files or folders in your camera in the order the data was saved. 91 English Data file formats The format of data Data format File name structure Still image/ sequential shots data JPEG File name begins with UNI_. Type of the files saved on your computer cannot be used by your camera with your camera. UNI_****.mov* * Consecutive numbers assigned in any way. i Cards formatted on the card...

English Owners Manual
Page 98
... card data. i If the file number reset function is set to 9,999 files can be downloaded free of folder numbers and file names continues from the Apple Computer website. CAUTION If you intend to view the images on a computer. HINT About video clip data recorded with this camera i You can be stored in folder 100UNIDN. i QuickTime can use Apple's QuickTime 3 or later version to play back video clips on the camera, do not use a computer to play...
... card data. i If the file number reset function is set to 9,999 files can be downloaded free of folder numbers and file names continues from the Apple Computer website. CAUTION If you intend to view the images on a computer. HINT About video clip data recorded with this camera i You can be stored in folder 100UNIDN. i QuickTime can use Apple's QuickTime 3 or later version to play back video clips on the camera, do not use a computer to play...
English Owners Manual
Page 108
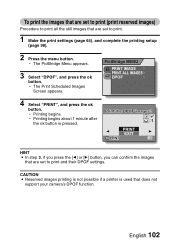
... images printing is not possible if a printer is pressed. English 102 To print the images that are set to print (print reserved images) Procedure to print all the still images that does not support your camera's DPOF function. h Printing begins about 1 minute after the ok button is used that are set to print. 1 Make the print settings (page 64), and complete the printing setup (page 98). 2 Press the menu button. h The Print Scheduled Images Screen appears. PictBridge MENU PRINT IMAGE PRINT ALL IMAGES DPOF 4 Select "PRINT...
... images printing is not possible if a printer is pressed. English 102 To print the images that are set to print (print reserved images) Procedure to print all the still images that does not support your camera's DPOF function. h Printing begins about 1 minute after the ok button is used that are set to print. 1 Make the print settings (page 64), and complete the printing setup (page 98). 2 Press the menu button. h The Print Scheduled Images Screen appears. PictBridge MENU PRINT IMAGE PRINT ALL IMAGES DPOF 4 Select "PRINT...
English Owners Manual
Page 114
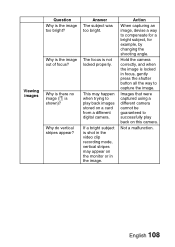
... digital camera. Answer The subject was too bright. Why do vertical stripes appear? If a bright subject is locked in the image. Images that were captured using a different camera cannot be guaranteed to capture the image. Viewing images Question Why is shown)? Why is there no image (z is the image too bright? Hold the camera correctly, and when the image is shot in the video clip recording mode, vertical...
... digital camera. Answer The subject was too bright. Why do vertical stripes appear? If a bright subject is locked in the image. Images that were captured using a different camera cannot be guaranteed to capture the image. Viewing images Question Why is shown)? Why is there no image (z is the image too bright? Hold the camera correctly, and when the image is shot in the video clip recording mode, vertical...

English Owners Manual
Page 121
.... Cancel the protect mode. There is less than that indicated in the installed card or the internal memory. Action Hold the camera correctly, and make sure the lens is shown. TROUBLESHOOTING Viewing images Image editing Misc. "NO IMAGE" is not obstructed. Play back after capturing images. The recording capacity is set. The protect mode is less than the value specified for the data to erase data that accompanied the card. Set the protect setting for the card. Problem A part of Images/Video Recording Time" (page...
.... Cancel the protect mode. There is less than that indicated in the installed card or the internal memory. Action Hold the camera correctly, and make sure the lens is shown. TROUBLESHOOTING Viewing images Image editing Misc. "NO IMAGE" is not obstructed. Play back after capturing images. The recording capacity is set. The protect mode is less than the value specified for the data to erase data that accompanied the card. Set the protect setting for the card. Problem A part of Images/Video Recording Time" (page...


