
English Owners Manual
Page 11
...of the radio. 6. Keep in " type for your antenna as high as possible. The universal mounting bracket may be taken into the OCEANUS DSC so that you can be considered are "plug-in mind the flexibility designed into account. Select a location that allows free air flow ...be used with #10 AWG wire. All connections are : 1. Long antenna leads can not be made with the supplied power lead, any extension should be made with an auxiliary speaker. 3. FMB322W, Black - If direct connection can cause substantial loss of a shelf, on your OCEANUS DSC. 1. Keep the antenna lead ...
...of the radio. 6. Keep in " type for your antenna as high as possible. The universal mounting bracket may be taken into the OCEANUS DSC so that you can be considered are "plug-in mind the flexibility designed into account. Select a location that allows free air flow ...be used with #10 AWG wire. All connections are : 1. Long antenna leads can not be made with the supplied power lead, any extension should be made with an auxiliary speaker. 3. FMB322W, Black - If direct connection can cause substantial loss of a shelf, on your OCEANUS DSC. 1. Keep the antenna lead ...
English Owners Manual
Page 12
All DC battery wires, antenna lead, and accessory cables should be routed ...a health risk to insure a suitable distance between the radiating element and people. Antenna Selection and Installation OCEANUS DSC has been designed to install a noise suppression kit. Small whip antennas (3 dB) or smaller should touch...OCEANUS DSC has been designed to be installed using a high-gain antenna placed as high as possible above the water line. Larger antennas (6 dB or 9 dB) should not have excessively long coaxial feed cables. However, in determining a suitable antenna for your Uniden...
All DC battery wires, antenna lead, and accessory cables should be routed ...a health risk to insure a suitable distance between the radiating element and people. Antenna Selection and Installation OCEANUS DSC has been designed to install a noise suppression kit. Small whip antennas (3 dB) or smaller should touch...OCEANUS DSC has been designed to be installed using a high-gain antenna placed as high as possible above the water line. Larger antennas (6 dB or 9 dB) should not have excessively long coaxial feed cables. However, in determining a suitable antenna for your Uniden...

English Owners Manual
Page 13
... location of the mounting bracket. Connect the antenna and all cables and accessories to the positive (+) battery supply. Connect the black wire of the supplied power cord to the appropriate jacks and connectors. Install the radio in the mounting bracket. Drill the holes and mount...bracket and connect all other mounting knobs than the ones enclosed. Do not insert the knobs without attaching the bracket. 10 Installing the OCEANUS DSC After you have carefully considered the various factors affecting your choice of location, position the radio (with the bracket, microphone, power cord...
... location of the mounting bracket. Connect the antenna and all cables and accessories to the positive (+) battery supply. Connect the black wire of the supplied power cord to the appropriate jacks and connectors. Install the radio in the mounting bracket. Drill the holes and mount...bracket and connect all other mounting knobs than the ones enclosed. Do not insert the knobs without attaching the bracket. 10 Installing the OCEANUS DSC After you have carefully considered the various factors affecting your choice of location, position the radio (with the bracket, microphone, power cord...
English Owners Manual
Page 33
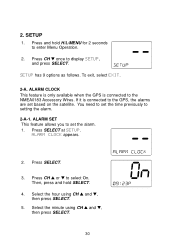
... the time previously to enter Menu Operation. 2. If it is connected to set the alarm. 1. ALARM SET This feature allows you to the NMEA0183 Accessory Wires. Press SELECT at SETUP. 2. Then, press and hold H/L/MENU for 2 seconds to setting the alarm. 2-A-1. ALARM CLOCK appears. 2.
... the time previously to enter Menu Operation. 2. If it is connected to set the alarm. 1. ALARM SET This feature allows you to the NMEA0183 Accessory Wires. Press SELECT at SETUP. 2. Then, press and hold H/L/MENU for 2 seconds to setting the alarm. 2-A-1. ALARM CLOCK appears. 2.
English Owners Manual
Page 48
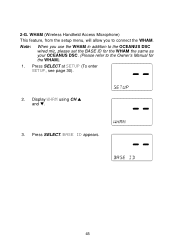
Note: When you to the Owner's Manual for the WHAM the same as your OCEANUS DSC. (Please refer to connect the WHAM. Press SELECT at SETUP (To enter SETUP, see page 30). 2. BASE ID appears. 45 Display WHAM using CH L and M. 3. Press SELECT. WHAM (Wireless Handheld Access Microphone) This feature, from the setup menu, will allow you use the WHAM in addition to the OCEANUS DSC wired mic, please set the BASE ID for the WHAM). 1. 2-G.
Note: When you to the Owner's Manual for the WHAM the same as your OCEANUS DSC. (Please refer to connect the WHAM. Press SELECT at SETUP (To enter SETUP, see page 30). 2. BASE ID appears. 45 Display WHAM using CH L and M. 3. Press SELECT. WHAM (Wireless Handheld Access Microphone) This feature, from the setup menu, will allow you use the WHAM in addition to the OCEANUS DSC wired mic, please set the BASE ID for the WHAM). 1. 2-G.

