
User Guide
Page 2
If you need assistance, please do NOT return this product. 2. Reading your owner's manual, included with this product to your questions by: 1. Visiting our customer support website at 1-817-858-2900 or 1-800-658-8068. Customer Care At Uniden®, we care about you . Our customer care specialists are available to your place of purchase. Calling our customer care specialists at www.uniden.com. 3. Quickly find answers to serve you !
If you need assistance, please do NOT return this product. 2. Reading your owner's manual, included with this product to your questions by: 1. Visiting our customer support website at 1-817-858-2900 or 1-800-658-8068. Customer Care At Uniden®, we care about you . Our customer care specialists are available to your place of purchase. Calling our customer care specialists at www.uniden.com. 3. Quickly find answers to serve you !
User Guide
Page 3
...local, state and federal law. For further information on video surveillance and audio recording legal requirements, please consult your Uniden Guardian Firmware 45 Taking Care of Your Hardware 45 Receiver 45 Cameras 45 Additional Information 48 Product Specifications 48 Lithium-...Statement 50 RF Exposure Information 50 IC Compliance Information 51 Radio Equipment Notice 51 CE Compliance Information 51 One-year Limited Warranty 51 Uniden surveillance products are hereby reserved. Contents Customer Care 2 GETTING STARTED 4 Using This Manual 4 What's Included 5 Getting to ...
...local, state and federal law. For further information on video surveillance and audio recording legal requirements, please consult your Uniden Guardian Firmware 45 Taking Care of Your Hardware 45 Receiver 45 Cameras 45 Additional Information 48 Product Specifications 48 Lithium-...Statement 50 RF Exposure Information 50 IC Compliance Information 51 Radio Equipment Notice 51 CE Compliance Information 51 One-year Limited Warranty 51 Uniden surveillance products are hereby reserved. Contents Customer Care 2 GETTING STARTED 4 Using This Manual 4 What's Included 5 Getting to ...

User Guide
Page 4
Here you how to connect your surveillance system to physically set up . •• Uniden Guardian™ Software Operations Overview. This section tells you will find detailed descriptions of each screen and how it is set it from your ...the internet and access it up in six main sections: •• Getting Started. This section lists basic operations in the third section. •• Uniden Guardian Screen Descriptions. GETTING STARTED Using This Manual This manual is used. •• Remote Access. This section describes your PC or other devices. •...
Here you how to connect your surveillance system to physically set up . •• Uniden Guardian™ Software Operations Overview. This section tells you will find detailed descriptions of each screen and how it is set it from your ...the internet and access it up in six main sections: •• Getting Started. This section lists basic operations in the third section. •• Uniden Guardian Screen Descriptions. GETTING STARTED Using This Manual This manual is used. •• Remote Access. This section describes your PC or other devices. •...
User Guide
Page 5
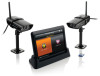
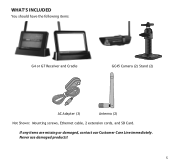
Never use damaged products! 5 If any items are missing or damaged, contact our Customer Care Line immediately. What's Included You should have the following items: G4 or G7 Receiver and Cradle GC45 Camera (2) Stand (2) AC Adapter (3) Antenna (2) Not Shown: Mounting screws, Ethernet cable, 2 extension cords, and SD Card.
Never use damaged products! 5 If any items are missing or damaged, contact our Customer Care Line immediately. What's Included You should have the following items: G4 or G7 Receiver and Cradle GC45 Camera (2) Stand (2) AC Adapter (3) Antenna (2) Not Shown: Mounting screws, Ethernet cable, 2 extension cords, and SD Card.
User Guide
Page 6
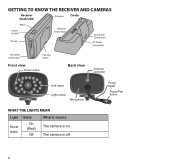
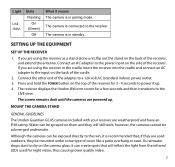
The camera is on. Getting to Know the Receiver and Cameras Receiver (back/side) Antenna Cradle Reset Power On/O SD slot Receiver Power Dock Data Cable Connection AC Power Connection AC Power Connection Pull-Out Stand Front view Power status Back view Antenna connector Link status Light sensor Microphone Power pigtail Power/Pair button What the lights mean Light Power status State On (Red) Off What it means The camera is off. 6
The camera is on. Getting to Know the Receiver and Cameras Receiver (back/side) Antenna Cradle Reset Power On/O SD slot Receiver Power Dock Data Cable Connection AC Power Connection AC Power Connection Pull-Out Stand Front view Power status Back view Antenna connector Link status Light sensor Microphone Power pigtail Power/Pair button What the lights mean Light Power status State On (Red) Off What it means The camera is off. 6
User Guide
Page 7
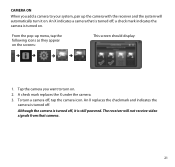
Mount the Camera Stand General Guidelines The Uniden Guardian GC45 cameras included with your receiver are powered up . 4. however, the cameras cannot be mounted under some type of the receiver, and extend the ...antenna. The camera is connected to the LIVE view. Press and hold the Power button on the top of the cradle. 2. The receiver displays the Uniden Welcome screen for 3 - 4 seconds to a 120 volt AC (standard indoor) power outlet. 3. The screen remains dark until the cameras are weatherproof and have an IP66...
Mount the Camera Stand General Guidelines The Uniden Guardian GC45 cameras included with your receiver are powered up . 4. however, the cameras cannot be mounted under some type of the receiver, and extend the ...antenna. The camera is connected to the LIVE view. Press and hold the Power button on the top of the cradle. 2. The receiver displays the Uniden Welcome screen for 3 - 4 seconds to a 120 volt AC (standard indoor) power outlet. 3. The screen remains dark until the cameras are weatherproof and have an IP66...
User Guide
Page 8
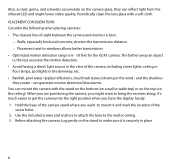
Placement next to the wall or ceiling. 3. When you are positioning the camera, you have the display handy. 1. and the shadows they can mount the camera with a soft cloth. it's much easier to get the camera into the right position when you might lower video quality. Hold the base of the screw holes. 2. Also, as dust, grime, and cobwebs accumulate on the camera glass, they create - Use the included screws and anchors to attach the base to windows allows better transmission. •• Optimized motion detection range is best. -- Placement Considerations Consider the ...
Placement next to the wall or ceiling. 3. When you are positioning the camera, you have the display handy. 1. and the shadows they can mount the camera with a soft cloth. it's much easier to get the camera into the right position when you might lower video quality. Hold the base of the screw holes. 2. Also, as dust, grime, and cobwebs accumulate on the camera glass, they create - Use the included screws and anchors to attach the base to windows allows better transmission. •• Optimized motion detection range is best. -- Placement Considerations Consider the ...
User Guide
Page 9
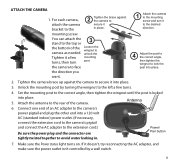
Set the mounting post to the left a few mounting turns, then turn it to the desired direction. 4 Adjust the post to the correct angle, then tighten the wingnut to secure it doesn't, try reconnecting the AC adapter, and make sure the power outlet isn't controlled by turning the wingnut to the correct angle, then tighten the wingnut until the post is locked into place. 3. Power/ Pair button 7. Unlock the mounting post by a wall switch. 9 If it in . Tighten the camera brace up against the camera to lock the post into a 120 volt AC (standard indoor) power outlet. (If ...
Set the mounting post to the left a few mounting turns, then turn it to the desired direction. 4 Adjust the post to the correct angle, then tighten the wingnut to secure it doesn't, try reconnecting the AC adapter, and make sure the power outlet isn't controlled by turning the wingnut to the correct angle, then tighten the wingnut until the post is locked into place. 3. Power/ Pair button 7. Unlock the mounting post by a wall switch. 9 If it in . Tighten the camera brace up against the camera to lock the post into a 120 volt AC (standard indoor) power outlet. (If ...
User Guide
Page 10
...;• Schedule Recordings ("Schedule Record" on page 25) •• Language (default language is English; Camera Settings •• Brightness ("Uniden Guardian Settings Screen" on page 18) •• Motion Detection ("Uniden Guardian Settings Screen" on page 18) •• Schedule Recordings ("Schedule Record" on page 23) System Settings •• Power...
...;• Schedule Recordings ("Schedule Record" on page 25) •• Language (default language is English; Camera Settings •• Brightness ("Uniden Guardian Settings Screen" on page 18) •• Motion Detection ("Uniden Guardian Settings Screen" on page 18) •• Schedule Recordings ("Schedule Record" on page 23) System Settings •• Power...
User Guide
Page 11
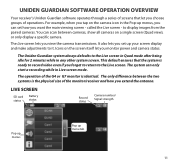
... and camera status. This default ensures that let you choose groups of operations. You can scan between the two systems is identical. The Uniden Guardian system always defaults to the Live screen in Quad mode after being idle for 2 minutes while in Live screen mode. called the ...start a recording while in any other system screen. It also lets you set how you want the main viewing screen - Uniden Guardian Software Operation Overview Your receiver's Uniden Guardian software operates through a series of screens that the system is ready to record video even if you forget to return...
... and camera status. This default ensures that let you choose groups of operations. You can scan between the two systems is identical. The Uniden Guardian system always defaults to the Live screen in Quad mode after being idle for 2 minutes while in Live screen mode. called the ...start a recording while in any other system screen. It also lets you set how you want the main viewing screen - Uniden Guardian Software Operation Overview Your receiver's Uniden Guardian software operates through a series of screens that the system is ready to record video even if you forget to return...

User Guide
Page 12
... remaining. Tap to start or stop recording for that camera • Steady on full screen) Adjust the volume level. Battery Capacity Displays battery capacity. Uniden Guardian System Settings Access the Uniden Guardian Software Operation screens or view recorded events. This graphic shows battery at nearly full. Recording 12 Not recording • Flashing -
... remaining. Tap to start or stop recording for that camera • Steady on full screen) Adjust the volume level. Battery Capacity Displays battery capacity. Uniden Guardian System Settings Access the Uniden Guardian Software Operation screens or view recorded events. This graphic shows battery at nearly full. Recording 12 Not recording • Flashing -

User Guide
Page 13
Motion System indicates motion detection recording in progress. If less than 4 cameras are on, only those cameras' video will display on the Live screen. 13 Scheduled System indicates scheduled recording in progress. Pop up Menu Tab Opens and closes the pop up menu display. Changing How the Live Screen Displays The Live screen displays in each quadrant. NO SD CARD INDICATOR Displays red when the SD card is not present or is damaged. Quad View divides the screen's image area into 4 quadrants and displays camera video in 2 views - Quad View or Full View. Icon ...
Motion System indicates motion detection recording in progress. If less than 4 cameras are on, only those cameras' video will display on the Live screen. 13 Scheduled System indicates scheduled recording in progress. Pop up Menu Tab Opens and closes the pop up menu display. Changing How the Live Screen Displays The Live screen displays in each quadrant. NO SD CARD INDICATOR Displays red when the SD card is not present or is damaged. Quad View divides the screen's image area into 4 quadrants and displays camera video in 2 views - Quad View or Full View. Icon ...
User Guide
Page 14
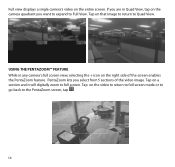
PentaZoom lets you want to expand to the PentaZoom screen, tap . 14 Tap on that image to return to full screen. Tap on a section and it will digitally zoom to Quad View. Full view displays a single camera's video on the video to return to full screen mode or to go back to Full View. Using the PentaZoom™ Feature While in Quad View, tap on the right side of the video image. If you are in any camera's full screen view, selecting the + icon on the camera quadrant you select from 5 sections of the screen enables the PentaZoom feature. Tap on the entire screen.
PentaZoom lets you want to expand to the PentaZoom screen, tap . 14 Tap on that image to return to full screen. Tap on a section and it will digitally zoom to Quad View. Full view displays a single camera's video on the video to return to full screen mode or to go back to Full View. Using the PentaZoom™ Feature While in Quad View, tap on the right side of the video image. If you are in any camera's full screen view, selecting the + icon on the camera quadrant you select from 5 sections of the screen enables the PentaZoom feature. Tap on the entire screen.
User Guide
Page 15
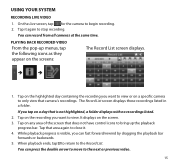
You can fast forward/rewind by dragging the playback bar forwards or backwards. 5. You can press the double arrow to move to stop recording. Tap it . 4. Tap that camera's recordings. When playback ends, tap to return to begin recording. 2. Using Your System Recording Live Video 1. Tap on the highlighted day containing the recording you want to bring up menus, tap the following icons as they appear on the screen. 3. The Record List screen displays those recordings listed in a folder. Playing Back Recorded Video From the pop-up the playback progress bar. If you ...
You can fast forward/rewind by dragging the playback bar forwards or backwards. 5. You can press the double arrow to move to stop recording. Tap it . 4. Tap that camera's recordings. When playback ends, tap to return to begin recording. 2. Using Your System Recording Live Video 1. Tap on the highlighted day containing the recording you want to bring up menus, tap the following icons as they appear on the screen. 3. The Record List screen displays those recordings listed in a folder. Playing Back Recorded Video From the pop-up the playback progress bar. If you ...
User Guide
Page 16
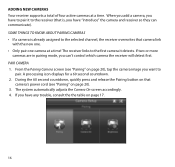
The system automatically adjusts the Camera On screen accordingly. 4. Some things to know about pairing cameras •• If a camera is , you have any trouble, consult the the table on page 17. 16 If two or more cameras are in pairing mode, you want to the selected channel, the receiver overwrites that camera link with the new one. •• Only pair one camera at a time. From the Pairing Camera screen (see "Pairing" on page 20), tap the camera image you can communicate). Pair Camera 1. During the 60 second countdown, quickly press and release the Pairing button on ...
The system automatically adjusts the Camera On screen accordingly. 4. Some things to know about pairing cameras •• If a camera is , you have any trouble, consult the the table on page 17. 16 If two or more cameras are in pairing mode, you want to the selected channel, the receiver overwrites that camera link with the new one. •• Only pair one camera at a time. From the Pairing Camera screen (see "Pairing" on page 20), tap the camera image you can communicate). Pair Camera 1. During the 60 second countdown, quickly press and release the Pairing button on ...
User Guide
Page 17
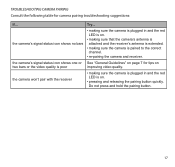
the camera's signal status icon shows no bars • making sure the camera is plugged in and the red LED is paired to the correct channel. • re-pairing the camera and receiver. Do not press and hold the pairing button. 17 Troubleshooting camera Pairing Consult the following table for tips on . • making sure that the camera's antenna is attached and the receiver's antenna is extended. • making sure the camera is plugged in and the red LED is on two bars or the video quality is poor improving video quality. the camera's signal status icon shows one or See "...
the camera's signal status icon shows no bars • making sure the camera is plugged in and the red LED is paired to the correct channel. • re-pairing the camera and receiver. Do not press and hold the pairing button. 17 Troubleshooting camera Pairing Consult the following table for tips on . • making sure that the camera's antenna is attached and the receiver's antenna is extended. • making sure the camera is plugged in and the red LED is on two bars or the video quality is poor improving video quality. the camera's signal status icon shows one or See "...
User Guide
Page 18
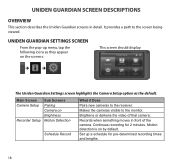
.... Set up menu, tap the following icons as they appear on the screens: This screen should display: The Uniden Guardian Settings screen highlights the Camera Setup option as the default. Main Screen Camera Setup Recorder Setup Sub Screens Pairing Camera on by default.... Makes the cameras visible to the screen being viewed. Records when something moves in detail. Uniden Guardian Settings Screen From the pop-up a schedule for 2 minutes. Continues recording for pre-determined recording times and lengths. 18 Motion ...
.... Set up menu, tap the following icons as they appear on the screens: This screen should display: The Uniden Guardian Settings screen highlights the Camera Setup option as the default. Main Screen Camera Setup Recorder Setup Sub Screens Pairing Camera on by default.... Makes the cameras visible to the screen being viewed. Records when something moves in detail. Uniden Guardian Settings Screen From the pop-up a schedule for 2 minutes. Continues recording for pre-determined recording times and lengths. 18 Motion ...
User Guide
Page 19
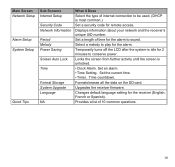
Set a length of time for the alarm to conserve power. Temporarily turns off the LCD after the system is idle for 2 minutes to sound. Provides a list of 10 common questions. 19 Set the current time. • Timer. Formats/erases all the data on the SD card. Locks the screen from further activity until the screen is most common.) Set a security code for the receiver (English, French or Spanish). Changes default language setting for remote access. Main Screen Network Setup Alarm Setup System Setup Quick Tips Sub Screens Internet Setup Security Code Network Information Period ...
Set a length of time for the alarm to conserve power. Temporarily turns off the LCD after the system is idle for 2 minutes to sound. Provides a list of 10 common questions. 19 Set the current time. • Timer. Formats/erases all the data on the SD card. Locks the screen from further activity until the screen is most common.) Set a security code for the receiver (English, French or Spanish). Changes default language setting for remote access. Main Screen Network Setup Alarm Setup System Setup Quick Tips Sub Screens Internet Setup Security Code Network Information Period ...
User Guide
Page 20
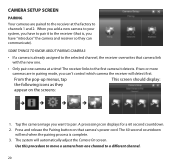
If two or more cameras are paired to the receiver at a time! From the pop-up menus, tap This screen should display: the following icons as they can 't control which camera the receiver will detect first. Some things to know about pairing cameras: •• If a camera is already assigned to the selected channel, the receiver overwrites that is complete. 3. A processing icon displays for a 60 second countdown. 2. Use this procedure to move a camera from one camera at the factory to channels 1 and 2. The system will end when the pairing process is , you have to ...
If two or more cameras are paired to the receiver at a time! From the pop-up menus, tap This screen should display: the following icons as they can 't control which camera the receiver will detect first. Some things to know about pairing cameras: •• If a camera is already assigned to the selected channel, the receiver overwrites that is complete. 3. A processing icon displays for a 60 second countdown. 2. Use this procedure to move a camera from one camera at the factory to channels 1 and 2. The system will end when the pairing process is , you have to ...
User Guide
Page 21
a check mark indicates the camera is turned on . 2. Tap the camera you add a camera to turn on . A check mark replaces the X under the camera. 3. To turn it is turned off ; An X replaces the checkmark and indicates the camera is turned off , it on the screens: This screen should display: 1. Camera On When you want to your system, pair up menu, tap the following icons as they appear on . An X indicates a camera that camera. 21 From the pop-up the camera with the receiver and the system will not receive video signals from that is...
a check mark indicates the camera is turned on . 2. Tap the camera you add a camera to turn on . A check mark replaces the X under the camera. 3. To turn it is turned off ; An X replaces the checkmark and indicates the camera is turned off , it on the screens: This screen should display: 1. Camera On When you want to your system, pair up menu, tap the following icons as they appear on . An X indicates a camera that camera. 21 From the pop-up the camera with the receiver and the system will not receive video signals from that is...