English Owners Manual
Page 2
... DCT756 - Parts of the Base 9 Handset Icons 10 Using the Interface 11 Using the Four-way Function Key 11 Using the Handset Menus 11 Entering Text from Your Handset 12 Installing the Phone 13 Choosing the Best Location 13 Wall Mounting the Base (DCT7565 Only 14 Direct Wall Mounting (DCT7565 ...Only 15 Installing the Rechargeable Battery 16 Connecting the Base and Charging the Handset 17 Installing the Belt Clip 18 Connecting to the Phone Line 18 Testing the Connection 18 Changing the ...
... DCT756 - Parts of the Base 9 Handset Icons 10 Using the Interface 11 Using the Four-way Function Key 11 Using the Handset Menus 11 Entering Text from Your Handset 12 Installing the Phone 13 Choosing the Best Location 13 Wall Mounting the Base (DCT7565 Only 14 Direct Wall Mounting (DCT7565 ...Only 15 Installing the Rechargeable Battery 16 Connecting the Base and Charging the Handset 17 Installing the Belt Clip 18 Connecting to the Phone Line 18 Testing the Connection 18 Changing the ...
English Owners Manual
Page 3
...Phonebook 28 Deleting Phonebook Entries 28 Deleting All the Phonebook Entries at Once 29 Copying Phonebook Entries to Another Handset 29 Customizing Your Phone 30 Changing the Handset Banner 30 Selecting Ring Tones (Handset Only 31 Activating AutoTalk (Handset only 32 Activating Any Key Answer (...Handset only 32 Using Your Phone 33 Making a Call from the Phonebook 34 Making a Call with Speed Dial and with Base Speed Dial (DCT7565 Only 34 Switching to the Handset Speakerphone During a Call 34 Using Caller ID, Call...
...Phonebook 28 Deleting Phonebook Entries 28 Deleting All the Phonebook Entries at Once 29 Copying Phonebook Entries to Another Handset 29 Customizing Your Phone 30 Changing the Handset Banner 30 Selecting Ring Tones (Handset Only 31 Activating AutoTalk (Handset only 32 Activating Any Key Answer (...Handset only 32 Using Your Phone 33 Making a Call from the Phonebook 34 Making a Call with Speed Dial and with Base Speed Dial (DCT7565 Only 34 Switching to the Handset Speakerphone During a Call 34 Using Caller ID, Call...
English Owners Manual
Page 6
... and the base. Only one base. The extra, or accessory handset, is a handset that comes with this model. Product Overview DCT7565/DCT756 Features: • 2.4GHz Digital Expandable System • Expands up to 4 Handsets • Caller ID/Call Waiting Deluxe • Base Keypad...10 Melodies) • Personalized Ring by Party • 10 Speed Dial Locations • Last 3 Number Redial • Copy Phonebook Entries to a phone line. Any handset or the base. If you have accessory handsets on the handset or the base, enabling a dial tone. Charger DirectLink Extra or Accessory...
... and the base. Only one base. The extra, or accessory handset, is a handset that comes with this model. Product Overview DCT7565/DCT756 Features: • 2.4GHz Digital Expandable System • Expands up to 4 Handsets • Caller ID/Call Waiting Deluxe • Base Keypad...10 Melodies) • Personalized Ring by Party • 10 Speed Dial Locations • Last 3 Number Redial • Copy Phonebook Entries to a phone line. Any handset or the base. If you have accessory handsets on the handset or the base, enabling a dial tone. Charger DirectLink Extra or Accessory...

English Owners Manual
Page 7
DCT756 and DCT7565 - key (speaker) 22.Handset Microphone 23.Handset Charging Contacts 7 Parts of the Handset 1.Handset Antenna 2.Headset Jack Cover 3.Beltclip Hole 4.Speakerphone Speaker and Ringer 5.Handset Battery Compartment 6.New Message LED 7.Handset Earpiece 8.LCD Display 9. [menu/clear] key 10.[redial/pause] key 11.[ /flash] key (talk/flash) 12.[ ] key (phonebook) 13.[*/tone/ key 21.
DCT756 and DCT7565 - key (speaker) 22.Handset Microphone 23.Handset Charging Contacts 7 Parts of the Handset 1.Handset Antenna 2.Headset Jack Cover 3.Beltclip Hole 4.Speakerphone Speaker and Ringer 5.Handset Battery Compartment 6.New Message LED 7.Handset Earpiece 8.LCD Display 9. [menu/clear] key 10.[redial/pause] key 11.[ /flash] key (talk/flash) 12.[ ] key (phonebook) 13.[*/tone/ key 21.

English Owners Manual
Page 9
Parts of the Base [memory] key [ ] [pause] key [hold] key [int'com/xfer] key (intercom/transfer) [dnd] key and LED (do not disturb) [*/tone] key [#] key 9 [speaker] key and speaker LED (speaker) [flash] key [redial] key [mute/find hs] key (find handset) DCT7565 -
Parts of the Base [memory] key [ ] [pause] key [hold] key [int'com/xfer] key (intercom/transfer) [dnd] key and LED (do not disturb) [*/tone] key [#] key 9 [speaker] key and speaker LED (speaker) [flash] key [redial] key [mute/find hs] key (find handset) DCT7565 -

English Owners Manual
Page 14
... AC adapter cord through the molded wiring channel as shown. 4. Align the mounting slots on the base with DCT7565 Base. Plug the AC adapter into the DC IN 9V jack. 3. DO NOT use any standard wall plate... Do not use an AC outlet controlled by a wall switch. Then push in and down until the phone is not wall mountable. • Use only the supplied AD-800 AC adapter with the mounting posts on...line cord into the TEL LINE jack. 6. Notes: • The DCT756 base is firmly seated. Wall Mounting the Base (DCT7565 Only) This phone can be mounted on any other AC adapter. 14
... AC adapter cord through the molded wiring channel as shown. 4. Align the mounting slots on the base with DCT7565 Base. Plug the AC adapter into the DC IN 9V jack. 3. DO NOT use any standard wall plate... Do not use an AC outlet controlled by a wall switch. Then push in and down until the phone is not wall mountable. • Use only the supplied AD-800 AC adapter with the mounting posts on...line cord into the TEL LINE jack. 6. Notes: • The DCT756 base is firmly seated. Wall Mounting the Base (DCT7565 Only) This phone can be mounted on any other AC adapter. 14

English Owners Manual
Page 15
Insert two mounting screws into the wall. • Try to mount your phone directly to the wall. Allow about 1/8 inch between the wall and screw heads for the wall material where the base unit will be placed. 1. Refer ... inserting screws into the wall, using the appropriate anchoring device, 3-15/16 inches apart. Direct Wall Mounting (DCT7565 Only) If you don't have a standard wall plate, you can mount your phone within 5-feet of a working phone jack to avoid excessive wire lengths. • Make sure the wall material is capable of supporting the...
Insert two mounting screws into the wall. • Try to mount your phone directly to the wall. Allow about 1/8 inch between the wall and screw heads for the wall material where the base unit will be placed. 1. Refer ... inserting screws into the wall, using the appropriate anchoring device, 3-15/16 inches apart. Direct Wall Mounting (DCT7565 Only) If you don't have a standard wall plate, you can mount your phone within 5-feet of a working phone jack to avoid excessive wire lengths. • Make sure the wall material is capable of supporting the...
English Owners Manual
Page 17
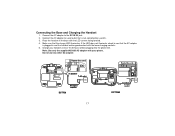
... to a wall outlet that the charge LED illuminates. Charge your phone. Note: Use only the supplied AD-800 AC adapter with the LCD screen facing forward. 4. Connect the AC adapter to the DC IN 9V jack. 2. Connecting the Base and Charging the Handset 1. DCT756 17 DCT7565 Do not use any other AC adapter.
... to a wall outlet that the charge LED illuminates. Charge your phone. Note: Use only the supplied AD-800 AC adapter with the LCD screen facing forward. 4. Connect the AC adapter to the DC IN 9V jack. 2. Connecting the Base and Charging the Handset 1. DCT756 17 DCT7565 Do not use any other AC adapter.
English Owners Manual
Page 22
... each pause counts as one digit. 6. Press when you receive a new voice mail message, the LED on the DCT7565 base for 5 seconds. Your voice mail service provider will supply you with your phone company's voice messaging system, you can reset back to HANDSET SETUP menu and press . 3. In the event your... the handset flashes. To reset, press and hold [find hs] on the DCT756 base or [mute/find hs] on the top of sync with the access number. This number may be simply a phone number. Move the cursor to insert a two-second pause in the display each time you...
... each pause counts as one digit. 6. Press when you receive a new voice mail message, the LED on the DCT7565 base for 5 seconds. Your voice mail service provider will supply you with your phone company's voice messaging system, you can reset back to HANDSET SETUP menu and press . 3. In the event your... the handset flashes. To reset, press and hold [find hs] on the DCT756 base or [mute/find hs] on the top of sync with the access number. This number may be simply a phone number. Move the cursor to insert a two-second pause in the display each time you...

English Owners Manual
Page 24
...MODELS VARY! Before registering the DCX750 accessory or extra handset, the battery pack MUST be assigned. Registering DCX640 and DCX700 Handsets 1. For the DCT7565 dualkeypad base, press and hold [flash] until you register an extra handset to register the handset before use. See Resetting Handsets on the... has been registered to the base by the factory. Only one handset can register it to flash. 2. Handsets supplied with the phone are registered to the base. For the DCT756, press and hold [#] until the charge LED starts to a new base. When REGISTRA-
...MODELS VARY! Before registering the DCX750 accessory or extra handset, the battery pack MUST be assigned. Registering DCX640 and DCX700 Handsets 1. For the DCT7565 dualkeypad base, press and hold [flash] until you register an extra handset to register the handset before use. See Resetting Handsets on the... has been registered to the base by the factory. Only one handset can register it to flash. 2. Handsets supplied with the phone are registered to the base. For the DCT756, press and hold [#] until the charge LED starts to a new base. When REGISTRA-
English Owners Manual
Page 27
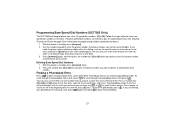
... the phonebook from Z to [9] and [0]) once for the first letter, twice for information on the number keys to jump to store this phone number. Press a number key ([2] to A press [ ]. If you want to a name that starts with the letter M, press [6] once.... to [9]. you want to search for an entry beginning with that letter. Programming Base Speed Dial Numbers (DCT7565 Only) The DCT7565 dual-keypad phone can store 10 speed dial numbers, [0] to other entries. With the phone in standby, press [memory]. 2. Deleting Base Speed Dial Numbers 1. For example, to delete.
... the phonebook from Z to [9] and [0]) once for the first letter, twice for information on the number keys to jump to store this phone number. Press a number key ([2] to A press [ ]. If you want to a name that starts with the letter M, press [6] once.... to [9]. you want to search for an entry beginning with that letter. Programming Base Speed Dial Numbers (DCT7565 Only) The DCT7565 dual-keypad phone can store 10 speed dial numbers, [0] to other entries. With the phone in standby, press [memory]. 2. Deleting Base Speed Dial Numbers 1. For example, to delete.
English Owners Manual
Page 33
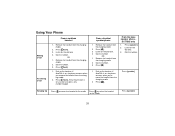
...the handset from the charging cradle. 2. Dial the number. 1. Using Your Phone Making a Call Answering a Call From a cordless handset 1. Press [ /flash]. 3. From a handset speaker phone 1. Dial the number. 3. Press [speaker] 2. Remove the handset from... the charging cradle. 2. Press [ /flash]. Press [ ]. 3. Listen for the dial tone. 3. Press [ ]. Press [ ]. Listen for the dial tone. 4. Listen for the dial tone 4. DCT7565...
...the handset from the charging cradle. 2. Dial the number. 1. Using Your Phone Making a Call Answering a Call From a cordless handset 1. Press [ /flash]. 3. From a handset speaker phone 1. Dial the number. 3. Press [speaker] 2. Remove the handset from... the charging cradle. 2. Press [ /flash]. Press [ ]. 3. Listen for the dial tone. 3. Press [ ]. Press [ ]. Listen for the dial tone. 4. Listen for the dial tone 4. DCT7565...

English Owners Manual
Page 34
.... Move the cursor to call comes in the display. 2. Making a Call with Base Speed Dial (DCT7565 Only) 1. When the phone is in standby, press [speaker]. 2. To switch from a speaker phone call to a normal call to the speakerphone, press [ ] on the handset. Using Caller ID, ... Entry on the handset to the Handset Speakerphone During a Call To switch a normal call , press [ ]. Making a Call with Speed Dial 1. The phone dials the programmed number. Press [ /flash] or [ ] on page 27). 4. Find the phonebook entry you open the phonebook. 2. Switching to...
.... Move the cursor to call comes in the display. 2. Making a Call with Base Speed Dial (DCT7565 Only) 1. When the phone is in standby, press [speaker]. 2. To switch from a speaker phone call to a normal call to the speakerphone, press [ ] on the handset. Using Caller ID, ... Entry on the handset to the Handset Speakerphone During a Call To switch a normal call , press [ ]. Making a Call with Speed Dial 1. The phone dials the programmed number. Press [ /flash] or [ ] on page 27). 4. Find the phonebook entry you open the phonebook. 2. Switching to...

English Owners Manual
Page 37
From the base DCT7565 only 1. With the phone in stand- The redialed number is deleted. With the phone in standby, press [redial/pause]. 2. Then press [redial] From the handset 1. OR 1. Select YES, and press or [menu/clear]. Use [ ] or [ ] to scroll through... a Redial Record If you want to open the redial list. 2. Redialing a Number You can choose from the redial list, follow the steps below: 1. With the phone in standy, press [redial/pause] to delete, press [menu/clear]. 4. Press [ /flash] or [ ]. 2. by, use [ ] or [ ] on the handset or [ ] or [ ]...
From the base DCT7565 only 1. With the phone in stand- The redialed number is deleted. With the phone in standby, press [redial/pause]. 2. Then press [redial] From the handset 1. OR 1. Select YES, and press or [menu/clear]. Use [ ] or [ ] to scroll through... a Redial Record If you want to open the redial list. 2. Redialing a Number You can choose from the redial list, follow the steps below: 1. With the phone in standy, press [redial/pause] to delete, press [menu/clear]. 4. Press [ /flash] or [ ]. 2. by, use [ ] or [ ] on the handset or [ ] or [ ]...
English Owners Manual
Page 39
...holding party. Notes: • You can easily join a call already in a conference call on the DCT756 and up , return the handset to place the caller on the DCT7565 base. A four-way conference call . 2. The phone returns to the party on hold, press [ /flash] or [ ] on a handset or... [speaker] on hold for 5 minutes. Once 5 minutes has passed, that party's line is on the DCT7565. Press [ /flash] or ...
...holding party. Notes: • You can easily join a call already in a conference call on the DCT756 and up , return the handset to place the caller on the DCT7565 base. A four-way conference call . 2. The phone returns to the party on hold, press [ /flash] or [ ] on a handset or... [speaker] on hold for 5 minutes. Once 5 minutes has passed, that party's line is on the DCT7565. Press [ /flash] or ...
English Owners Manual
Page 40
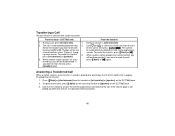
DCT7565 only 1. To page all the registered handsets, press [*/tone/ The call from one station to [4]. Transferring a Call You can transfer a call is automatically placed on hold. 2. During a call, press [int'com/xfer]. 1. 2. Select the handset you want to talk with by pressing [1] to another. From the base -
DCT7565 only 1. To page all the registered handsets, press [*/tone/ The call from one station to [4]. Transferring a Call You can transfer a call is automatically placed on hold. 2. During a call, press [int'com/xfer]. 1. 2. Select the handset you want to talk with by pressing [1] to another. From the base -

English Owners Manual
Page 41
... station is in the display until the feature is ringing by pressing [dnd] on the DCT7565 base. Move the cursor to PRIVACY MODE, and press . To cancel muting, press [mute/fi...nd hs] again or press [speaker]. With the phone in several seconds.To cancel muting, repeat the procedure. During a call . Move the cursor to ... phone is turned off the microphone. 2. appears in the display and remains while MUTE ON disappears in standby, press and hold [dnd] on the base. Using Special Features Do Not Disturb (All Calls) (DCT7565 ...
... station is in the display until the feature is ringing by pressing [dnd] on the DCT7565 base. Move the cursor to PRIVACY MODE, and press . To cancel muting, press [mute/fi...nd hs] again or press [speaker]. With the phone in several seconds.To cancel muting, repeat the procedure. During a call . Move the cursor to ... phone is turned off the microphone. 2. appears in the display and remains while MUTE ON disappears in standby, press and hold [dnd] on the base. Using Special Features Do Not Disturb (All Calls) (DCT7565 ...

English Owners Manual
Page 43
...standby, press [menu/clear] and then press or return the handset to call another station without using DirectLink communication, the display shows UNAVAILABLE. DCT7565 only 1. Select the handset you want to [4]. To page all registered handsets, press [*/tone/ Making an Intercom Page You can use the...intercom to talk to another handset with by pressing [1] to talk with DirectLink communication, press [ /flash]. To call . With the phone in the display. If the handset is on, press any key of the handset you want to the cradle. DIRECT LINK MODE CANCEL appears...
...standby, press [menu/clear] and then press or return the handset to call another station without using DirectLink communication, the display shows UNAVAILABLE. DCT7565 only 1. Select the handset you want to [4]. To page all registered handsets, press [*/tone/ Making an Intercom Page You can use the...intercom to talk to another handset with by pressing [1] to talk with DirectLink communication, press [ /flash]. To call . With the phone in the display. If the handset is on, press any key of the handset you want to the cradle. DIRECT LINK MODE CANCEL appears...

English Owners Manual
Page 44
From the DCT7565 base, press [int'com/xfer], or [speaker]. To hang up an intercom page from the handset, press [ ]. Press . it will function as a remote speaker, allowing ... Room Monitor, press [ ] or return the handset to monitor by using [ ] or [ ]. 3. To hang up an intercom page from the DCT7565 base, press [int'com/xfer]. Place a handset (or the DCT7565 base) in the room where the station is installed. 4. TO ROOM MONITOR appears. 2. ROOM MONITOR appears, and you hear sounds in...
From the DCT7565 base, press [int'com/xfer], or [speaker]. To hang up an intercom page from the handset, press [ ]. Press . it will function as a remote speaker, allowing ... Room Monitor, press [ ] or return the handset to monitor by using [ ] or [ ]. 3. To hang up an intercom page from the DCT7565 base, press [int'com/xfer]. Place a handset (or the DCT7565 base) in the room where the station is installed. 4. TO ROOM MONITOR appears. 2. ROOM MONITOR appears, and you hear sounds in...

English Owners Manual
Page 45
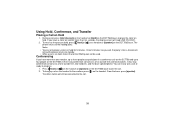
... display, and the operation is canceled. • While a pair of handsets is useful when you can still make your call connects, press [*/tone/ Once your phone is set to tone dialing after the call connects. Notes: • This feature only works when both handsets are within the range of the base...
... display, and the operation is canceled. • While a pair of handsets is useful when you can still make your call connects, press [*/tone/ Once your phone is set to tone dialing after the call connects. Notes: • This feature only works when both handsets are within the range of the base...