

English Owners Manual
Page 1
Table of Contents Introduction 2 Included with the BC9000XLT 3 Feature Highlights 4 Getting Started 6 Base Installation 6 What is Scanning 7 Searching 7 Banks and Channels 8 Setting the Squelch 8 Using the Rotary Tuner 10 Programming Channels ... Auto Recording 41 Viewing Scanner Status Information . . . 42 Display Light 44 Using Hi-Cut 44 CTCSS Operation 45 Installing the CTCSS Board 45 Using CTCSS 47 To Change the CTCSS Tone Frequency 48 CTCSS Tone Frequencies 49 Care and Maintenance 50 Troubleshooting 51 Optional Accessories and Replacement Parts 52 Specifications 53 1
Table of Contents Introduction 2 Included with the BC9000XLT 3 Feature Highlights 4 Getting Started 6 Base Installation 6 What is Scanning 7 Searching 7 Banks and Channels 8 Setting the Squelch 8 Using the Rotary Tuner 10 Programming Channels ... Auto Recording 41 Viewing Scanner Status Information . . . 42 Display Light 44 Using Hi-Cut 44 CTCSS Operation 45 Installing the CTCSS Board 45 Using CTCSS 47 To Change the CTCSS Tone Frequency 48 CTCSS Tone Frequencies 49 Care and Maintenance 50 Troubleshooting 51 Optional Accessories and Replacement Parts 52 Specifications 53 1

English Owners Manual
Page 6
For use with an optional CTCSS Tone Board: See "CTCSS Operation, " page 45. 6 Connect a cable from the "LINE" jack on the back of the scanner to the recorder's "REMOTE" jack. (See "Using Auto ...
For use with an optional CTCSS Tone Board: See "CTCSS Operation, " page 45. 6 Connect a cable from the "LINE" jack on the back of the scanner to the recorder's "REMOTE" jack. (See "Using Auto ...
English Owners Manual
Page 45
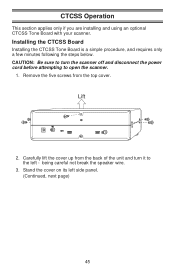
Carefully lift the cover up from the top cover. CTCSS Operation This section applies only if you are installing and using an optional CTCSS Tone Board with your scanner. Remove the five screws from the back of the unit and turn the scanner off and disconnect the power cord before attempting ...: Be sure to turn it to open the scanner. 1. Stand the cover on its left - being careful not break the speaker wire. 3. Installing the CTCSS Board Installing the CTCSS Tone Board is a simple procedure, and requires only a few minutes following the steps below.
Carefully lift the cover up from the top cover. CTCSS Operation This section applies only if you are installing and using an optional CTCSS Tone Board with your scanner. Remove the five screws from the back of the unit and turn the scanner off and disconnect the power cord before attempting ...: Be sure to turn it to open the scanner. 1. Stand the cover on its left - being careful not break the speaker wire. 3. Installing the CTCSS Board Installing the CTCSS Tone Board is a simple procedure, and requires only a few minutes following the steps below.


