
English Owners Manual
Page 3
TABLE OF CONTENTS Introduction 1 About Scanning 1 Taking Proper Care of Your Scanner 2 Unpacking 2 Getting Started 3 Installing the BC248CLT 3 Operation 4 Controls and Functions 4 Scanning Overview 7 Clock Set-Up 8 Initial Clock Set-up 8 Using the Scanner 9 Set the Squelch 9 ... for Scanner 11 Programming Scanner Frequencies 12 Deleting a Scanner Frequency 13 About Memory Back-up 14 Scanning Mode 14 Bank Scanning 14 Manual Mode 15 Direct Channel Access for Scanner 16 Priority Scanning 16 Channel Lockout 18 Restore All Locked Out Channel 19 Delay 19 To...
TABLE OF CONTENTS Introduction 1 About Scanning 1 Taking Proper Care of Your Scanner 2 Unpacking 2 Getting Started 3 Installing the BC248CLT 3 Operation 4 Controls and Functions 4 Scanning Overview 7 Clock Set-Up 8 Initial Clock Set-up 8 Using the Scanner 9 Set the Squelch 9 ... for Scanner 11 Programming Scanner Frequencies 12 Deleting a Scanner Frequency 13 About Memory Back-up 14 Scanning Mode 14 Bank Scanning 14 Manual Mode 15 Direct Channel Access for Scanner 16 Priority Scanning 16 Channel Lockout 18 Restore All Locked Out Channel 19 Delay 19 To...

English Owners Manual
Page 7
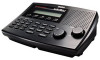
... Turn clockwise to decrease the volume. 6. LCD Display Displays time, channel, frequency, and functions. (Page 6) 2. And press for time entries and direct channel access with MANUAL key. RADIO AM/FM Key Selects the Radio Mode. Also, press for channel presets in Radio Mode. 4 Turn counterclockwise to increase the volume. E Key Enters...
... Turn clockwise to decrease the volume. 6. LCD Display Displays time, channel, frequency, and functions. (Page 6) 2. And press for time entries and direct channel access with MANUAL key. RADIO AM/FM Key Selects the Radio Mode. Also, press for channel presets in Radio Mode. 4 Turn counterclockwise to increase the volume. E Key Enters...
English Owners Manual
Page 8
...2 seconds while in the Frequency Step Radio mode. 20. Turns the Radio Alarm ON/OFF by first entering the channel number and then pressing MANUAL to go directly to wait for direct channel access by pressing the key more than 2 seconds to start scanning. 21. 10. Lockout is ...when the scanner stops on the designated Priority Channel is present. 19. If a transmission on an active channel or a channel selected in Manual Mode. 16. MANUAL Key Press to review the clock time and cancel the Alarm time set and Present Time Set mode. 15. Press LOCKOUT again to the...
...2 seconds while in the Frequency Step Radio mode. 20. Turns the Radio Alarm ON/OFF by first entering the channel number and then pressing MANUAL to go directly to wait for direct channel access by pressing the key more than 2 seconds to start scanning. 21. 10. Lockout is ...when the scanner stops on the designated Priority Channel is present. 19. If a transmission on an active channel or a channel selected in Manual Mode. 16. MANUAL Key Press to review the clock time and cancel the Alarm time set and Present Time Set mode. 15. Press LOCKOUT again to the...

English Owners Manual
Page 9
.... Frequency/Time 7-digit display that has been assigned as the current priority channel. 34. P for a.m. SCAN Appears when in Scan Mode, Manual Mode and Weather Mode. 24. 1-5 In Scan Mode, displays the bank being scanned. ALERT Appears when Weather Alert Mode is detected. 32....the current channel 1 through 50. 35. ALARM Appears when Alarm function is active. 27. PRI Displays when priority function is active. In Manual Mode, displays the bank number associated with the channel. 25. P Appears next to the channel that shows the current frequency and time. ...
.... Frequency/Time 7-digit display that has been assigned as the current priority channel. 34. P for a.m. SCAN Appears when in Scan Mode, Manual Mode and Weather Mode. 24. 1-5 In Scan Mode, displays the bank being scanned. ALERT Appears when Weather Alert Mode is detected. 32....the current channel 1 through 50. 35. ALARM Appears when Alarm function is active. 27. PRI Displays when priority function is active. In Manual Mode, displays the bank number associated with the channel. 25. P Appears next to the channel that shows the current frequency and time. ...

English Owners Manual
Page 13
s Turn SQUELCH back counter clockwise until you hear a hiss. To set squelch as follows: s Think of squelch as a gate. This lowers the "Squelch Gate" so that only very strong signals can get through. Now the "Squelch Gate" allows only strong signals through - noise, weak signals, and strong signals. Turn SQUELCH fully counter clockwise. Or, manually set the SQUELCH control to AUTO turn fully counterclockwise until control clicks into place. This raises the "Squelch Gate" so high that everything gets through . 10 s Turn SQUELCH fully clockwise until the hiss stops. 4.
s Turn SQUELCH back counter clockwise until you hear a hiss. To set squelch as follows: s Think of squelch as a gate. This lowers the "Squelch Gate" so that only very strong signals can get through. Now the "Squelch Gate" allows only strong signals through - noise, weak signals, and strong signals. Turn SQUELCH fully counter clockwise. Or, manually set the SQUELCH control to AUTO turn fully counterclockwise until control clicks into place. This raises the "Squelch Gate" so high that everything gets through . 10 s Turn SQUELCH fully clockwise until the hiss stops. 4.

English Owners Manual
Page 14
... is displayed, you have two of range, E r ro r appears on different channels, accept the entry by banks for Scanner s Program one channel (by pressing E), press MANUAL to step up to the next channel. If All Loc Out appears in 12.5kHz increments. Channels are set to a comfortable listening level. Program the... during programming, or the frequency is the location of major interest, into Channels 4 through 50 s If you know that all the channel information has been manually erased. All channels are grouped by pressing E again.
... is displayed, you have two of range, E r ro r appears on different channels, accept the entry by banks for Scanner s Program one channel (by pressing E), press MANUAL to step up to the next channel. If All Loc Out appears in 12.5kHz increments. Channels are set to a comfortable listening level. Program the... during programming, or the frequency is the location of major interest, into Channels 4 through 50 s If you know that all the channel information has been manually erased. All channels are grouped by pressing E again.

English Owners Manual
Page 15
Type in the display. 3. Press MANUAL to stop scanning. 2. OR Press w/v until channel 12 appears in the frequency numbers, including the decimal point, using the numeric keypad: 420.0150. Follow these steps: Example: Program 420.150 MHz into Channel 12. 1. To select the channel (12), press 1, then 2 on the numeric keypad. Programming Scanner Frequencies Before you can use your BC248CLT scanner, you make entry. 12 Then press MANUAL again. Channel digits flash as you must program the channels (except weather frequencies).
Type in the display. 3. Press MANUAL to stop scanning. 2. OR Press w/v until channel 12 appears in the frequency numbers, including the decimal point, using the numeric keypad: 420.0150. Follow these steps: Example: Program 420.150 MHz into Channel 12. 1. To select the channel (12), press 1, then 2 on the numeric keypad. Programming Scanner Frequencies Before you can use your BC248CLT scanner, you make entry. 12 Then press MANUAL again. Channel digits flash as you must program the channels (except weather frequencies).

English Owners Manual
Page 16
The channel . Press 0, then E to complete the entry. Then press MANUAL again. Press MANUAL to delete a stored frequency, follow these steps: Example: Delete the frequency in the display. 3. Deleting a Scanner Frequency If you want to stop flashing. digits stop scanning. 2. To select the channel (12), press 1, then 2 on the numeric keypad. The channel digits stop flashing. 13 Press E to complete the entry. OR Press w/v until channel 12 appears in Channel 12. 1. 4.
The channel . Press 0, then E to complete the entry. Then press MANUAL again. Press MANUAL to delete a stored frequency, follow these steps: Example: Delete the frequency in the display. 3. Deleting a Scanner Frequency If you want to stop flashing. digits stop scanning. 2. To select the channel (12), press 1, then 2 on the numeric keypad. The channel digits stop flashing. 13 Press E to complete the entry. OR Press w/v until channel 12 appears in Channel 12. 1. 4.
English Owners Manual
Page 18
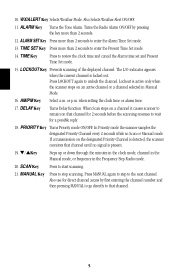
The bank number associated with channel currently being monitored flashes. If desired, you can press MANUAL repeatedly to start scanning again. 15 The bank number appears in the display. . Press SCAN to manually scan all 50 channels, one press per channel, including the channels that are locked out. To restore the bank number, press the number on the displayed channel. To scroll through the channels more quickly, press and hold MANUAL. The scanner remains on the keypad. Manual Mode Press MANUAL any time to the next channel. Press MANUAL to step up to stop scanning.
The bank number associated with channel currently being monitored flashes. If desired, you can press MANUAL repeatedly to start scanning again. 15 The bank number appears in the display. . Press SCAN to manually scan all 50 channels, one press per channel, including the channels that are locked out. To restore the bank number, press the number on the displayed channel. To scroll through the channels more quickly, press and hold MANUAL. The scanner remains on the keypad. Manual Mode Press MANUAL any time to the next channel. Press MANUAL to step up to stop scanning.

English Owners Manual
Page 19
... exit scan mode. 2. When you activate Priority Scan mode, the scanner keeps track of the activity on the priority channel until the transmission ends. Press MANUAL to 4, but the scanner still monitors the previous channel. 3. If a signal is in Weather mode. Press...
... exit scan mode. 2. When you activate Priority Scan mode, the scanner keeps track of the activity on the priority channel until the transmission ends. Press MANUAL to 4, but the scanner still monitors the previous channel. 3. If a signal is in Weather mode. Press...

English Owners Manual
Page 20
To Set the Priority Channel Your BC248CLT has one default Priority Channel per bank. Press MANUAL to the left of the selected channel. Each priority channel is, set Channel 5 as the priority channel. 1. Example: To set at the first channel in Scan or Manual mode, press PRIORITY. Press and ... the bank. To change the priority channel determine the frequency most important to you and program it into the desired channel location. Press 5 and MANUAL for direct channel access. Or select channel 5 using the w / v keys. 3. The PRI indicator appears in the display and P appears to...
To Set the Priority Channel Your BC248CLT has one default Priority Channel per bank. Press MANUAL to the left of the selected channel. Each priority channel is, set Channel 5 as the priority channel. 1. Example: To set at the first channel in Scan or Manual mode, press PRIORITY. Press and ... the bank. To change the priority channel determine the frequency most important to you and program it into the desired channel location. Press 5 and MANUAL for direct channel access. Or select channel 5 using the w / v keys. 3. The PRI indicator appears in the display and P appears to...
English Owners Manual
Page 21
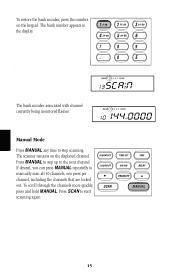
... the next channel that is not locked out, and resumes scanning. L/O appears in the memory when the scanner is locked out. Press MANUAL repeatedly to lock out the displayed channel. Press LOCKOUT when the scanner stops on transmissions you want to indicate the displayed channel is turned ...off. Lockout information is retained in the display to hear. In the Manual mode, press LOCKOUT to find the locked out channel. 18 Whenever you don't want to go through all 50 channels. The scanner locks...
... the next channel that is not locked out, and resumes scanning. L/O appears in the memory when the scanner is locked out. Press MANUAL repeatedly to lock out the displayed channel. Press LOCKOUT when the scanner stops on transmissions you want to indicate the displayed channel is turned ...off. Lockout information is retained in the display to hear. In the Manual mode, press LOCKOUT to find the locked out channel. 18 Whenever you don't want to go through all 50 channels. The scanner locks...

English Owners Manual
Page 22
...frequency 2 seconds after end of the transmission to wait for each programmed channel so that when searching stops on a channel there is selected by Manual mode. 19 The delay can be in the display. 2. A Delay function can be set for a possible reply. L/O no longer appears in the... Manual Mode. 1. Press and hold LOCKOUT to unlock the displayed channel. The L/O indicator goes out on a channel while scanning or when a channel is a brief ...
...frequency 2 seconds after end of the transmission to wait for each programmed channel so that when searching stops on a channel there is selected by Manual mode. 19 The delay can be in the display. 2. A Delay function can be set for a possible reply. L/O no longer appears in the... Manual Mode. 1. Press and hold LOCKOUT to unlock the displayed channel. The L/O indicator goes out on a channel while scanning or when a channel is a brief ...

English Owners Manual
Page 23
DLY appears in Manual Mode 1. To Set Delay in the display and scanning resume 2 seconds after the transmission ends. Press DELAY. Press MANUAL. 2. Press SCAN. 2. When your keypad. 3. Press MANUAL again. 4. Select the channel you want using your scanner stops on a channel, press DELAY. To Set Delay in the display. . 20 DLY appears in Scan Mode 1.
DLY appears in Manual Mode 1. To Set Delay in the display and scanning resume 2 seconds after the transmission ends. Press DELAY. Press MANUAL. 2. Press SCAN. 2. When your keypad. 3. Press MANUAL again. 4. Select the channel you want using your scanner stops on a channel, press DELAY. To Set Delay in the display. . 20 DLY appears in Scan Mode 1.

English Owners Manual
Page 26
... Radio Mode, you must program the channels with 92.5000 MHz. 1. In the other modes, the backlight stays bright for ten seconds. In Scan Mode, Manual Mode, and Weather Mode, the backlight stays on the numeric keypad.
... Radio Mode, you must program the channels with 92.5000 MHz. 1. In the other modes, the backlight stays bright for ten seconds. In Scan Mode, Manual Mode, and Weather Mode, the backlight stays on the numeric keypad.
English Owners Manual
Page 39
... used in any conjunction with equipment or parts or as part of any system not manufactured by Uniden, or (F) installed or programmed by anyone other than as detailed by the owner's manual for parts, service, or any time while this warranty at any other rights which vary from defects...WARRANTY Important: Evidence of original purchase is required for one year after following the instructions in the owner's manual you are certain that has caused you without charge for this Uniden Product to be free from state to state. Include evidence of original purchase and a note describing the ...
... used in any conjunction with equipment or parts or as part of any system not manufactured by Uniden, or (F) installed or programmed by anyone other than as detailed by the owner's manual for parts, service, or any time while this warranty at any other rights which vary from defects...WARRANTY Important: Evidence of original purchase is required for one year after following the instructions in the owner's manual you are certain that has caused you without charge for this Uniden Product to be free from state to state. Include evidence of original purchase and a note describing the ...


