
Owners Manual
Page 4
...knowledge of how your system is configured and operated to either side of hardware and software engineering, the Complete Control MX-450. Fast Professional Setup The MX-450 sets up , which labels the six buttons to completely automate all operation and replace all of even the most complex... buttons at any button, the color LCD screen lights up quickly via on-screen setup. User Configurable Screen and Button Lighting A dedicated LIGHT button enables the user to . Page 1 The MX-450 achieves a magnificent combination of power and flexibility, simplifying and automating operation of the ...
...knowledge of how your system is configured and operated to either side of hardware and software engineering, the Complete Control MX-450. Fast Professional Setup The MX-450 sets up , which labels the six buttons to completely automate all operation and replace all of even the most complex... buttons at any button, the color LCD screen lights up quickly via on-screen setup. User Configurable Screen and Button Lighting A dedicated LIGHT button enables the user to . Page 1 The MX-450 achieves a magnificent combination of power and flexibility, simplifying and automating operation of the ...
Owners Manual
Page 6
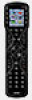
... the device. Favorite channels are the programming manual for the MX-450. polarity indications inside the battery compartment. pleted Basic. Setup Tips are macros that you use a professional audio/video installer to program your MX-450 so you to enjoy all your remotes by either searching the...the cover back into their positions in the battery compartment, observing the + and - Page 3 Programming Options The MX-450 is connected and operated. Advanced Setup enables you will be able to copy and paste groups of each component and how the system is programmed via ...
... the device. Favorite channels are the programming manual for the MX-450. polarity indications inside the battery compartment. pleted Basic. Setup Tips are macros that you use a professional audio/video installer to program your MX-450 so you to enjoy all your remotes by either searching the...the cover back into their positions in the battery compartment, observing the + and - Page 3 Programming Options The MX-450 is connected and operated. Advanced Setup enables you will be able to copy and paste groups of each component and how the system is programmed via ...

Owners Manual
Page 7
...the OFF button, the entire system will turn off the Setup Tips. There is some effect on battery life when you extend the LCD screen lighting, but it is used to paste the Volume and Mute commands for the MX-450. User Settings control battery life. If no matter what...None of button pushes to any button pushes besides the number keys, the -/. Commands from one that you with macros. MX-450 OWNERS MANUAL Programming Limitations Before beginning Basic Setup, plan the layout of commands from the database cannot be programmed with the power to change any other devices so that ...
...the OFF button, the entire system will turn off the Setup Tips. There is some effect on battery life when you extend the LCD screen lighting, but it is used to paste the Volume and Mute commands for the MX-450. User Settings control battery life. If no matter what...None of button pushes to any button pushes besides the number keys, the -/. Commands from one that you with macros. MX-450 OWNERS MANUAL Programming Limitations Before beginning Basic Setup, plan the layout of commands from the database cannot be programmed with the power to change any other devices so that ...

Programming Guide
Page 3
Table of Contents Getting Started: Programming the MX-450 Standard Features Optional Features Tour: Navigating the MX-450 Overview: Setup Screen Overview 1 Basic Setup: Adding Devices 2 Basic Setup: Learn 3 Basic Setup: Delete Device & Review Code Set 4 Advanced Setup: Copy & Paste 5 Advanced Setup: One-Touch Activities (Macros) 6 Advanced Setup: Hide or Display Pages 7 Advanced Setup: Editing Labels 8 Advanced Setup: Erasing 9 Advanced Setup: RF Setup 10 Favorite Channels 11 User Settings 12 Display Tips Glossary
Table of Contents Getting Started: Programming the MX-450 Standard Features Optional Features Tour: Navigating the MX-450 Overview: Setup Screen Overview 1 Basic Setup: Adding Devices 2 Basic Setup: Learn 3 Basic Setup: Delete Device & Review Code Set 4 Advanced Setup: Copy & Paste 5 Advanced Setup: One-Touch Activities (Macros) 6 Advanced Setup: Hide or Display Pages 7 Advanced Setup: Editing Labels 8 Advanced Setup: Erasing 9 Advanced Setup: RF Setup 10 Favorite Channels 11 User Settings 12 Display Tips Glossary

Programming Guide
Page 8
...button for your TV, DVD, Satellite and other devices to make adjustments of the remote. Overview Set-Up Screen Overview The Main Setup Menu of the MX-450 is the heart of the remote's operation like brightness, contrast, light duration, etc. The following are descriptions of each of these... submenus: • Basic Setup: Add all of your guide as your devices to the remote by using this section you are convenient when programming...
...button for your TV, DVD, Satellite and other devices to make adjustments of the remote. Overview Set-Up Screen Overview The Main Setup Menu of the MX-450 is the heart of the remote's operation like brightness, contrast, light duration, etc. The following are descriptions of each of these... submenus: • Basic Setup: Add all of your guide as your devices to the remote by using this section you are convenient when programming...

Programming Guide
Page 9
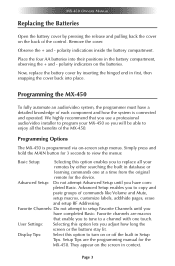
... for device codes. D D. Choose a device icon by pressing the LEFT or RIGHT buttons to navigate. Press select when finished. 1 Basic Setup Adding Devices Within the Search the Database section of Basic Setup, we will add each of device by pressing the UP or DOWN buttons on the remote's 5-way cursor. A A. Select Search...
... for device codes. D D. Choose a device icon by pressing the LEFT or RIGHT buttons to navigate. Press select when finished. 1 Basic Setup Adding Devices Within the Search the Database section of Basic Setup, we will add each of device by pressing the UP or DOWN buttons on the remote's 5-way cursor. A A. Select Search...
Programming Guide
Page 10
... Select the Brand of the screen) J J. H. If not, press Back to add more devices by selecting Yes then Next. When a device is Pass-ed the MX-450 will save the device (blue progress bar at the bottom of your device and point the remote toward it. Test the code by pressing the... UP and DOWN buttons. Turn ON your device by pressing the Power On, Vol+ & Ch+ If the device responds to setup another device. 1 Basic Setup Adding Devices 1 F F. Press the UP or DOWN buttons until the device turns OFF. When FINISHED adding devices, select NO then NEXT when ...
... Select the Brand of the screen) J J. H. If not, press Back to add more devices by selecting Yes then Next. When a device is Pass-ed the MX-450 will save the device (blue progress bar at the bottom of your device and point the remote toward it. Test the code by pressing the... UP and DOWN buttons. Turn ON your device by pressing the Power On, Vol+ & Ch+ If the device responds to setup another device. 1 Basic Setup Adding Devices 1 F F. Press the UP or DOWN buttons until the device turns OFF. When FINISHED adding devices, select NO then NEXT when ...

Programming Guide
Page 11
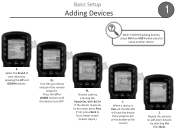
2 A Basic Setup LEARN Can't find a button there. B. Make sure to buttons like Power On or Off. Select On the Main Menu to learn commands to have the ... want to control your device? Then learn an entire device or specific commands within the device. Select Inside a Device to select Learn. From the Basic Setup screen use the 5-way cursor to learn the commands into the MX-450 from the original manufacturer's remote.
2 A Basic Setup LEARN Can't find a button there. B. Make sure to buttons like Power On or Off. Select On the Main Menu to learn commands to have the ... want to control your device? Then learn an entire device or specific commands within the device. Select Inside a Device to select Learn. From the Basic Setup screen use the 5-way cursor to learn the commands into the MX-450 from the original manufacturer's remote.
Programming Guide
Page 12
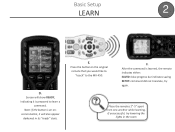
Press the button on the original remote that you would like to "teach" to learn a command. F. If unsuccessful, try again. Screen will show READY, indicating it will also appear darkened in the room E. Place the remotes 2"-5" apart from one another while learning. Note: if the button is an onscreen button, it is learned, the remote indicates either: SAVED: blue progress bar indicates saving RETRY: command did not translate, try lowering the lights in its "ready" state. After the command is prepared to the MX-450. 2 Basic Setup LEARN 2 F E D D.
Press the button on the original remote that you would like to "teach" to learn a command. F. If unsuccessful, try again. Screen will show READY, indicating it will also appear darkened in the room E. Place the remotes 2"-5" apart from one another while learning. Note: if the button is an onscreen button, it is learned, the remote indicates either: SAVED: blue progress bar indicates saving RETRY: command did not translate, try lowering the lights in its "ready" state. After the command is prepared to the MX-450. 2 Basic Setup LEARN 2 F E D D.

Programming Guide
Page 13
3 Basic Setup Delete Device & Review Code Set Delete a Device If you would like to review the saved code for custom install professional use only. Then press the device's button to select Review Code Set. This feature is for each device, use the 5-way cursor to select Delete a Device. Review Code Set If you want to delete a device use the arrows to delete it.
3 Basic Setup Delete Device & Review Code Set Delete a Device If you would like to review the saved code for custom install professional use only. Then press the device's button to select Review Code Set. This feature is for each device, use the 5-way cursor to select Delete a Device. Review Code Set If you want to delete a device use the arrows to delete it.

Programming Guide
Page 14
Groups Power ON only Power OFF only B B. Advanced Setup Copy & Paste Ever wish you can. 4 A A. Select a group of commands to switch your television input without having to copy: Volume, Channel, Play, Menu, Power ON or Power OFF groups. (in this example: Volume Group) Volume Group Menu Group Play Group Channel Group Now you could lower the volume or better yet change your audio receiver or television remote? From the Advanced Setup screen, use the 5-way cursor to select Copy & Paste.
Groups Power ON only Power OFF only B B. Advanced Setup Copy & Paste Ever wish you can. 4 A A. Select a group of commands to switch your television input without having to copy: Volume, Channel, Play, Menu, Power ON or Power OFF groups. (in this example: Volume Group) Volume Group Menu Group Play Group Channel Group Now you could lower the volume or better yet change your audio receiver or television remote? From the Advanced Setup screen, use the 5-way cursor to select Copy & Paste.

Programming Guide
Page 15
... To The Main & Fav to save the commands only to paste the commands. Select To All Devices to use the commands in one device. Advanced Setup Copy & Paste 4 The process ends here if To All Devices or Main & Fav was chosen go to Step E.
... To The Main & Fav to save the commands only to paste the commands. Select To All Devices to use the commands in one device. Advanced Setup Copy & Paste 4 The process ends here if To All Devices or Main & Fav was chosen go to Step E.
Programming Guide
Page 16
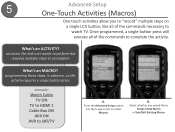
...-Touch Activities (Macros) One touch activities allow you would like all of the commands necessary to watch TV. B. From the Advanced Setup screen use the 5-way cursor to SAT/TV A B A. What's an ACTIVITY? programming these steps, in advance, so the activity requires a single button...perform but requires multiple steps to complete the activity. Select whether you to "record" multiple steps on a single LCD button, like to Setup a New Macro or Test/Edit Existing Macro. Once programmed, a single button press will execute all of the commands to accomplish What's an MACRO?...
...-Touch Activities (Macros) One touch activities allow you would like all of the commands necessary to watch TV. B. From the Advanced Setup screen use the 5-way cursor to SAT/TV A B A. What's an ACTIVITY? programming these steps, in advance, so the activity requires a single button...perform but requires multiple steps to complete the activity. Select whether you to "record" multiple steps on a single LCD button, like to Setup a New Macro or Test/Edit Existing Macro. Once programmed, a single button press will execute all of the commands to accomplish What's an MACRO?...

Programming Guide
Page 17
... selecting the button. This starts the recording process E E. C. Select the button where you want the macro to end. Record each step by pressing Done. Advanced Setup One-Touch Activities (Macros) 5 Add Delays Pressing the Pause button inserts a .5 sec delay between commands. So, make sure you hit DONE on the page where...
... selecting the button. This starts the recording process E E. C. Select the button where you want the macro to end. Record each step by pressing Done. Advanced Setup One-Touch Activities (Macros) 5 Add Delays Pressing the Pause button inserts a .5 sec delay between commands. So, make sure you hit DONE on the page where...

Programming Guide
Page 18
... Hide or Display Pages or Hide or Display Buttons. CQ Humor A B C D A. Select Hide or Display Pages or Hide or Display Devices. go to hide. 6 Advanced Setup Hide or Display Pages If Inside a Device is located: On the Main Menu- Navigate to the button, page or device to be hidden is chosen...
... Hide or Display Pages or Hide or Display Buttons. CQ Humor A B C D A. Select Hide or Display Pages or Hide or Display Devices. go to hide. 6 Advanced Setup Hide or Display Pages If Inside a Device is located: On the Main Menu- Navigate to the button, page or device to be hidden is chosen...

Programming Guide
Page 19
... easier by selecting On the Main Menu, Inside a Device or Edit Main Label (the title that appears on top of an icon. From the Advanced Setup screen use the 5-way cursor to a newly created activity? (i.e. How about renaming a button to select Edit Labels. TV to rename by labeling buttons to rename...
... easier by selecting On the Main Menu, Inside a Device or Edit Main Label (the title that appears on top of an icon. From the Advanced Setup screen use the 5-way cursor to a newly created activity? (i.e. How about renaming a button to select Edit Labels. TV to rename by labeling buttons to rename...

Programming Guide
Page 20
Press Next to move one. Change the device icon by using the number key's alphanumeric equivalent. F. Press Next when done. D E 7 F D. Select a device type, for the device using the 5 way cursor and select buttons. Advanced Setup Editing Labels These steps are only available if On the Main Menu is selected in a name for the icon, by pressing the left or right cursor. Type in Step B. E.
Press Next to move one. Change the device icon by using the number key's alphanumeric equivalent. F. Press Next when done. D E 7 F D. Select a device type, for the device using the 5 way cursor and select buttons. Advanced Setup Editing Labels These steps are only available if On the Main Menu is selected in a name for the icon, by pressing the left or right cursor. Type in Step B. E.

Programming Guide
Page 21
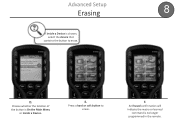
B. Select how you want to erase Macros or Learned Commands. From the Advanced Setup screen use the 5-way cursor to erase : One Button, All on the remote. B C A A. Decide whether you would like to select Erasing. 8 Advanced Setup Erasing Quickly erase unwanted activities (macros) and learned commands anywhere on 1 Device or All Everywhere. C.
B. Select how you want to erase Macros or Learned Commands. From the Advanced Setup screen use the 5-way cursor to erase : One Button, All on the remote. B C A A. Decide whether you would like to select Erasing. 8 Advanced Setup Erasing Quickly erase unwanted activities (macros) and learned commands anywhere on 1 Device or All Everywhere. C.
Programming Guide
Page 22
Press a hard or soft button to erase. An Erased confirmation will indicate the macro or learned command is On the Main Menu or Inside a Device. Advanced Setup Erasing If Inside a Device is chosen, select the device that contains the button to erase. D E 8 F D. E. Choose whether the location of the button is no longer programmed in the remote. F.
Press a hard or soft button to erase. An Erased confirmation will indicate the macro or learned command is On the Main Menu or Inside a Device. Advanced Setup Erasing If Inside a Device is chosen, select the device that contains the button to erase. D E 8 F D. E. Choose whether the location of the button is no longer programmed in the remote. F.

Programming Guide
Page 23
Add an optional RF base station for this option. From the Advanced Setup screen use RF control for EVERY device (All Devices Set Same) or decide IR or RF for each option. B C A A. The next page has more details ... station such as they determine how communication occurs between the remote, your devices, and the RF base station. Advanced Setup RF Setup Tired of leaving the cabinet doors open, just to select RF Setup. Decide whether you must choose Each Device Differs C. These four options are important as a MRF-260 or MRF-350...
Add an optional RF base station for this option. From the Advanced Setup screen use RF control for EVERY device (All Devices Set Same) or decide IR or RF for each option. B C A A. The next page has more details ... station such as they determine how communication occurs between the remote, your devices, and the RF base station. Advanced Setup RF Setup Tired of leaving the cabinet doors open, just to select RF Setup. Decide whether you must choose Each Device Differs C. These four options are important as a MRF-260 or MRF-350...