
Owners Manual
Page 2
... may be copied or reproduced in this manual is designed to assist you step-by-step as you for purchasing the MX-350 TM Pre-Programmed and Learning Remote Control. This manual is copyright protected. No part of your remote controls and automate your home entertainment ... 3 Basic Setup 5 Pre-Programmed Method 5 Learning Method 9 Volume Control Punch Through 12 Advanced Operation 14 Advanced Setup 16 Editing Button Labels 16 Macro Button Setup 19 Favorite Channel Setup 21 Hiding and Adding Pages 23 Erasing 25 Cloning One MX-350 to change without prior written ...
... may be copied or reproduced in this manual is designed to assist you step-by-step as you for purchasing the MX-350 TM Pre-Programmed and Learning Remote Control. This manual is copyright protected. No part of your remote controls and automate your home entertainment ... 3 Basic Setup 5 Pre-Programmed Method 5 Learning Method 9 Volume Control Punch Through 12 Advanced Operation 14 Advanced Setup 16 Editing Button Labels 16 Macro Button Setup 19 Favorite Channel Setup 21 Hiding and Adding Pages 23 Erasing 25 Cloning One MX-350 to change without prior written ...
Owners Manual
Page 4
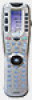
...the LIGHT button to backlight all of the display buttons change their function to the pre-programmed code tables on the A/V component you wish to setup, so that you don't press a button within that time, the MX-350 will show "SETUP". The code numbers are eight pages of devices, then by sending ... The top of the screen changes from MAIN to display the remaining five devices on the screen. However, all the buttons of your MX-350 using either the Pre-Programmed Method or the Learning Method. See page 37 for a category list. 3 Press and hold both the MAIN and ENT (Enter) buttons for...
...the LIGHT button to backlight all of the display buttons change their function to the pre-programmed code tables on the A/V component you wish to setup, so that you don't press a button within that time, the MX-350 will show "SETUP". The code numbers are eight pages of devices, then by sending ... The top of the screen changes from MAIN to display the remaining five devices on the screen. However, all the buttons of your MX-350 using either the Pre-Programmed Method or the Learning Method. See page 37 for a category list. 3 Press and hold both the MAIN and ENT (Enter) buttons for...

Owners Manual
Page 5
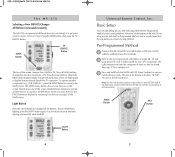
...is correct, press SELECT. I found the code that you 'd like to the correct type of component you enter each Code Table contains. 7 Point the MX-350 at the TV. It didn't turn off the TV. 7 When it turned off . SELECT If the name flashing in the display. First Five Device Names... setting up AUX to operate a Laser Disc Player), use the UP and DOWN buttons to setup. Use the number buttons to select the Pre-Programmed Method. The MX-350 4 Press the P-PRO button to enter the code number. If the flashing name is correct, press the SELECT button. For Example: I found ...
...is correct, press SELECT. I found the code that you 'd like to the correct type of component you enter each Code Table contains. 7 Point the MX-350 at the TV. It didn't turn off the TV. 7 When it turned off . SELECT If the name flashing in the display. First Five Device Names... setting up AUX to operate a Laser Disc Player), use the UP and DOWN buttons to setup. Use the number buttons to select the Pre-Programmed Method. The MX-350 4 Press the P-PRO button to enter the code number. If the flashing name is correct, press the SELECT button. For Example: I found ...

Owners Manual
Page 12
The MX-350 5 Navigate to the Device and Page that you have 30 seconds for each of the display will show the channel name. Each macro button can program delays in a channel number. A new screen displays three choices: SAVE Button SAVE - UNDO - By simply setting up to 190 steps, so you ...out of the favorite channel buttons, you erase the last step. If you are not likely to enter channel numbers). 6 Press each step, otherwise the MX-350 will flash "SELECT". 3 Use the Page buttons until you want . Favorite Channel Setup Imagine surfing all the macro steps. 7 Press the MAIN button...
The MX-350 5 Navigate to the Device and Page that you have 30 seconds for each of the display will show the channel name. Each macro button can program delays in a channel number. A new screen displays three choices: SAVE Button SAVE - UNDO - By simply setting up to 190 steps, so you ...out of the favorite channel buttons, you erase the last step. If you are not likely to enter channel numbers). 6 Press each step, otherwise the MX-350 will flash "SELECT". 3 Use the Page buttons until you want . Favorite Channel Setup Imagine surfing all the macro steps. 7 Press the MAIN button...

Owners Manual
Page 13
...button. 8 When you can hide pages without affecting operation of your macros. 1 Enter SETUP mode by a half second. The MX-350 Note: If a number is usually best to program your Macros before you entered, press the SAVE button. Each press of the pause button increases the delay by pressing the PAUSE...the channel you hide pages with a potential macro step in them . Hiding and Adding Pages Each of the screen. 23 If you change your MX-350 Devices contains up Favorite Channel buttons, press the MAIN button twice to return to set a half second delay in between steps, each step, ...
...button. 8 When you can hide pages without affecting operation of your macros. 1 Enter SETUP mode by a half second. The MX-350 Note: If a number is usually best to program your Macros before you entered, press the SAVE button. Each press of the pause button increases the delay by pressing the PAUSE...the channel you hide pages with a potential macro step in them . Hiding and Adding Pages Each of the screen. 23 If you change your MX-350 Devices contains up Favorite Channel buttons, press the MAIN button twice to return to set a half second delay in between steps, each step, ...

Owners Manual
Page 15
Recalling Pre-Programmed Settings If you setup your settings and return to normal operation by pressing ...26 Universal Remote Control, Inc. The screen automatically switches between four screens, alternately flashing page one MX-350 to the page numbers on the MX-350 you can recall them via the PAGE UP button. 3 Press the RECAL button. Press the ...Page1 Devices. After 15 seconds, the RESET screen appears. Note: You have 30 seconds for each step, otherwise the MX-350 will flash "GOOD". 8 Return to the recall screens. Page 2 code numbers are the ones setup for 15 seconds....
Recalling Pre-Programmed Settings If you setup your settings and return to normal operation by pressing ...26 Universal Remote Control, Inc. The screen automatically switches between four screens, alternately flashing page one MX-350 to the page numbers on the MX-350 you can recall them via the PAGE UP button. 3 Press the RECAL button. Press the ...Page1 Devices. After 15 seconds, the RESET screen appears. Note: You have 30 seconds for each step, otherwise the MX-350 will flash "GOOD". 8 Return to the recall screens. Page 2 code numbers are the ones setup for 15 seconds....

Owners Manual
Page 16
... located in every direction. The intelligent routing of the components, the range will send your commands only to the TV you want to control. The MX-350 sends radio signal to easily reach components on reflective surfaces, lighting, etc.). Each flasher has a 10' cable to the MRF-100, MRF-250 or...room array of -sight output using an RF remote control. By purchasing the MRF-100 or the addressable MRF-250 or MRF-350 base stations, you have to be programmed to the front panels of 15 unique ID#'s. Since the RF Base Station picks up to components in the Den. Addressable base...
... located in every direction. The intelligent routing of the components, the range will send your commands only to the TV you want to control. The MX-350 sends radio signal to easily reach components on reflective surfaces, lighting, etc.). Each flasher has a 10' cable to the MRF-100, MRF-250 or...room array of -sight output using an RF remote control. By purchasing the MRF-100 or the addressable MRF-250 or MRF-350 base stations, you have to be programmed to the front panels of 15 unique ID#'s. Since the RF Base Station picks up to components in the Den. Addressable base...

Owners Manual
Page 18
...3. 3 The display changes to a list of the names of your MX-350 devices to the RF settings menu. Then, go to Step 4. Both IR and RF will be output Only IR line-of devices. You program each with an MRF-250 or MRF-350 assigned a unique Receiver ID#. Select the device you would like... to change the signal settings to Step 4. ID # - Then, go to just one of the devices of the MX-350. Select DEVIC to change the ID#, then...
...3. 3 The display changes to a list of the names of your MX-350 devices to the RF settings menu. Then, go to Step 4. Both IR and RF will be output Only IR line-of devices. You program each with an MRF-250 or MRF-350 assigned a unique Receiver ID#. Select the device you would like... to change the signal settings to Step 4. ID # - Then, go to just one of the devices of the MX-350. Select DEVIC to change the ID#, then...

Owners Manual
Page 20
...all devices or just one of devices. Select a device 4 Select the new setting by brand (Sony, Panasonic, B & K, etc.). Pre-Programmed Code Tables The MX-350's Pre-Programmed code library is divided into categories (TV, VCR, AUX, etc.). TV TVs, Plasma/LCD TVs, Projectors and Monitors Pages 38-41 CABLE Cable...-56 Pages 56-59 37 The MX-350 1 From the RF Settings Menu, select BLAST. 2 Decide whether you are found on page 5). Just circle the correct row and refer to Step 4. If you setup (step-by-step instructions for using Pre-Programmed codes are changing the Blaster for ...
...all devices or just one of devices. Select a device 4 Select the new setting by brand (Sony, Panasonic, B & K, etc.). Pre-Programmed Code Tables The MX-350's Pre-Programmed code library is divided into categories (TV, VCR, AUX, etc.). TV TVs, Plasma/LCD TVs, Projectors and Monitors Pages 38-41 CABLE Cable...-56 Pages 56-59 37 The MX-350 1 From the RF Settings Menu, select BLAST. 2 Decide whether you are found on page 5). Just circle the correct row and refer to Step 4. If you setup (step-by-step instructions for using Pre-Programmed codes are changing the Blaster for ...


