Operation Manual
Page 11
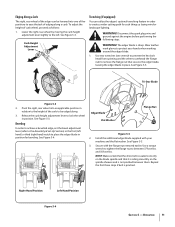
... spindle sheaves and is riding smoothly on the blade spindle and that secures the edger blade, leaving the edger blade in place. Repeat the first three steps if belt is sharp. The edger blade is pinched. Beveling In order to achieve a bevelled edge, set the ...moving the curb height adjustment lever slightly to the left hand) or third (right hand) notch to between them. Edger Blade Flat Washer Flange Nut Figure 5-5 2. Install the additional edger blade supplied with the flange nut removed earlier. Operation 11 WARNING! See Figure 5-5. 2 Tri-Star Blade Figure 5-3...
... spindle sheaves and is riding smoothly on the blade spindle and that secures the edger blade, leaving the edger blade in place. Repeat the first three steps if belt is sharp. The edger blade is pinched. Beveling In order to achieve a bevelled edge, set the ...moving the curb height adjustment lever slightly to the left hand) or third (right hand) notch to between them. Edger Blade Flat Washer Flange Nut Figure 5-5 2. Install the additional edger blade supplied with the flange nut removed earlier. Operation 11 WARNING! See Figure 5-5. 2 Tri-Star Blade Figure 5-3...
Operation Manual
Page 12
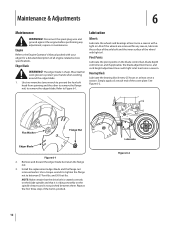
... at each end of all engine-related service specifications. See Figure 6-2. and 50 foot-lbs. Repeat the first three steps if the belt is not pinched between 37 foot-lbs. Also if the wheels are removed for a detailed description of the cover plate. Use two ... and discard the edger blade but retain the flange nut. 3. Use a torque wrench to tighten the flange nut to protect your edger for any adjustment, repairs or maintenance. Wear leather work gloves to between them. Flat Washer Flange Nut Edger Blade Figure 6-1 2. Install the replacement edger blade and the flange...
... at each end of all engine-related service specifications. See Figure 6-2. and 50 foot-lbs. Repeat the first three steps if the belt is not pinched between 37 foot-lbs. Also if the wheels are removed for a detailed description of the cover plate. Use two ... and discard the edger blade but retain the flange nut. 3. Use a torque wrench to tighten the flange nut to protect your edger for any adjustment, repairs or maintenance. Wear leather work gloves to between them. Flat Washer Flange Nut Edger Blade Figure 6-1 2. Install the replacement edger blade and the flange...


