Operation Manual
Page 11
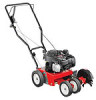
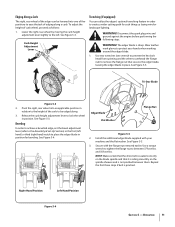
... See Figure 5-5. 3. NOTE: Make certain that the drive belt is seated correctly on the blade spindle and that secures the edger blade, leaving the edger blade in place. Repeat the first three steps if belt is pinched. Right-Hand Position Left-Hand Position Figure 5-4 Section ... Figure 5-3 2. Secure with your hands when working around the edger blade. 1. Edging Along a Curb The right, rear wheel of the edger can utilize the edger's optional trenching feature in order to place the edger blade in position for landscape lighting. See Figure 5-3. To adjust the height of curb wheel...
... See Figure 5-5. 3. NOTE: Make certain that the drive belt is seated correctly on the blade spindle and that secures the edger blade, leaving the edger blade in place. Repeat the first three steps if belt is pinched. Right-Hand Position Left-Hand Position Figure 5-4 Section ... Figure 5-3 2. Secure with your hands when working around the edger blade. 1. Edging Along a Curb The right, rear wheel of the edger can utilize the edger's optional trenching feature in order to place the edger blade in position for landscape lighting. See Figure 5-3. To adjust the height of curb wheel...


