
Operation Manual
Page 1
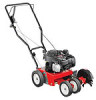
BOX 361131 CLEVELAND, OHIO 44136-0019 Form No. 769-08749A (January 3, 2013) Model 554 WARNING READ AND FOLLOW ALL SAFETY RULES AND INSTRUCTIONS IN THIS MANUAL BEFORE ATTEMPTING TO OPERATE THIS MACHINE. FAILURE TO COMPLY WITH THESE INSTRUCTIONS MAY RESULT IN PERSONAL INJURY. Safe Operation Practices • Set-Up • Operation • Maintenance • Service • Troubleshooting • Warranty Operator's Manual Lawn Edger - Printed In USA TROY-BILT LLC, P.O.
BOX 361131 CLEVELAND, OHIO 44136-0019 Form No. 769-08749A (January 3, 2013) Model 554 WARNING READ AND FOLLOW ALL SAFETY RULES AND INSTRUCTIONS IN THIS MANUAL BEFORE ATTEMPTING TO OPERATE THIS MACHINE. FAILURE TO COMPLY WITH THESE INSTRUCTIONS MAY RESULT IN PERSONAL INJURY. Safe Operation Practices • Set-Up • Operation • Maintenance • Service • Troubleshooting • Warranty Operator's Manual Lawn Edger - Printed In USA TROY-BILT LLC, P.O.

Operation Manual
Page 2
...carefully engineered to safely and easily set up and operating your machine, for more information. Throughout this machine can locate the model plate by Troy-Bilt. Please be found at the rear of Contents Safe Operation Practices 3 Assembly & Set-Up 7 Features & Controls 9 Operation 10 Maintenance ...and operation. Box 361131 • Cleveland, OH • 44136-0019 2 To The Owner 1 Thank You Thank you for purchasing an Edger manufactured by standing at the operator's position and looking down at www.opei.org or the engine manufacturer's web site. This information will...
...carefully engineered to safely and easily set up and operating your machine, for more information. Throughout this machine can locate the model plate by Troy-Bilt. Please be found at the rear of Contents Safe Operation Practices 3 Assembly & Set-Up 7 Features & Controls 9 Operation 10 Maintenance ...and operation. Box 361131 • Cleveland, OH • 44136-0019 2 To The Owner 1 Thank You Thank you for purchasing an Edger manufactured by standing at the operator's position and looking down at www.opei.org or the engine manufacturer's web site. This information will...
Operation Manual
Page 3
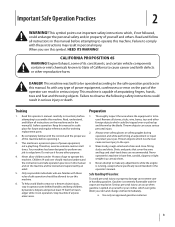
... machine. Read, understand, and follow all instructions on the part of California to the eyes. 3. Therefore, exercise extreme caution at least 75 feet from lawn edger while it for ordering replacement parts. 2. Read and follow all instructions in this manual before attempting to use extreme care in a safe place for future...
... machine. Read, understand, and follow all instructions on the part of California to the eyes. 3. Therefore, exercise extreme caution at least 75 feet from lawn edger while it for ordering replacement parts. 2. Read and follow all instructions in this manual before attempting to use extreme care in a safe place for future...
Operation Manual
Page 4
... at least two minutes before starting . 18. If gasoline is delayed or when transporting machine from a gasoline dispenser nozzle. Allow a lawn edger to another area. Do not operate machine while under watchful care of a responsible adult other sources of a child who may cause personal injury...remain where you last saw them. 1. k. b. Never operate this manual, use a nozzle lock-open flame, spark or pilot light as lawn edgers. Children are not covered in rain or wet soil conditions. 15. m. Use extreme care when approaching blind corners, doorways, shrubs, trees, ...
... at least two minutes before starting . 18. If gasoline is delayed or when transporting machine from a gasoline dispenser nozzle. Allow a lawn edger to another area. Do not operate machine while under watchful care of a responsible adult other sources of a child who may cause personal injury...remain where you last saw them. 1. k. b. Never operate this manual, use a nozzle lock-open flame, spark or pilot light as lawn edgers. Children are not covered in rain or wet soil conditions. 15. m. Use extreme care when approaching blind corners, doorways, shrubs, trees, ...
Operation Manual
Page 5
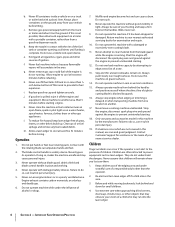
...spark plug wire and ground against the engine. Maintenance and Storage 1. Never attempt to prevent unintended starting and operating the lawn edger. 8. According to do not meet the original equipment specifications may have similar laws. Spark Arrestor WARNING! Check their proper ... equipped with a spark arrestor meeting applicable local or state laws (if any). If a spark arrestor is available through your new edger can suffer burns from hot or running . 9. Never tamper with original equipment manufacturer's (O.E.M.) parts only, listed in this manual....
...spark plug wire and ground against the engine. Maintenance and Storage 1. Never attempt to prevent unintended starting and operating the lawn edger. 8. According to do not meet the original equipment specifications may have similar laws. Spark Arrestor WARNING! Check their proper ... equipped with a spark arrestor meeting applicable local or state laws (if any). If a spark arrestor is available through your new edger can suffer burns from hot or running . 9. Never tamper with original equipment manufacturer's (O.E.M.) parts only, listed in this manual....
Operation Manual
Page 7
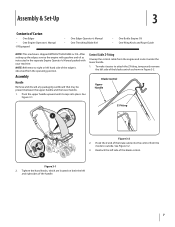
...and route it easier to attach the Z-fitting, temporarily remove the left and right sides of the handle. 7 Reattach the left hand side of the edger is shipped WITHOUT GASOLINE or OIL. See Figure 3-1. To make it under the lower handle. 1. See Figure 3-2. 3. NOTE: Reference to outside. ...Hook the Z end of the brake cable into place. After setting up the edger, service the engine with gasoline and oil as shown in the separate Engine Operator's Manual packed with your machine. Pivot the upper handle upward until...
...and route it easier to attach the Z-fitting, temporarily remove the left and right sides of the handle. 7 Reattach the left hand side of the edger is shipped WITHOUT GASOLINE or OIL. See Figure 3-1. To make it under the lower handle. 1. See Figure 3-2. 3. NOTE: Reference to outside. ...Hook the Z end of the brake cable into place. After setting up the edger, service the engine with gasoline and oil as shown in the separate Engine Operator's Manual packed with your machine. Pivot the upper handle upward until...
Operation Manual
Page 8
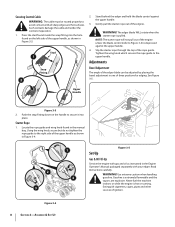
... in the Engine Operator's Manual packaged separately with all sharp edges and hot surfaces. Assembly & Set-Up Gasoline is pulled. Stand behind the edger and hold the blade control against the upper handle. 4. WARNING! Slip the starter rope through the top of ignition. Upper Handle Figure 3-3 ... positions for edging. Read Instructions carefully. NOTE: The starter rope will not pull out of the edger blade can be routed properly to avoid contact with your edger. Adjustments Bevel Adjustment The angle of the engine unless the blade control (refer to secure it into...
... in the Engine Operator's Manual packaged separately with all sharp edges and hot surfaces. Assembly & Set-Up Gasoline is pulled. Stand behind the edger and hold the blade control against the upper handle. 4. WARNING! Slip the starter rope through the top of ignition. Upper Handle Figure 3-3 ... positions for edging. Read Instructions carefully. NOTE: The starter rope will not pull out of the edger blade can be routed properly to avoid contact with your edger. Adjustments Bevel Adjustment The angle of the engine unless the blade control (refer to secure it into...
Operation Manual
Page 9
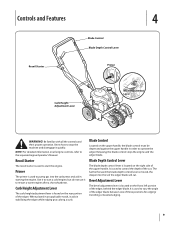
... will cut . NOTE: For detailed information on the upper handle, the blade control must be depressed against the upper handle in stabilizing the edger while edging grass along a curb. It is moved, the deeper into the carburetor and aid in starting the engine. Know how to restart a warm... Engine Operator's Manual. When placed in an applicable notch, it to start the engine. Be familiar with all engine controls, refer to operate the edger. It is located on the right side of the upper handle. Blade Depth Control Lever The blade depth control lever is used to control the...
... will cut . NOTE: For detailed information on the upper handle, the blade control must be depressed against the upper handle in stabilizing the edger while edging grass along a curb. It is moved, the deeper into the carburetor and aid in starting the engine. Know how to restart a warm... Engine Operator's Manual. When placed in an applicable notch, it to start the engine. Be familiar with all engine controls, refer to operate the edger. It is located on the right side of the upper handle. Blade Depth Control Lever The blade depth control lever is used to control the...
Operation Manual
Page 10
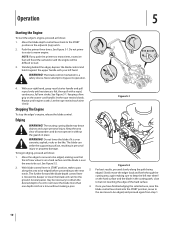
...bypass its operation. 1 4 3 3 2 4. This blade control mechanism is moved, the deeper or lower the blade will be necessary to start the edger's engine, proceed as follows: 1. Keeping a firm grip on the starter cord handle, let the rope rewind slowly. Keep the area clear of cut ...into the START position, move the edger back and forth through the cutting area, again making a pass. 4. Several passes may throw objects and cause personal injury. notch. WARNING! See ...
...bypass its operation. 1 4 3 3 2 4. This blade control mechanism is moved, the deeper or lower the blade will be necessary to start the edger's engine, proceed as follows: 1. Keeping a firm grip on the starter cord handle, let the rope rewind slowly. Keep the area clear of cut ...into the START position, move the edger back and forth through the cutting area, again making a pass. 4. Several passes may throw objects and cause personal injury. notch. WARNING! See ...
Operation Manual
Page 11
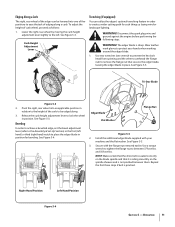
... belt is sharp. Right-Hand Position Left-Hand Position Figure 5-4 Section 5 - See Figure 5-4. Secure with your hands when working around the edger blade. 1. Operation 11 Lower the right, rear wheel by moving the curb height adjustment lever slightly to place the...spindle sheaves and is seated correctly on the blade spindle and that secures the edger blade, leaving the edger blade in the first (left hand) or third (right hand) notch to the left. Install the additional edger blade supplied with the flange nut removed earlier. See Figure 5-3. To adjust ...
... belt is sharp. Right-Hand Position Left-Hand Position Figure 5-4 Section 5 - See Figure 5-4. Secure with your hands when working around the edger blade. 1. Operation 11 Lower the right, rear wheel by moving the curb height adjustment lever slightly to place the...spindle sheaves and is seated correctly on the blade spindle and that secures the edger blade, leaving the edger blade in the first (left hand) or third (right hand) notch to the left. Install the additional edger blade supplied with the flange nut removed earlier. See Figure 5-3. To adjust ...
Operation Manual
Page 12
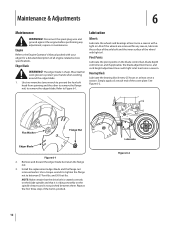
... the flange nut) to between them. Lubrication Wheels Lubricate the wheels and bearings at least once a season with your hands when working around the edger blade. 1. Also if the wheels are removed for a detailed description of all engine-related service specifications. Simply apply oil at each end of... the wheel with light oil at least once a season. Flat Washer Flange Nut Edger Blade Figure 6-1 2. NOTE: Make certain that the drive belt is seated correctly on the blade spindle and that it is not pinched between ...
... the flange nut) to between them. Lubrication Wheels Lubricate the wheels and bearings at least once a season with your hands when working around the edger blade. 1. Also if the wheels are removed for a detailed description of all engine-related service specifications. Simply apply oil at each end of... the wheel with light oil at least once a season. Flat Washer Flange Nut Edger Blade Figure 6-1 2. NOTE: Make certain that the drive belt is seated correctly on the blade spindle and that it is not pinched between ...
Operation Manual
Page 13
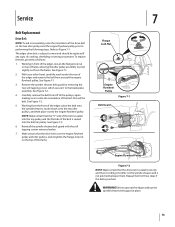
... Nut Engine Flywheel Pulley Figure 7-1 Belt Guard 7 Engine Flywheel Pulley Figure 7-2 NOTE: Make certain that the drive belt is seated into the bottom pulley. The edger drive belt is on the engine flywheel pulley and idler pulleys, and retighten the flange lock nut on the top of the frame. Reinstall the... the spindle sheaves belt guard in place. 13 With your other hand, carefully reach under the rear of the edger and remove the belt from the front of the edger, place the belt onto the spindle sheaves, route it back onto the two idler pulleys, and then place it is riding smoothly...
... Nut Engine Flywheel Pulley Figure 7-1 Belt Guard 7 Engine Flywheel Pulley Figure 7-2 NOTE: Make certain that the drive belt is seated into the bottom pulley. The edger drive belt is on the engine flywheel pulley and idler pulleys, and retighten the flange lock nut on the top of the frame. Reinstall the... the spindle sheaves belt guard in place. 13 With your other hand, carefully reach under the rear of the edger and remove the belt from the front of the edger, place the belt onto the spindle sheaves, route it back onto the two idler pulleys, and then place it is riding smoothly...

Operation Manual
Page 14
... corrosive materials, such as instructed on the previous page. 2. Store the edger in an poorly ventilated or metal storage shed, care should be taken to any type of power equipment in a dry, clean area. Coat the edger blade with a light oil or silicone spray. Do not store next to... rustproof the equipment. 14 Section 7- Coat the edger, especially any springs and bearings with chassis grease to the Engine Operator's Manual packed ...
... corrosive materials, such as instructed on the previous page. 2. Store the edger in an poorly ventilated or metal storage shed, care should be taken to any type of power equipment in a dry, clean area. Coat the edger blade with a light oil or silicone spray. Do not store next to... rustproof the equipment. 14 Section 7- Coat the edger, especially any springs and bearings with chassis grease to the Engine Operator's Manual packed ...
Operation Manual
Page 15
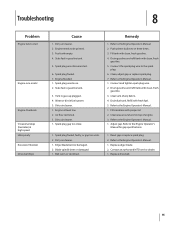
...the spark plug wire to the Engine Operator's Manual. 1. Clean, adjust gap or replace spark plug. 7. Refer to the spark plug. 6. Replace edger blade. 2. Spark plug fouled. 7. Dirty air cleaner. 1. Refer to the Engine Operator's Manual. 1. Drain gasoline and refill tank with clean,... 1. Air flow restricted. 3. Spark plug gap too close. 1. Spark plug fouled, faulty, or gap too wide. 2. Dirty air cleaner. 1. Edger blade bent or damaged. 2. Blade spindle bent or damaged. 1. Fill tank with clean, fresh gasoline. 3. Drain gasoline and refill tank with fresh ...
...the spark plug wire to the Engine Operator's Manual. 1. Clean, adjust gap or replace spark plug. 7. Refer to the spark plug. 6. Replace edger blade. 2. Spark plug fouled. 7. Dirty air cleaner. 1. Refer to the Engine Operator's Manual. 1. Drain gasoline and refill tank with clean,... 1. Air flow restricted. 3. Spark plug gap too close. 1. Spark plug fouled, faulty, or gap too wide. 2. Dirty air cleaner. 1. Edger blade bent or damaged. 2. Blade spindle bent or damaged. 1. Fill tank with clean, fresh gasoline. 3. Drain gasoline and refill tank with fresh ...


