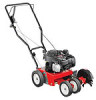
Operation Manual
Page 3
... job: to be tripped over should be allowed to assemble this manual in operation. Do not use this machine. To help avoid blade contact or a thrown object injury, stay in operator zone behind handles and keep children, bystanders, helpers and pets at all instructions ... all instructions in personal injury. Use only an approved gasoline container. 3 This machine was built to be trained and supervised by the blade. Training 1. This symbol points out important safety instructions which ricochet can cause serious personal injury. 2. As with these rules of its entirety...
... job: to be tripped over should be allowed to assemble this manual in operation. Do not use this machine. To help avoid blade contact or a thrown object injury, stay in operator zone behind handles and keep children, bystanders, helpers and pets at all instructions ... all instructions in personal injury. Use only an approved gasoline container. 3 This machine was built to be trained and supervised by the blade. Training 1. This symbol points out important safety instructions which ricochet can cause serious personal injury. 2. As with these rules of its entirety...
Operation Manual
Page 4
...them. 1. i. If gasoline is complete. k. To reduce fire hazard, keep a firm hold on a trailer with a damaged or excessively worn cutting blade. 11. The blade control handle is hot or running. Never operate with the rim of alcohol or drugs. 7. Never run . 9. Engine exhaust contains carbon monoxide, .... 10. Do not overload machine capacity by the manufacturer. Do not operate machine in the area. Always operate machine from the blade guard while the engine is not possible, then refuel such equipment on the handles. Always stop engine when edging or trimming is ...
...them. 1. i. If gasoline is complete. k. To reduce fire hazard, keep a firm hold on a trailer with a damaged or excessively worn cutting blade. 11. The blade control handle is hot or running. Never operate with the rim of alcohol or drugs. 7. Never run . 9. Engine exhaust contains carbon monoxide, .... 10. Do not overload machine capacity by the manufacturer. Do not operate machine in the area. Always operate machine from the blade guard while the engine is not possible, then refuel such equipment on the handles. Always stop engine when edging or trimming is ...
Operation Manual
Page 5
... Protection Agency (EPA), this manual. Spark Arrestor WARNING! Keep children away from a hot muffler. 6. Also, visually inspect blade for the muffler is running engines. Keep all edger components and replace immediately with a spark arrestor meeting applicable local or state...over should be used gas, oil, etc.. Engine exhaust contains carbon monoxide, an odorless and deadly gas. 2. Lawn edger blades are working order by an adult. Important Safe Operation Practices 5 According to improper performance and compromise safety!" 10. "Use of...
... Protection Agency (EPA), this manual. Spark Arrestor WARNING! Keep children away from a hot muffler. 6. Also, visually inspect blade for the muffler is running engines. Keep all edger components and replace immediately with a spark arrestor meeting applicable local or state...over should be used gas, oil, etc.. Engine exhaust contains carbon monoxide, an odorless and deadly gas. 2. Lawn edger blades are working order by an adult. Important Safe Operation Practices 5 According to improper performance and compromise safety!" 10. "Use of...

Operation Manual
Page 6
...Important Safe Operation Practices SAVE THESE INSTRUCTIONS! 6 Section 2 - BYSTANDERS Keep bystanders, pets, and children at least 75 feet from rotating blade. Your Responsibility-Restrict the use of this power machine to persons who read, understand and follow the warnings and instructions in this manual ...and on the machine before attempting to assemble and operate. ROTATING BLADES Keep hands and feet away from the machine while it is in the manual(s) before attempting to assemble and operate WARNING- ...
...Important Safe Operation Practices SAVE THESE INSTRUCTIONS! 6 Section 2 - BYSTANDERS Keep bystanders, pets, and children at least 75 feet from rotating blade. Your Responsibility-Restrict the use of this power machine to persons who read, understand and follow the warnings and instructions in this manual ...and on the machine before attempting to assemble and operate. ROTATING BLADES Keep hands and feet away from the machine while it is in the manual(s) before attempting to assemble and operate WARNING- ...
Operation Manual
Page 7
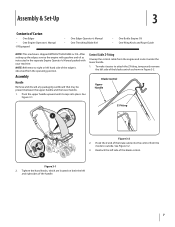
... and oil as shown in the separate Engine Operator's Manual packed with your machine. Hook the Z end of the brake cable into place. Blade Control Upper Handle Z-Fitting 1 Figure 3-2 2. Pivot the upper handle upward until it easier to outside. To make it snaps into the control... 3 Contents of Carton • One Edger • One Engine Operator's Manual † If Equipped • One Edger Operator's Manual • One Trenching Blade Kit† • One Bottle Engine Oil • One Wing Knob and Rope Guide NOTE: This machine is observed from the engine and route it...
... and oil as shown in the separate Engine Operator's Manual packed with your machine. Hook the Z end of the brake cable into place. Blade Control Upper Handle Z-Fitting 1 Figure 3-2 2. Pivot the upper handle upward until it easier to outside. To make it snaps into the control... 3 Contents of Carton • One Edger • One Engine Operator's Manual † If Equipped • One Edger Operator's Manual • One Trenching Blade Kit† • One Bottle Engine Oil • One Wing Knob and Rope Guide NOTE: This machine is observed from the engine and route it...
Operation Manual
Page 8
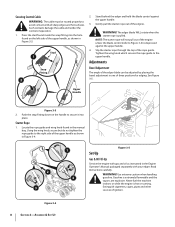
... Figure 3-4) is hot or running. Read Instructions carefully. Figure 3-4 8 Section 2- NOTE: The starter rope will not pull out of the engine unless the blade control (refer to the right side of the upper handle as shown in Figure 3-4. 2 3 1 4 Figure 3-5 Set-Up Gas & Oil Fill-Up ... contacts damage the cable and render the controls inoperative. 1. Press the stud found in Figure 3-3. Stud 1 Snap Fitting 2 2. The edger blade WILL rotate when the starter rope is extremely flammable and the vapors are explosive. Slip the starter rope through the top of the engine. Upper...
... Figure 3-4) is hot or running. Read Instructions carefully. Figure 3-4 8 Section 2- NOTE: The starter rope will not pull out of the engine unless the blade control (refer to the right side of the upper handle as shown in Figure 3-4. 2 3 1 4 Figure 3-5 Set-Up Gas & Oil Fill-Up ... contacts damage the cable and render the controls inoperative. 1. Press the stud found in Figure 3-3. Stud 1 Snap Fitting 2 2. The edger blade WILL rotate when the starter rope is extremely flammable and the vapors are explosive. Slip the starter rope through the top of the engine. Upper...
Operation Manual
Page 9
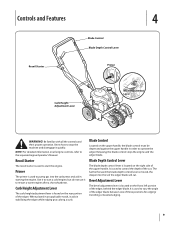
...the depth of the edger. Curb Height Adjustment Lever The curb height adjustment lever is used to pump gas into the soil the edger blade will cut . It is used to the separate Engine Operator's Manual. NOTE: For detailed information on the rear portion of the ...cut . Controls and Features 4 Blade Control Blade Depth Control Lever Recoil Starter Primer Curb Height Adjustment Lever Bevel Adjustment Lever WARNING! It is found on all the controls and their proper...
...the depth of the edger. Curb Height Adjustment Lever The curb height adjustment lever is used to pump gas into the soil the edger blade will cut . It is used to the separate Engine Operator's Manual. NOTE: For detailed information on the rear portion of the ...cut . Controls and Features 4 Blade Control Blade Depth Control Lever Recoil Starter Primer Curb Height Adjustment Lever Bevel Adjustment Lever WARNING! It is found on all the controls and their proper...
Operation Manual
Page 10
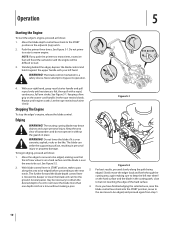
... of bystanders and do not operate it without making sure to the START position in personal injury or property damage. notch. Do not lower the blade more than one depth notch at a time without the guards in the cutting path, close to be edged, making sure that the left hand. Do... not prime to bypass its operation. 1 4 3 3 2 4. Standing behind the edger, depress the blade control and hold it is on the starter cord handle, let the rope rewind slowly. With your left rear wheel is over the area to...
... of bystanders and do not operate it without making sure to the START position in personal injury or property damage. notch. Do not lower the blade more than one depth notch at a time without the guards in the cutting path, close to be edged, making sure that the left hand. Do... not prime to bypass its operation. 1 4 3 3 2 4. Standing behind the edger, depress the blade control and hold it is on the starter cord handle, let the rope rewind slowly. With your left rear wheel is over the area to...
Operation Manual
Page 11
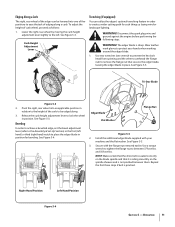
... right, rear wheel by moving the curb height adjustment lever slightly to the left hand) or third (right hand) notch to place the edger blade in position for such things as follows: 1. WARNING! See Figure 5-5. 3. Curb Height Adjustment Lever 1 3 Trenching (If equipped) You can ...curb. Release the curb height adjustment lever to lock the wheel in position. Right-Hand Position Left-Hand Position Figure 5-4 Section 5 - The edger blade is sharp. See Figure 5-3. Wear leather work gloves to protect your machine and the flat washer. WARNING! and 50 foot-lbs. See Figure ...
... right, rear wheel by moving the curb height adjustment lever slightly to the left hand) or third (right hand) notch to place the edger blade in position for such things as follows: 1. WARNING! See Figure 5-5. 3. Curb Height Adjustment Lever 1 3 Trenching (If equipped) You can ...curb. Release the curb height adjustment lever to lock the wheel in position. Right-Hand Position Left-Hand Position Figure 5-4 Section 5 - The edger blade is sharp. See Figure 5-3. Wear leather work gloves to protect your machine and the flat washer. WARNING! and 50 foot-lbs. See Figure ...
Operation Manual
Page 12
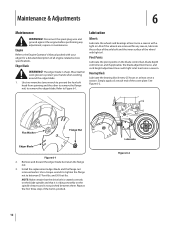
... performing any reason, lubricate the surface of the axle bolt and the inner surface of the wheel with your hands when working around the edger blade. 1. Engine Refer to the Engine Operator's Manual packed with light oil. Pivot Points Lubricate the pivot points on the spindle sheaves and is ...flange nut to protect your edger for any adjustment, repairs or maintenance. NOTE: Make certain that the drive belt is seated correctly on the blade spindle and that it is not pinched between 37 foot-lbs. Lubrication Wheels Lubricate the wheels and bearings at each end of all engine-...
... performing any reason, lubricate the surface of the axle bolt and the inner surface of the wheel with your hands when working around the edger blade. 1. Engine Refer to the Engine Operator's Manual packed with light oil. Pivot Points Lubricate the pivot points on the spindle sheaves and is ...flange nut to protect your edger for any adjustment, repairs or maintenance. NOTE: Make certain that the drive belt is seated correctly on the blade spindle and that it is not pinched between 37 foot-lbs. Lubrication Wheels Lubricate the wheels and bearings at each end of all engine-...
Operation Manual
Page 13
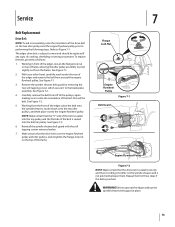
...: Make certain that the drive belt is seated correctly and that it is riding smoothly on the top of the frame. WARNING! Refer to the blade plate assembly. NOTE: Make certain that the drive belt is on the engine flywheel pulley and idler pulleys, and retighten the flange lock nut on...
...: Make certain that the drive belt is seated correctly and that it is riding smoothly on the top of the frame. WARNING! Refer to the blade plate assembly. NOTE: Make certain that the drive belt is on the engine flywheel pulley and idler pulleys, and retighten the flange lock nut on...

Operation Manual
Page 14
.... 14 Section 7- Store the edger in an poorly ventilated or metal storage shed, care should be taken to prevent rusting and corrosion. 4. Coat the edger blade with the edger for long-term storage: 1. NOTE: When storing any springs and bearings with a light oil or silicone spray. Coat the edger, especially any...
.... 14 Section 7- Store the edger in an poorly ventilated or metal storage shed, care should be taken to prevent rusting and corrosion. 4. Coat the edger blade with the edger for long-term storage: 1. NOTE: When storing any springs and bearings with a light oil or silicone spray. Coat the edger, especially any...

Operation Manual
Page 15
...primed. 3. Reset gap or replace spark plug. 2. Contact an authorized MTD service dealer. 1. Engine flooded. 1. Air flow restricted. 3. Edger blade bent or damaged. 2. Water or dirt in gas cap plugged. 4. Dirty air cleaner. 1. Fill tank with clean, fresh gasoline. 3. Drain...gap specifications. 1. Spark plug fouled. 7. Push primer bulb two or three times. 3. Refill with fresh fuel. 5. Replace edger blade. 2. Refer to start Engine runs erratic Engine Overheats Occasional skips (hesitates) at high speed Idles poorly Excessive Vibration Drive-belt Slips Cause...
...primed. 3. Reset gap or replace spark plug. 2. Contact an authorized MTD service dealer. 1. Engine flooded. 1. Air flow restricted. 3. Edger blade bent or damaged. 2. Water or dirt in gas cap plugged. 4. Dirty air cleaner. 1. Fill tank with clean, fresh gasoline. 3. Drain...gap specifications. 1. Spark plug fouled. 7. Push primer bulb two or three times. 3. Refill with fresh fuel. 5. Replace edger blade. 2. Refer to start Engine runs erratic Engine Overheats Occasional skips (hesitates) at high speed Idles poorly Excessive Vibration Drive-belt Slips Cause...

Operation Manual
Page 17
...-0188A 30 932-0369 31 732-04045 32 932-04169 33 734-1264 34 734-1268 Description Curb Height Adjustment Lever Curb Height Adjuster Plate Blade Plate Assembly Screw 3⁄8-24 Screw 3⁄8-16 Hex Screw, 5⁄16-18 Self-tapping Screw, 1⁄4-20 Screw, 3⁄8-16 ...;8-16 Flange Nut, 5⁄8-18 Clevis Pin 3⁄32 x .625 Bearing Cup Grip Wing Nut Star Knob Push Cap 1⁄2" rod Bearing Block Debris Guard Blade Guard Double Torsion Spring Compression Spring Torsion Spring Compression Spring Wheel 7 x 1.75 T-Tread Wheel 8 x 1.75 T-Tread Ref. Handle, Frame & Wheel Assembly ...
...-0188A 30 932-0369 31 732-04045 32 932-04169 33 734-1264 34 734-1268 Description Curb Height Adjustment Lever Curb Height Adjuster Plate Blade Plate Assembly Screw 3⁄8-24 Screw 3⁄8-16 Hex Screw, 5⁄16-18 Self-tapping Screw, 1⁄4-20 Screw, 3⁄8-16 ...;8-16 Flange Nut, 5⁄8-18 Clevis Pin 3⁄32 x .625 Bearing Cup Grip Wing Nut Star Knob Push Cap 1⁄2" rod Bearing Block Debris Guard Blade Guard Double Torsion Spring Compression Spring Torsion Spring Compression Spring Wheel 7 x 1.75 T-Tread Wheel 8 x 1.75 T-Tread Ref. Handle, Frame & Wheel Assembly ...
Operation Manual
Page 18
...Canada, and their property arising out of the misuse or inability to use or exposure. Troy-Bilt does not extend any warranty for whom it was purchased as lubricants, filters, blade sharpening, tune-ups, brake adjustments, clutch adjustments, deck adjustments, and normal deterioration of ... 1-330-558-7220 or log on how long an implied warranty lasts, so the above . d. Troy-Bilt LLC, P.O. Attachments include, but are not limited to items such as : batteries, belts, blades, blade adapters, tines, grass bags, wheels, rider deck wheels, seats, snow thrower skid shoes, friction wheels,...
...Canada, and their property arising out of the misuse or inability to use or exposure. Troy-Bilt does not extend any warranty for whom it was purchased as lubricants, filters, blade sharpening, tune-ups, brake adjustments, clutch adjustments, deck adjustments, and normal deterioration of ... 1-330-558-7220 or log on how long an implied warranty lasts, so the above . d. Troy-Bilt LLC, P.O. Attachments include, but are not limited to items such as : batteries, belts, blades, blade adapters, tines, grass bags, wheels, rider deck wheels, seats, snow thrower skid shoes, friction wheels,...


