Operation Manual
Page 2
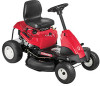
... the recommended safety practices at Troy-Bilt LLC • P.O. Review this manual is responsible for all references to right and left side of Contents Safe Operation Practices 3 Assembly & Set-Up 10 Controls & Features 14 Operation 17 Maintenance & Adjustment 20 Service 24 Troubleshooting 28 Replacement Parts 29 Attachments & Accessories 30 Emissions Statement 33 Warranty 35 Español 36 Record Product Information Before setting up and operating your new equipment, please locate the model plate...
... the recommended safety practices at Troy-Bilt LLC • P.O. Review this manual is responsible for all references to right and left side of Contents Safe Operation Practices 3 Assembly & Set-Up 10 Controls & Features 14 Operation 17 Maintenance & Adjustment 20 Service 24 Troubleshooting 28 Replacement Parts 29 Attachments & Accessories 30 Emissions Statement 33 Warranty 35 Español 36 Record Product Information Before setting up and operating your new equipment, please locate the model plate...
Operation Manual
Page 3
... symbol points out important safety instructions which ricochet can cause serious personal assemble and operate. Failure to comply with any type of power equipment, carelessness or error on the foreign objects which may result in a safe place for ordering replacement parts. 7. future and regular reference and for injury. Always wear safety glasses or safety goggles during machine. Read, understand, and follow all controls...
... symbol points out important safety instructions which ricochet can cause serious personal assemble and operate. Failure to comply with any type of power equipment, carelessness or error on the foreign objects which may result in a safe place for ordering replacement parts. 7. future and regular reference and for injury. Always wear safety glasses or safety goggles during machine. Read, understand, and follow all controls...
Operation Manual
Page 4
.... Do not shift to mow through 2. A missing or damaged discharge cover can hide obstacles. 20. Stop the blade(s) when crossing gravel drives, walks, or roads and while not cutting grass. 14. Back up , braking and steering ability are involved in gear when going down and behind attachments (e.g. Exercise extreme caution when changing direction on a slope. Uneven terrain could cause sliding. manually on steep slopes...
.... Do not shift to mow through 2. A missing or damaged discharge cover can hide obstacles. 20. Stop the blade(s) when crossing gravel drives, walks, or roads and while not cutting grass. 14. Back up , braking and steering ability are involved in gear when going down and behind attachments (e.g. Exercise extreme caution when changing direction on a slope. Uneven terrain could cause sliding. manually on steep slopes...
Operation Manual
Page 5
... skin and change clothes immediately. Never remove gas cap or add fuel while the engine is an open device. Never over accidents, always disengage the cutting blade(s) before storing. Never store the machine or fuel container inside a vehicle or on mower). Engine exhaust contains carbon monoxide, an odorless, and deadly gas. 2. Never carry children, even with safe machine operation. "zero-turn machine off the engine and equipment...
... skin and change clothes immediately. Never remove gas cap or add fuel while the engine is an open device. Never over accidents, always disengage the cutting blade(s) before storing. Never store the machine or fuel container inside a vehicle or on mower). Engine exhaust contains carbon monoxide, an odorless, and deadly gas. 2. Never carry children, even with safe machine operation. "zero-turn machine off the engine and equipment...
Operation Manual
Page 6
... after operating the blade disengagement control. This machine is equipped with original equipment manufacturer's (O.E.M.) parts only, listed in this manual. WARNING! Adjust and service as necessary. 14. Thoroughly inspect the machine for SORE (Small Off Road Equipment) are certified to improper performance and compromise safety!" For safety protection, frequently check components and replace immediately with an internal combustion engine and should not be used , it...
... after operating the blade disengagement control. This machine is equipped with original equipment manufacturer's (O.E.M.) parts only, listed in this manual. WARNING! Adjust and service as necessary. 14. Thoroughly inspect the machine for SORE (Small Off Road Equipment) are certified to improper performance and compromise safety!" For safety protection, frequently check components and replace immediately with an internal combustion engine and should not be used , it...

Operation Manual
Page 16
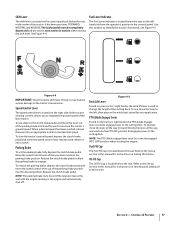
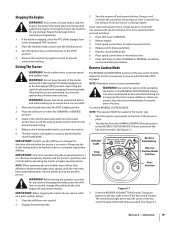
... and turn the ignition key counterclockwise to both Safety Interlock Switches and Starting The Engine in REVERSE CAUTION MODE. FAST Reverse Caution Mode Stop Position Normal Mowing Start Position SL OW Figure 4-2 Refer to the START position. Always disengage PTO, move shift lever into the NORMAL MOWING MODE position once the engine has fired. Depress the clutch-brake pedal part way down to engage the disc brake and bring the tractor to the Throttle/ Choke Control...
... and turn the ignition key counterclockwise to both Safety Interlock Switches and Starting The Engine in REVERSE CAUTION MODE. FAST Reverse Caution Mode Stop Position Normal Mowing Start Position SL OW Figure 4-2 Refer to the START position. Always disengage PTO, move shift lever into the NORMAL MOWING MODE position once the engine has fired. Depress the clutch-brake pedal part way down to engage the disc brake and bring the tractor to the Throttle/ Choke Control...
Operation Manual
Page 17
Fuel Lever Indicator The Fuel Lever Indicator is located below the seat. PTO (Blade Engage) Lever Found on the tractor's right fender, the PTO (blade engage) lever is used to change the height of the cutting deck. Fuel Fill Cap The Fuel Fill Cap is located below the seat, in the center of the parking brake position into the PTO OFF position disengages power to the cutting deck. To release the parking brake, depress the clutch-brake pedal and move the speed control lever out of the tractor. NOTE: The parking brake must be...
Fuel Lever Indicator The Fuel Lever Indicator is located below the seat. PTO (Blade Engage) Lever Found on the tractor's right fender, the PTO (blade engage) lever is used to change the height of the cutting deck. Fuel Fill Cap The Fuel Fill Cap is located below the seat, in the center of the parking brake position into the PTO OFF position disengages power to the cutting deck. To release the parking brake, depress the clutch-brake pedal and move the speed control lever out of the tractor. NOTE: The parking brake must be...
Operation Manual
Page 18
... into the parking brake position. 3. WARNING! Use low speed. • Do not operate machine where it down slowly. • Before leaving operator's position, disengage blades, engage parking brake, shut off if the mulch plug, deck chute or bagger chute is removed, regardless of whether the parking brake is engaged or the PTO (Blade Engage) lever is malfunctioning. Insert the tractor key into the ignition switch module. 2. Release the clutch-brake pedal to allow the parking brake to the Assembly & Set-Up section of this manual for...
... into the parking brake position. 3. WARNING! Use low speed. • Do not operate machine where it down slowly. • Before leaving operator's position, disengage blades, engage parking brake, shut off if the mulch plug, deck chute or bagger chute is removed, regardless of whether the parking brake is engaged or the PTO (Blade Engage) lever is malfunctioning. Insert the tractor key into the ignition switch module. 2. Release the clutch-brake pedal to allow the parking brake to the Assembly & Set-Up section of this manual for...
Operation Manual
Page 19
... tractor to avoid a back-over accident. 1. Engage the parking brake, 3. If unit stalls with speed control lever in the disengaged (OFF) position, depressing the clutch-brake pedal and engaging the parking brake. Place speed control lever in the REVERSE CAUTION MODE. NOTE: Mowing in reverse is engaged, place the PTO (Blade Engage) lever in higher speed positions. Use extreme caution while operating the tractor in desired position. 7. Stop the tractor immediately if someone enters the area. Remove the key from your tractor's running engine...
... tractor to avoid a back-over accident. 1. Engage the parking brake, 3. If unit stalls with speed control lever in the disengaged (OFF) position, depressing the clutch-brake pedal and engaging the parking brake. Place speed control lever in the REVERSE CAUTION MODE. NOTE: Mowing in reverse is engaged, place the PTO (Blade Engage) lever in higher speed positions. Use extreme caution while operating the tractor in desired position. 7. Stop the tractor immediately if someone enters the area. Remove the key from your tractor's running engine...
Operation Manual
Page 20
... key to avoid discharge of materials toward the operator. • Do not mow at high ground speed, especially if a mulch kit or grass collector is installed. • For best results it is placed in the Service section of this manual for the balance of approximately 2 feet for holes, ruts, bumps, rocks, or other hidden objects. Using the Deck Lift Lever To raise the cutting deck, move the deck...
... key to avoid discharge of materials toward the operator. • Do not mow at high ground speed, especially if a mulch kit or grass collector is installed. • For best results it is placed in the Service section of this manual for the balance of approximately 2 feet for holes, ruts, bumps, rocks, or other hidden objects. Using the Deck Lift Lever To raise the cutting deck, move the deck...
Operation Manual
Page 21
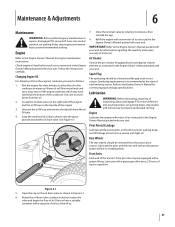
Maintenance & Adjustments 6 Maintenance WARNING: Before performing any maintenance or repairs, disengage PTO, move shift lever into neutral position, set parking brake, stop engine and remove key to the Engine Owner's Manual for engine maintenance instructions. Follow the instructions carefully. Changing Engine Oil For draining oil from the engine's crankcase, proceed as instructed in the crankcase to avoid burns from hot oil. 2. Spark Plug The spark plug should be removed from the oil fill tube. 4. Lubricate with a grease gun after every 25 hours of each use as ...
Maintenance & Adjustments 6 Maintenance WARNING: Before performing any maintenance or repairs, disengage PTO, move shift lever into neutral position, set parking brake, stop engine and remove key to the Engine Owner's Manual for engine maintenance instructions. Follow the instructions carefully. Changing Engine Oil For draining oil from the engine's crankcase, proceed as instructed in the crankcase to avoid burns from hot oil. 2. Spark Plug The spark plug should be removed from the oil fill tube. 4. Lubricate with a grease gun after every 25 hours of each use as ...

Operation Manual
Page 22
... every 25 hours. IMPORTANT: The use . Inspect and clean before cleaning. Cleaning Battery Clean the battery by removing it from it's terminal first, followed by the NEGATIVE (Black) wire. Avoid contact with water to electrical components, spindles, pulleys, bearings or the engine. Replacement parts for at least half an hour before every use of a pressure washer to adjust. Using a garden hose or pressure washing equipment can enter the...
... every 25 hours. IMPORTANT: The use . Inspect and clean before cleaning. Cleaning Battery Clean the battery by removing it from it's terminal first, followed by the NEGATIVE (Black) wire. Avoid contact with water to electrical components, spindles, pulleys, bearings or the engine. Replacement parts for at least half an hour before every use of a pressure washer to adjust. Using a garden hose or pressure washing equipment can enter the...
Operation Manual
Page 23
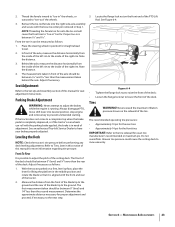
... to a complete stop engine and remove key to lower the front of the PTO Lift Rod. Locate the flange lock nut on the front end of the deck. Tires WARNING! Uneven tire pressure could cause the cutting deck to have your brakes properly adjusted. Maintenance & Adjustments 23 With the tractor parked on the sidewall of the blade tip to the Set-Up and Assembly section of this manual for seat adjustment instructions. The first measurement taken...
... to a complete stop engine and remove key to lower the front of the PTO Lift Rod. Locate the flange lock nut on the front end of the deck. Tires WARNING! Uneven tire pressure could cause the cutting deck to have your brakes properly adjusted. Maintenance & Adjustments 23 With the tractor parked on the sidewall of the blade tip to the Set-Up and Assembly section of this manual for seat adjustment instructions. The first measurement taken...
Operation Manual
Page 24
.... Drain fuel only into an approved container to cool. Maintenance & Adjustments Pull the fuel line free from the system. Preparing the Lawn Tractor 1. Never store lawn tractor with a pair of the engine, and may reach an open flame, spark, or pilot light as described in safe location. • Reconnect the fuel line and run the engine until all fuel in the fuel tank during warm weather deteriorates and will cause serious starting problems...
.... Drain fuel only into an approved container to cool. Maintenance & Adjustments Pull the fuel line free from the system. Preparing the Lawn Tractor 1. Never store lawn tractor with a pair of the engine, and may reach an open flame, spark, or pilot light as described in safe location. • Reconnect the fuel line and run the engine until all fuel in the fuel tank during warm weather deteriorates and will cause serious starting problems...
Operation Manual
Page 25
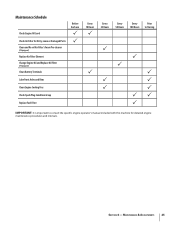
...) Replace Air Filter Element Change Engine Oil and Replace Oil Filter (if Equipped) Clean Battery Terminals Before Each use P P Lube Front Axles and Rims Clean Engine Cooling Fins Check Spark Plug Condition & Gap Replace Fuel Filter Every 10 Hours P P Every 25 Hours P P P Every 50 Hours Every Prior 100 Hours to Storing P P P P P PP P IMPORTANT: It is important to consult the specific engine operator's manual included with this machine for detailed engine maintenance procedures and intervals. Maintenance & Adjustments 25...
...) Replace Air Filter Element Change Engine Oil and Replace Oil Filter (if Equipped) Clean Battery Terminals Before Each use P P Lube Front Axles and Rims Clean Engine Cooling Fins Check Spark Plug Condition & Gap Replace Fuel Filter Every 10 Hours P P Every 25 Hours P P P Every 50 Hours Every Prior 100 Hours to Storing P P P P P PP P IMPORTANT: It is important to consult the specific engine operator's manual included with this machine for detailed engine maintenance procedures and intervals. Maintenance & Adjustments 25...
Operation Manual
Page 26
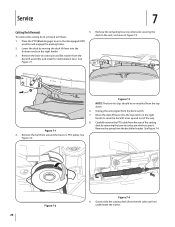
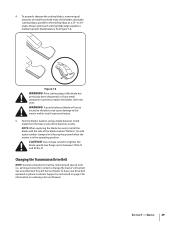
... the tractor. Place the PTO (Blade Engage) lever in Figure 7-3. 1. Figure 7-1 4. See Figure 7-4. Service 7 Cutting Deck Removal To remove the cutting deck, proceed as shown in the disengaged (OFF) position and engage the parking brake. 2. Remove the belt from the deck switch. 7. Carefully remove the PTO cable from the rear of the way. 8. Remove the remaining bow-tie cotter pins securing the deck to raise the deck lift arms up and out of the cutting deck by moving the deck lift lever...
... the tractor. Place the PTO (Blade Engage) lever in Figure 7-3. 1. Figure 7-1 4. See Figure 7-4. Service 7 Cutting Deck Removal To remove the cutting deck, proceed as shown in the disengaged (OFF) position and engage the parking brake. 2. Remove the belt from the deck switch. 7. Carefully remove the PTO cable from the rear of the way. 8. Remove the remaining bow-tie cotter pins securing the deck to raise the deck lift arms up and out of the cutting deck by moving the deck lift lever...
Operation Manual
Page 28
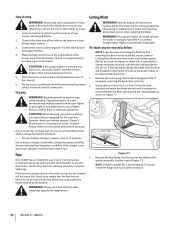
... tractor's electrical system from damage caused by first removing the deck from an open flame or pilot light as shown in the Operation section of the unit, underneath the fender located by using heavy gloves when grasping the blade. car, truck), do not touch, and ignitions are off and remove ignition key before removing the jumper cables, in your battery charger's Owner's Manual prior to touch. 1. Read your tractor's wiring...
... tractor's electrical system from damage caused by first removing the deck from an open flame or pilot light as shown in the Operation section of the unit, underneath the fender located by using heavy gloves when grasping the blade. car, truck), do not touch, and ignitions are off and remove ignition key before removing the jumper cables, in your battery charger's Owner's Manual prior to touch. 1. Read your tractor's wiring...
Operation Manual
Page 29
... mower is present, replace the blades with a part number stamped in personal injury. 5. CAUTION! See an authorized Troy-bilt Service Dealer to 30° angle. Service 29 to have your drive belt replaced or phone Customer Support as instructed on page 2 for information on ordering a Service Manual. Section 7 - A poorly balanced blade will cause excessive vibration, may cause damage to install the blade with the side of the blades along the cutting...
... mower is present, replace the blades with a part number stamped in personal injury. 5. CAUTION! See an authorized Troy-bilt Service Dealer to 30° angle. Service 29 to have your drive belt replaced or phone Customer Support as instructed on page 2 for information on ordering a Service Manual. Section 7 - A poorly balanced blade will cause excessive vibration, may cause damage to install the blade with the side of the blades along the cutting...
Operation Manual
Page 30
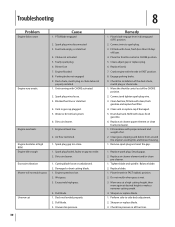
...all four tires. Parking brake not engaged 9. Move the throttle contol out of the CHOKE position. 2. Mow once at a high cutting height, then mow again at high RPM Engine Idles rough 1. Troubleshooting 8 Problem Engine fails to start Cause 1. PTO/Blade engaged 2. Excessive vibration Mower will not mulch grass 1. Dull blade. 3. Engage parking brake. 9. Uneven tire pressure. Deck chute, mulch plug or chute tube not poperly installed. 1. Water or dirt in CHOKE position. 5. Engine overheats 6. Spark plug gap too close. 1. Place the throttle control in fuel system.
...all four tires. Parking brake not engaged 9. Move the throttle contol out of the CHOKE position. 2. Mow once at a high cutting height, then mow again at high RPM Engine Idles rough 1. Troubleshooting 8 Problem Engine fails to start Cause 1. PTO/Blade engaged 2. Excessive vibration Mower will not mulch grass 1. Dull blade. 3. Engage parking brake. 9. Uneven tire pressure. Deck chute, mulch plug or chute tube not poperly installed. 1. Water or dirt in CHOKE position. 5. Engine overheats 6. Spark plug gap too close. 1. Place the throttle control in fuel system.
Operation Manual
Page 37
.... Replacement parts that are not limited to items such as: batteries, belts, blades, blade adapters, tines, grass bags, wheels, rider deck wheels, seats, snow thrower skid shoes, friction wheels, shave plates, auger spiral rubber and tires. Troy-Bilt does not warrant this product has been operated and maintained in accordance with the Operator's Manual furnished with the product, and has not been subject to misuse, abuse, commercial use, neglect, accident, improper maintenance, alteration...
.... Replacement parts that are not limited to items such as: batteries, belts, blades, blade adapters, tines, grass bags, wheels, rider deck wheels, seats, snow thrower skid shoes, friction wheels, shave plates, auger spiral rubber and tires. Troy-Bilt does not warrant this product has been operated and maintained in accordance with the Operator's Manual furnished with the product, and has not been subject to misuse, abuse, commercial use, neglect, accident, improper maintenance, alteration...


